

3d Game Design Unreal Engine
Introduction
Are you ready to start developing FPS games, RPGs, retro-style games, and more with the amazing Unreal Engine? You're in for quite a treat, then!
Unreal Engine 4 is one of the most popular engines out there for game development – powering everywhere from indie games like Dead by Daylight to AAA games likeGears 5.Its powerful graphical features allow developers to create visually stunning games, while the Unreal Engine blueprinting system creates an environment that makes it easy for programmers and non-programmers alike to create the game of their dreams. To boot, the engine is completely free until you earn $1 million with your product, making it a great choice for any aspiring developer.
Before you get intimidated by the power of the engine, though, remember that everyone starts somewhere – and this tutorial is just the place to get started.
In this tutorial, we'll be guiding you through your initial steps as you create your first game inside of the Unreal Engine. This game will be a 3D platformer game with collectible gems and enemies to avoid. We'll be going many of Unreal's features such as level creation, blueprints, creating logic with nodes, and even creating a UI.
All in all, we'll provide you with the foundations to get started, so if you're ready to go, let's get started with creating our Unreal Engine platformer!
Don't miss out! Offer ends in
- Access all 200+ courses
- New courses added monthly
- Cancel anytime
- Certificates of completion
Project Files
For this project, we're going to be using some pre-made models and materials.
- Download the intro assets here
You can also choose to download the complete project to see what the finished product looks like.
- Download the complete project here (full version)
- Download the complete project here (stripped down version)
What is the Unreal Engine?
The Unreal Engine is a game engine created by Epic Games. With the focus on powerful 3D graphics, this engine has been used to create many popular AAA games, including: Fortnite, Bioshock, Rocket League, and many more.
Installation
To install the Unreal Engine, we need to download the Epic Games launcher. You may already have this, but if you don't just go to the Epic Games website, and click on theGet Epic Games button in the top-left.

Go through the installation process and when it prompts you to login, do so. This can be done by creating an Epic Games account, or by logging in with your Google account.
Once you've logged in and have the launcher open, navigate over to theUnreal Enginepage. Here, you want to go to theLibrary screen and click the install button. I've already installed the engine, so you'll just see one version appearing.
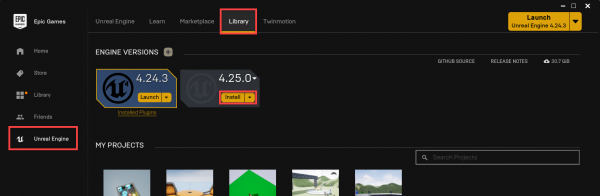
This may take some time as the engine can be around15 GBin size.
Creating a New Project
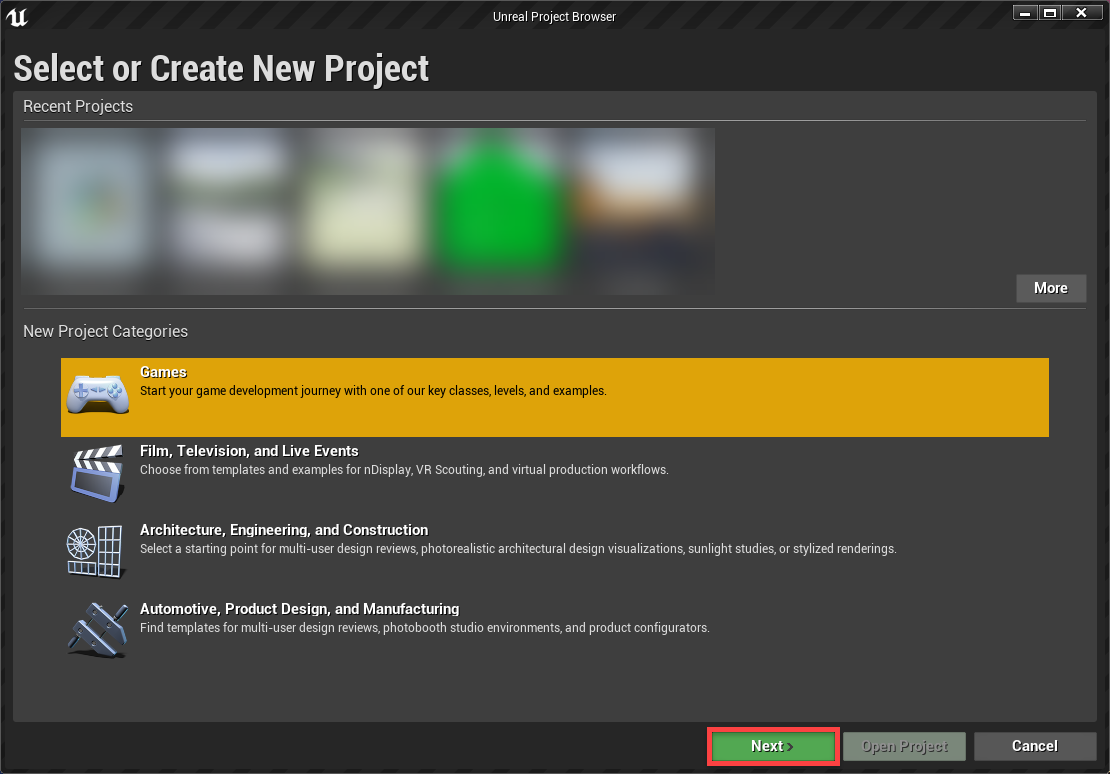
Once that's complete, click on the yellowLaunch button to open it up. Here we can choose what we want to create. SelectGames then click theNextbutton.
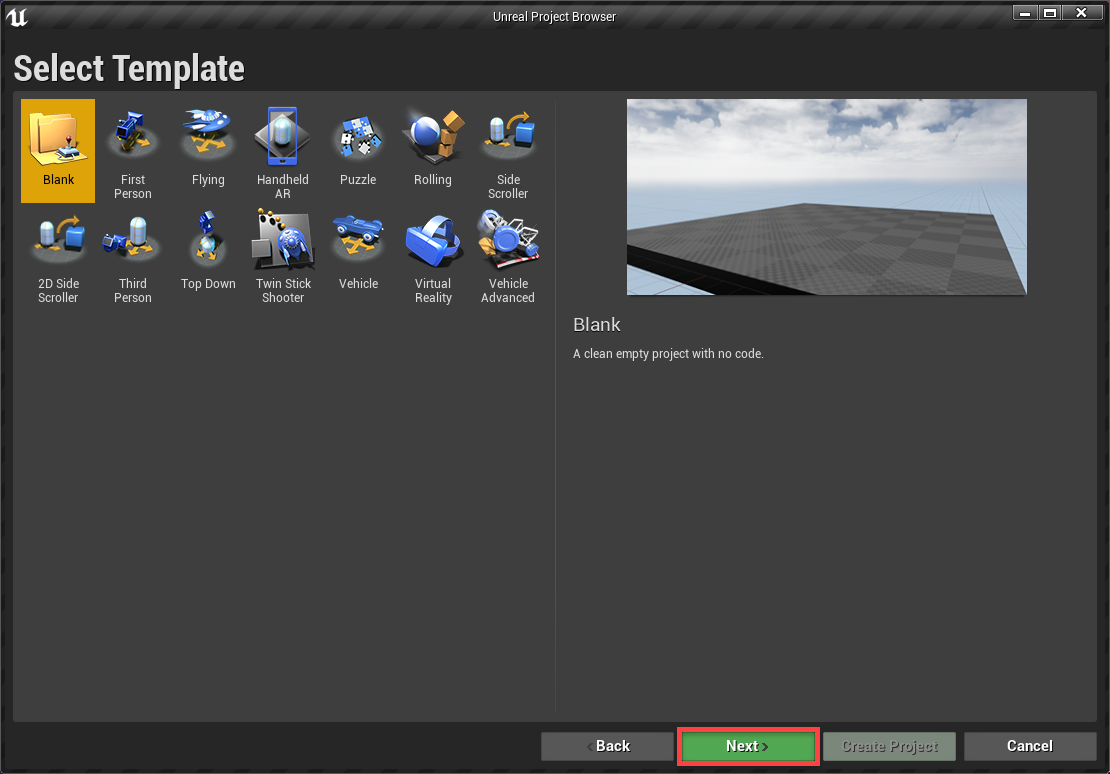
The next screen allows us to select a template. These are a really good learning resource to see how certain systems can be created in the engine. For now though, selectBlank and hit next.
Finally, we have the project settings. There's a few things we need to make sure we have selected.
- Make sureBlueprint is selected rather than C++.
- Make sureWith Starter Content is selected rather than No Starter Content.
Down at the bottom, we can choose the location to store our project (it will be around 800 MB) and the name. Once you've done all that, click on theCreate Project button to open up the editor.
Quick Note: When the editor opens you may see a Steam VR window popup. We can just close that since we're not working in VR.
Editor Overview
Welcome to the editor. This is where we'll be creating our game! It may look daunting at first with all the windows, buttons and options – but let's go ahead and try make some sense out of it all.
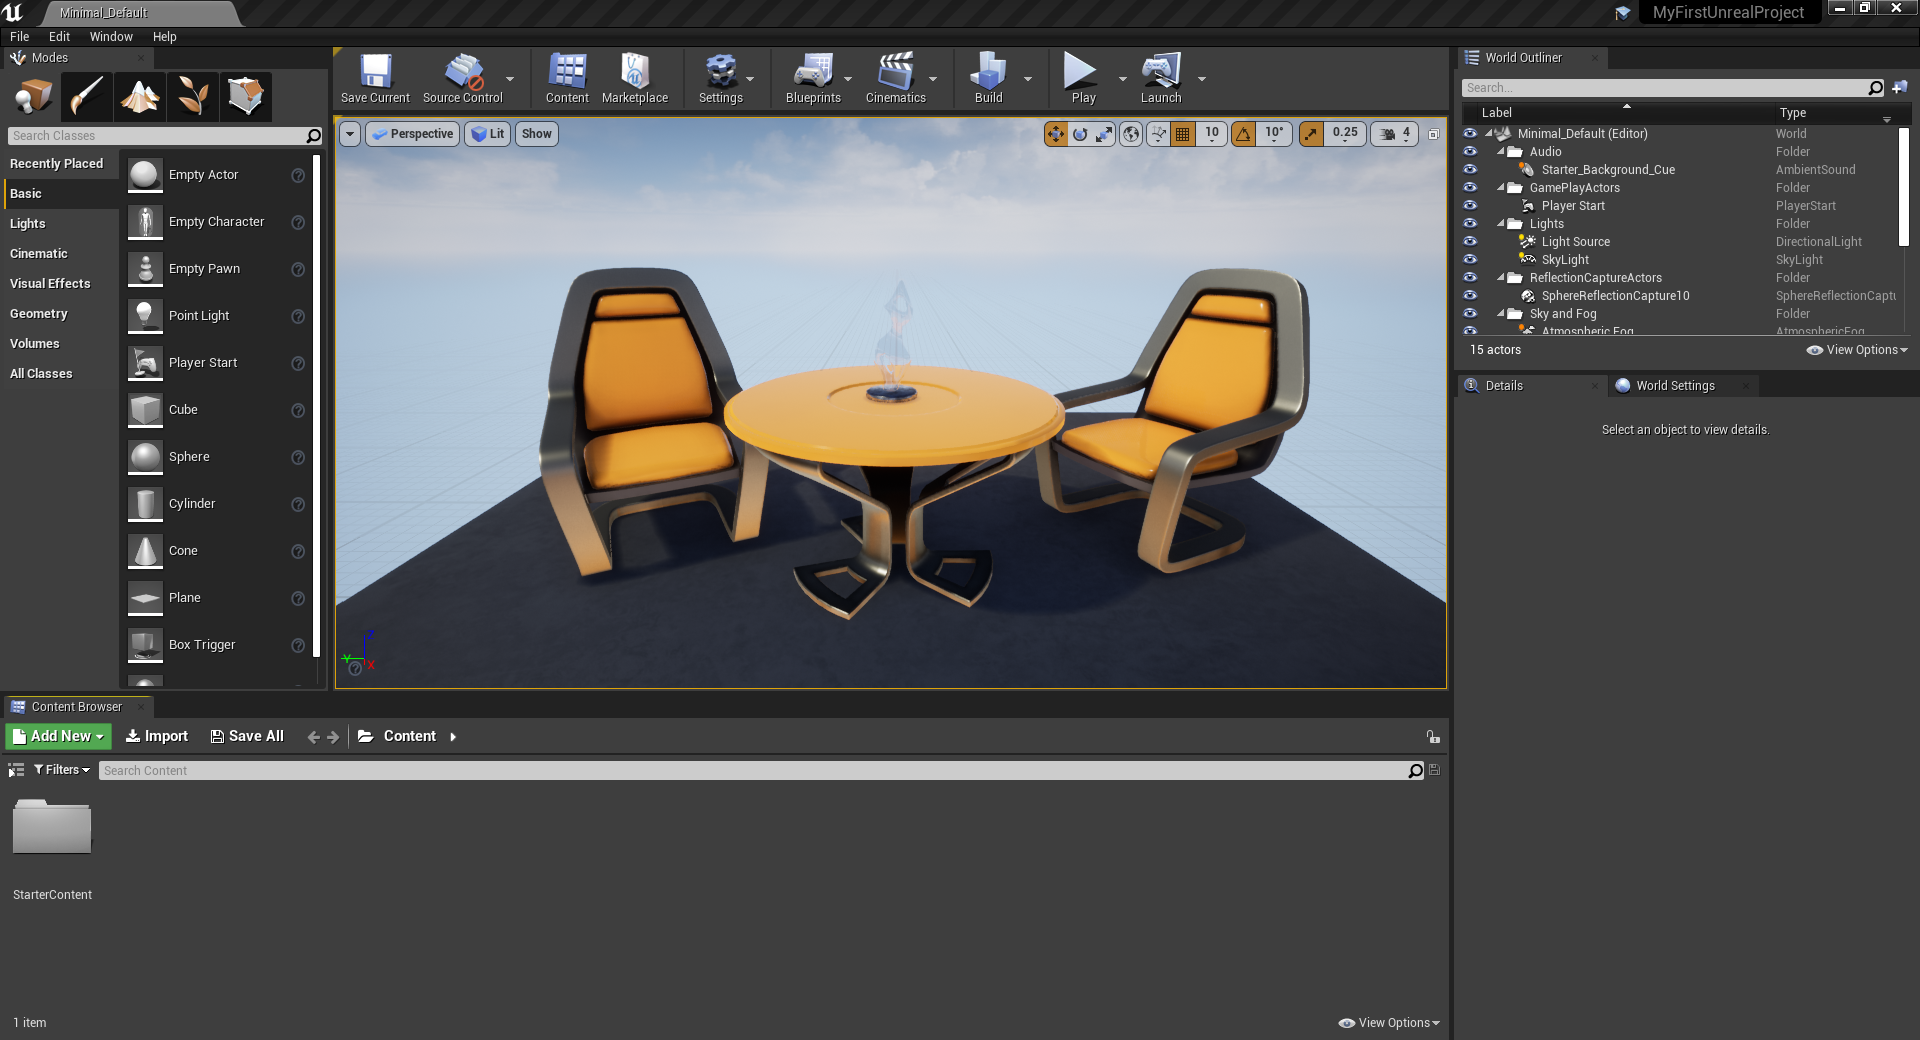
This is the level editor and the main screen that appears when opening Unreal. The engine is split up into a number of different editors (material editor, blueprint editor, animation editor, etc). Each serve a specific purpose to help us create games. The level editor here is what we use to build our levels. Place down objects, setup the lighting and overall manage the project.
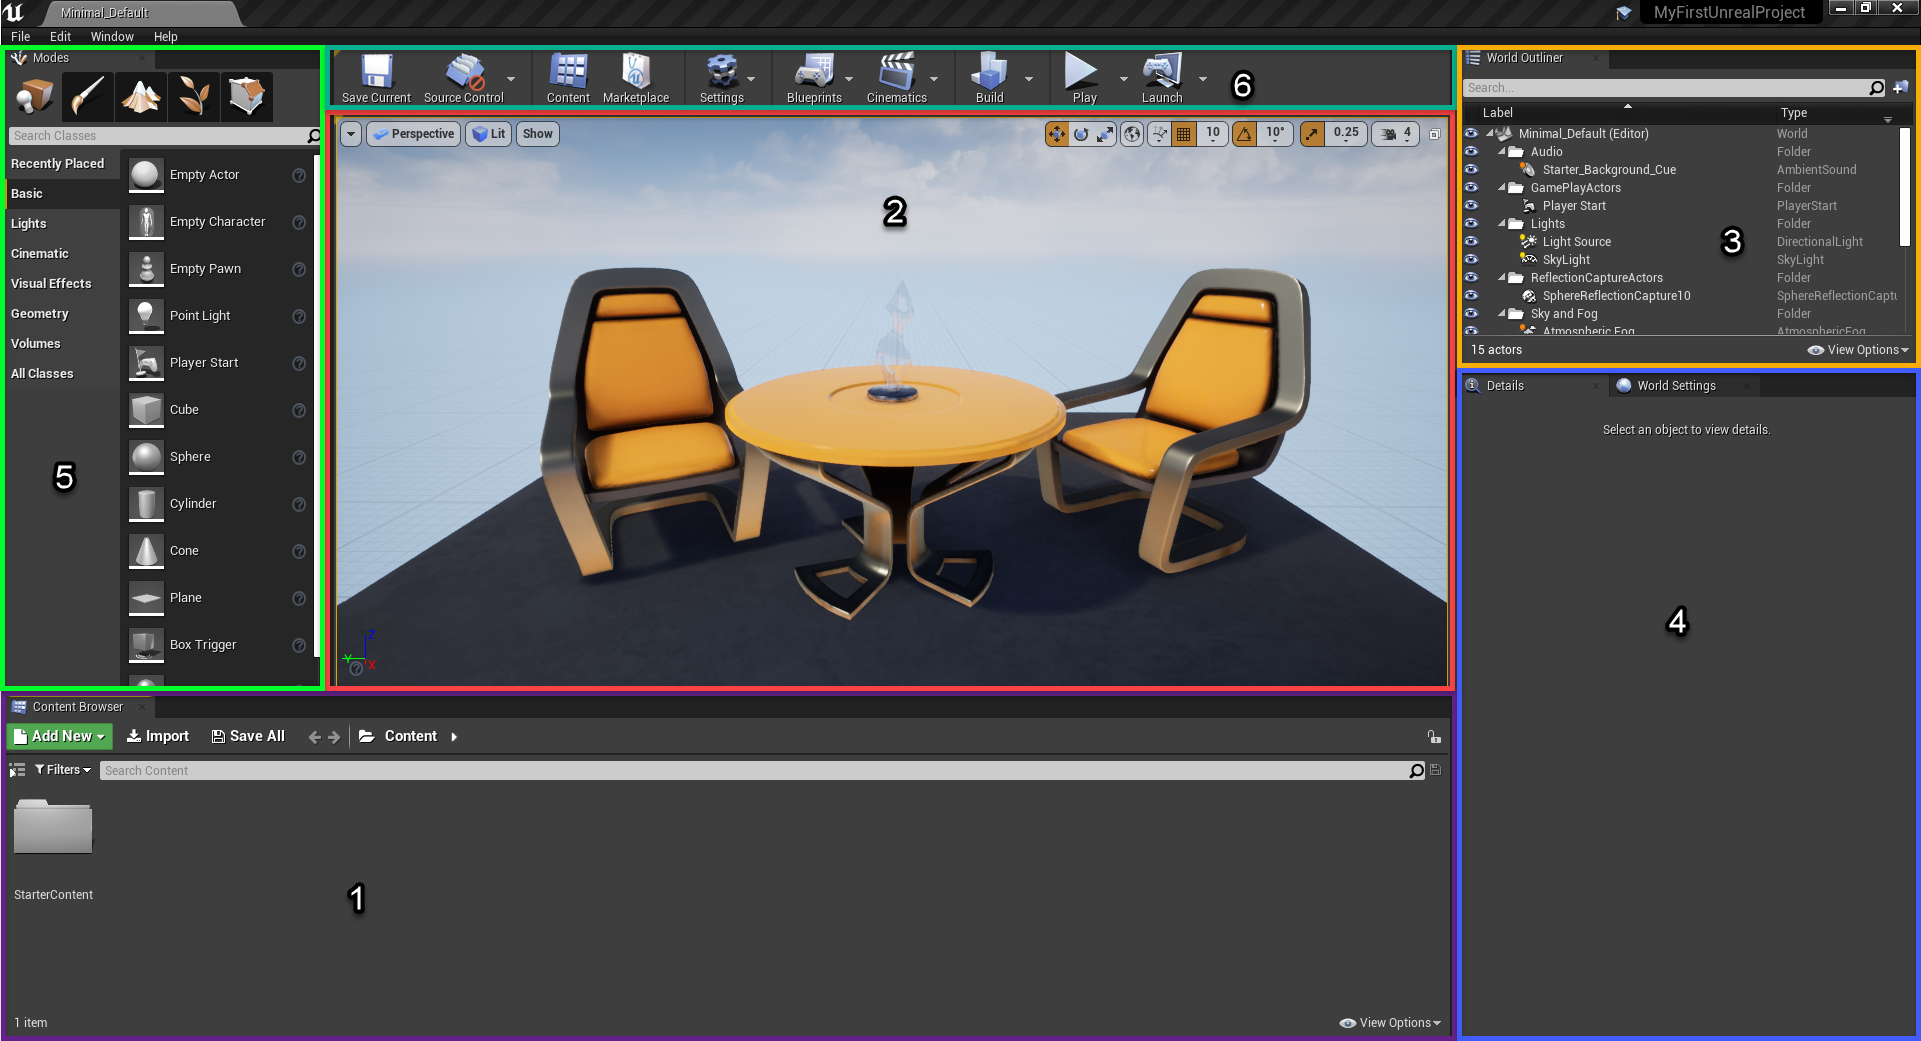
- First, we have the Content Browser. This is like a file explorer and shows us all of the assets (models, sound effects, textures, materials, etc) for our game and the folder structure.
- Next, we have the Viewport screen. Here we can see into our level, move the camera around, select and move around objects.
- This is theWorld Outliner and it shows us all of the objects in our current level.
- TheDetails panel shows us the inner workings of a selected object. Try selecting an object in the viewport window and you'll see that various properties such as the position, rotation, scale, rendering, etc appears for that object.
- This is theModes panel. Here we can create primative 3D models, create lights, triggers, VFX, etc.
- Finally, theToolbar. This is where we can test out the game, build it, save the game, etc.
We'll be going over more about each panel as we get there in the tutorial.
Creating a New Level
In Unreal Engine, we have the concept oflevels. Levels are what splits a game up. Different stages, areas, etc. Right now, we're in one of the starter levels that comes with the starter content. Let's now go ahead and create a new one.
- GoFile > New Level
- Select theDefault level
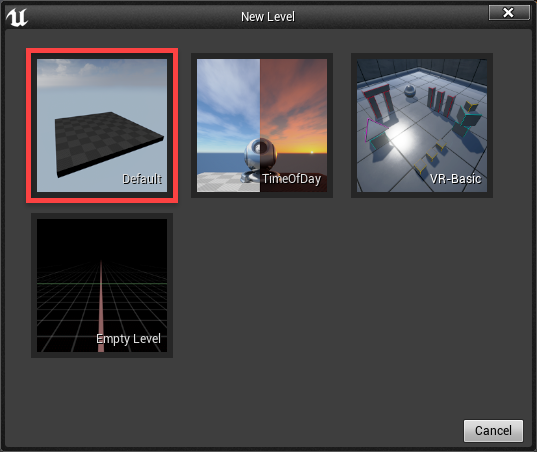
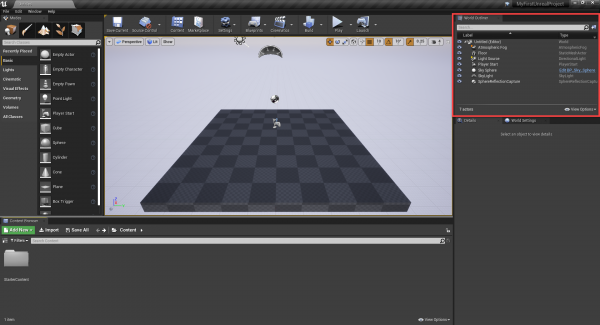
This will create us a brand new level with a few things already in it.
Over in theWorld Outliner you'll see that we have a floor model, a light, a player start and a few skybox objects. These help build the scene we see here.
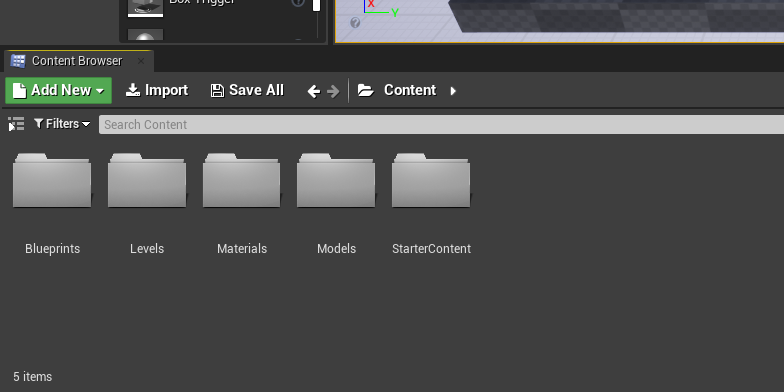
Before we continue, let's go down to theContent Browser and create 4 new folders to store our future assets (right click and selectNew Folder).
- Blueprints (to store our blueprints such as the player, gems, enemies, etc).
- Levels
- Materials
- Models
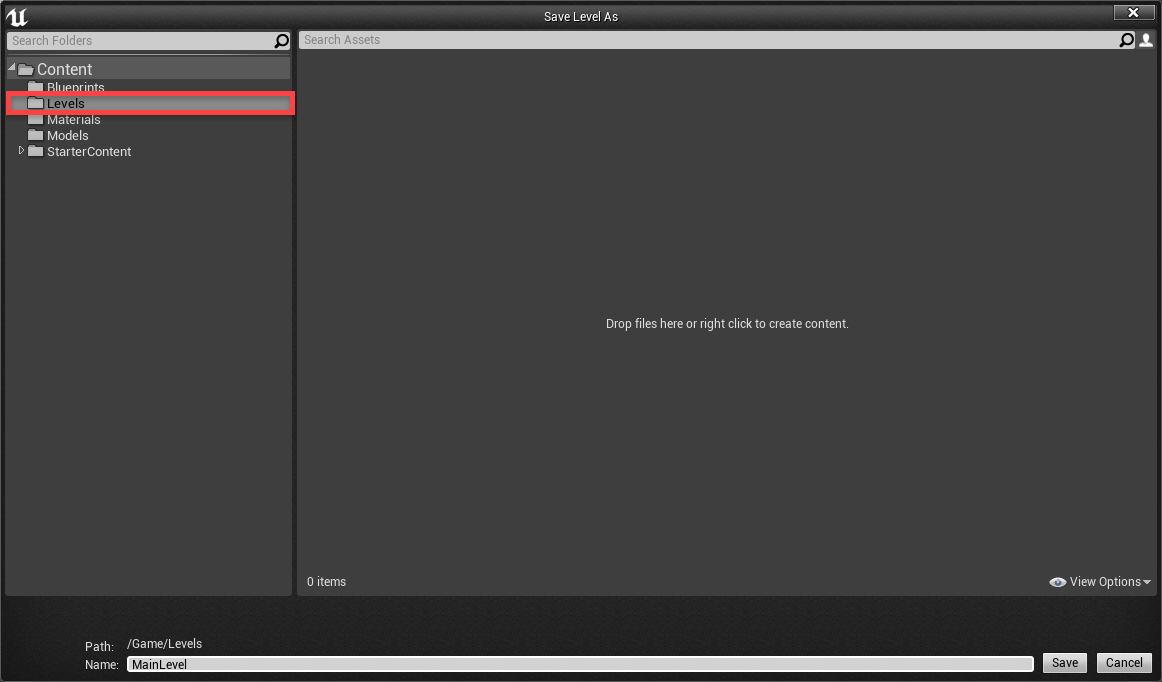
We can now save our level (CTRL + S) to the Levels folder. Give it the name ofMainLevel.
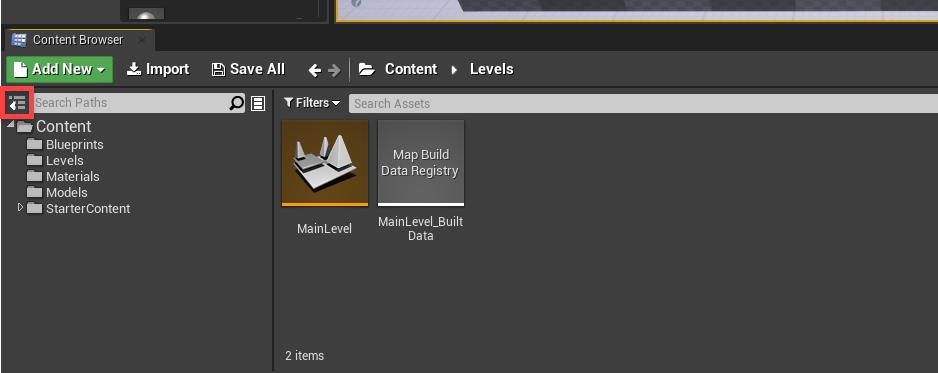
If we open the levels folder, you'll see that we have theMainLevel asset there. If we ever want to open the level, we can just double click on it.
Quick Note: To make navigation easier, click on theShow Sources Panel button. This will give us an overview of the folder structure.
While we're here, let's also import our intro assets. These are a few 3D models and materials we'll be using and can be downloaded here. Inside of the .ZIP file, there will be aModels andMaterials folder. Place the contents in their respective counterparts in the Unreal editor content browser. It may pop-up with some import options, just click import on all of them.
Creating the Player
Now it's time to create our player! We'll be able to move around and jump on platforms. But before we jump in, let's set up the controls, because we need to know which buttons are for moving and which are for jumping.
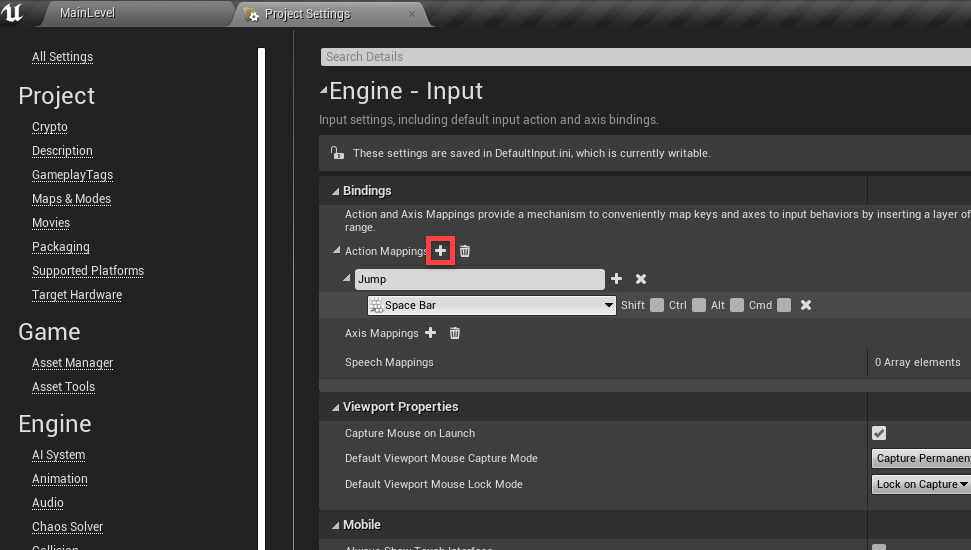
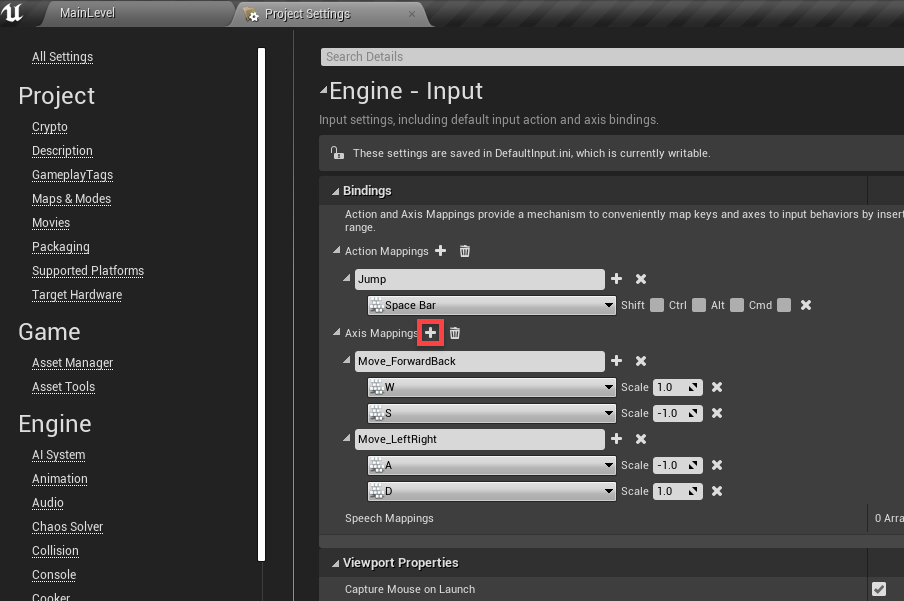
Open up theProject Settings window (Edit > Project Settings). On the left hand side list, selectInput to go to the input options. We haveactions andaxis'. Actions are single button inputs (i.e. press a button and something happens). Then we have axis inputs which change a value based on the given input (i.e. a controller joystick).
First, let's create a new action calledJump. Set the key to be the space bar.
Next, let's add two new axis mappings. An axis for moving forward and back as well as an axis for moving left and right. Make sure to set their scale as seen in the image.
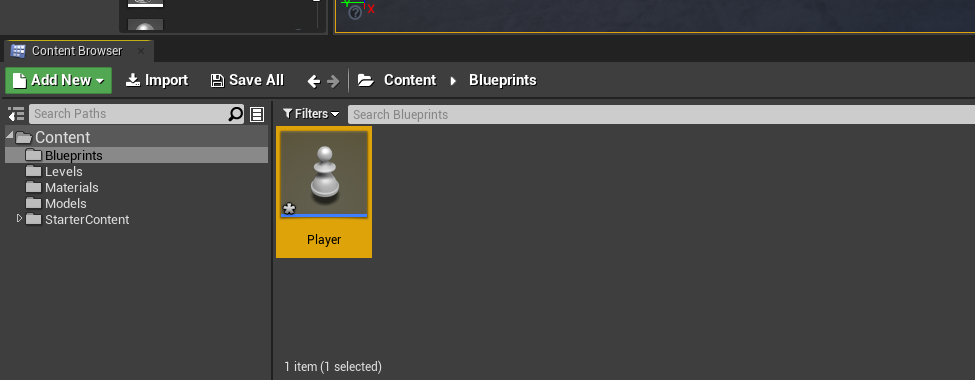
Now that we've got our inputs setup, let's go back to the main level window (tab at the top of the screen) and create our playerblueprint. In the Unreal Engine, blueprints are objects that we can have in our games which each have their own properties, scripting and various other things. Think of the player, enemies, gems, etc. These are all blueprints. They have their own logic and they can be created/destroyed. To create a blueprint, let's go to ourBluerints folder, right click and selectBlueprint Class.
It will ask us to choose a parent class. In Unreal, we've got a number of base classes we can expand upon depending on what we want to create. Select thePawn. As the player we can possess a pawn so that it will receive our inputs. Call the blueprint:Player.
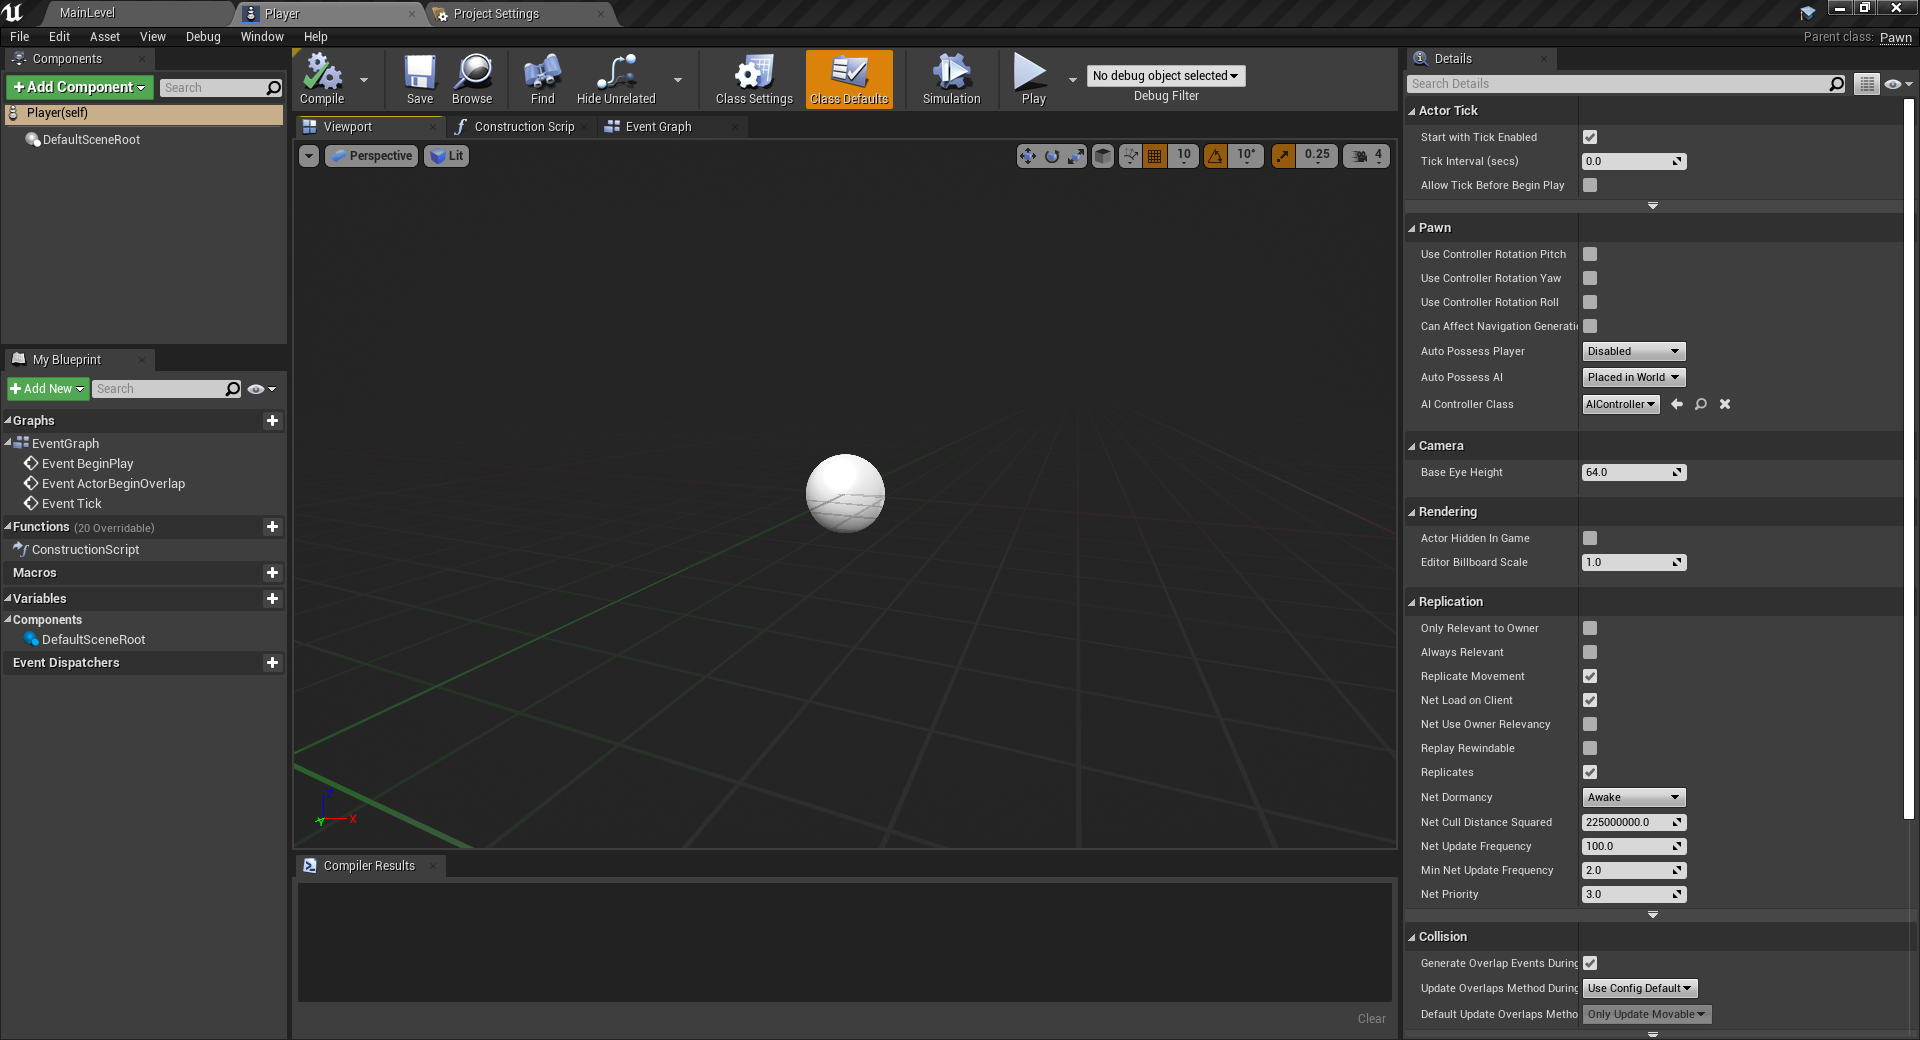
Now double click on the blueprint to open it up in the Blueprint Editor. It may prompt you to open it in the full editor. If so, click the button.
So here we have the Blueprint Editor. Here, we can create our player object by doing many things.
- We can give the player models, lights, effects and other various objects to build them up.
- We can use the blueprint graph to create logic for the player.
- We can tweak the player's properties to our liking.
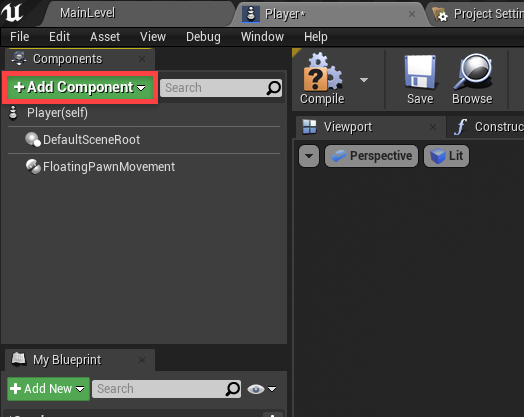
First thing we need to do is give our pawn (the type of class the player is) the ability to move. Or give it the knowledge of how to do so. For this, we can click on theAdd Componentbutton and search forFloatingPawnMovement. This will add the component to our component list.
Next, we need to give the player some physical presence. ClickAdd Component again and search forStaticMesh. This is basically a 3D model.
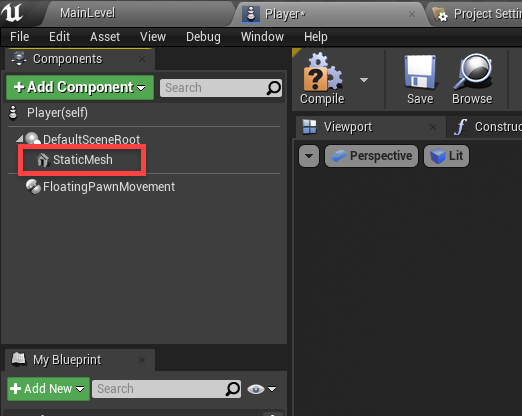
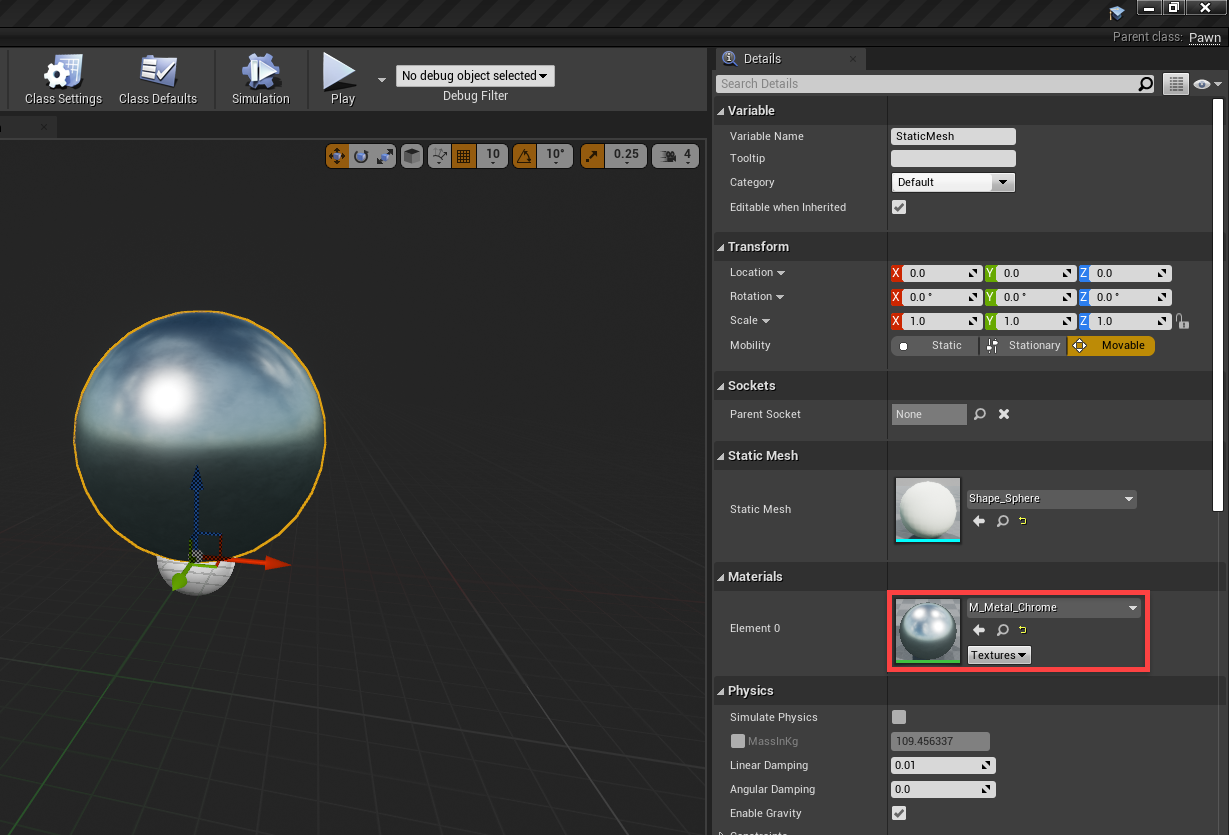
To assign the model, select theStaticMesh and over in theDetails panel, set theStatic Mesh field to beShape_Sphere.

Quick Note: You can move the camera around in the center viewport. Holdright-click and use WASD to fly around.
A plain white sphere doesn't look that good, so let's also change theMaterial toM_Metal_Chrome. When we set up lighting later on this will reflect it all and look pretty good.
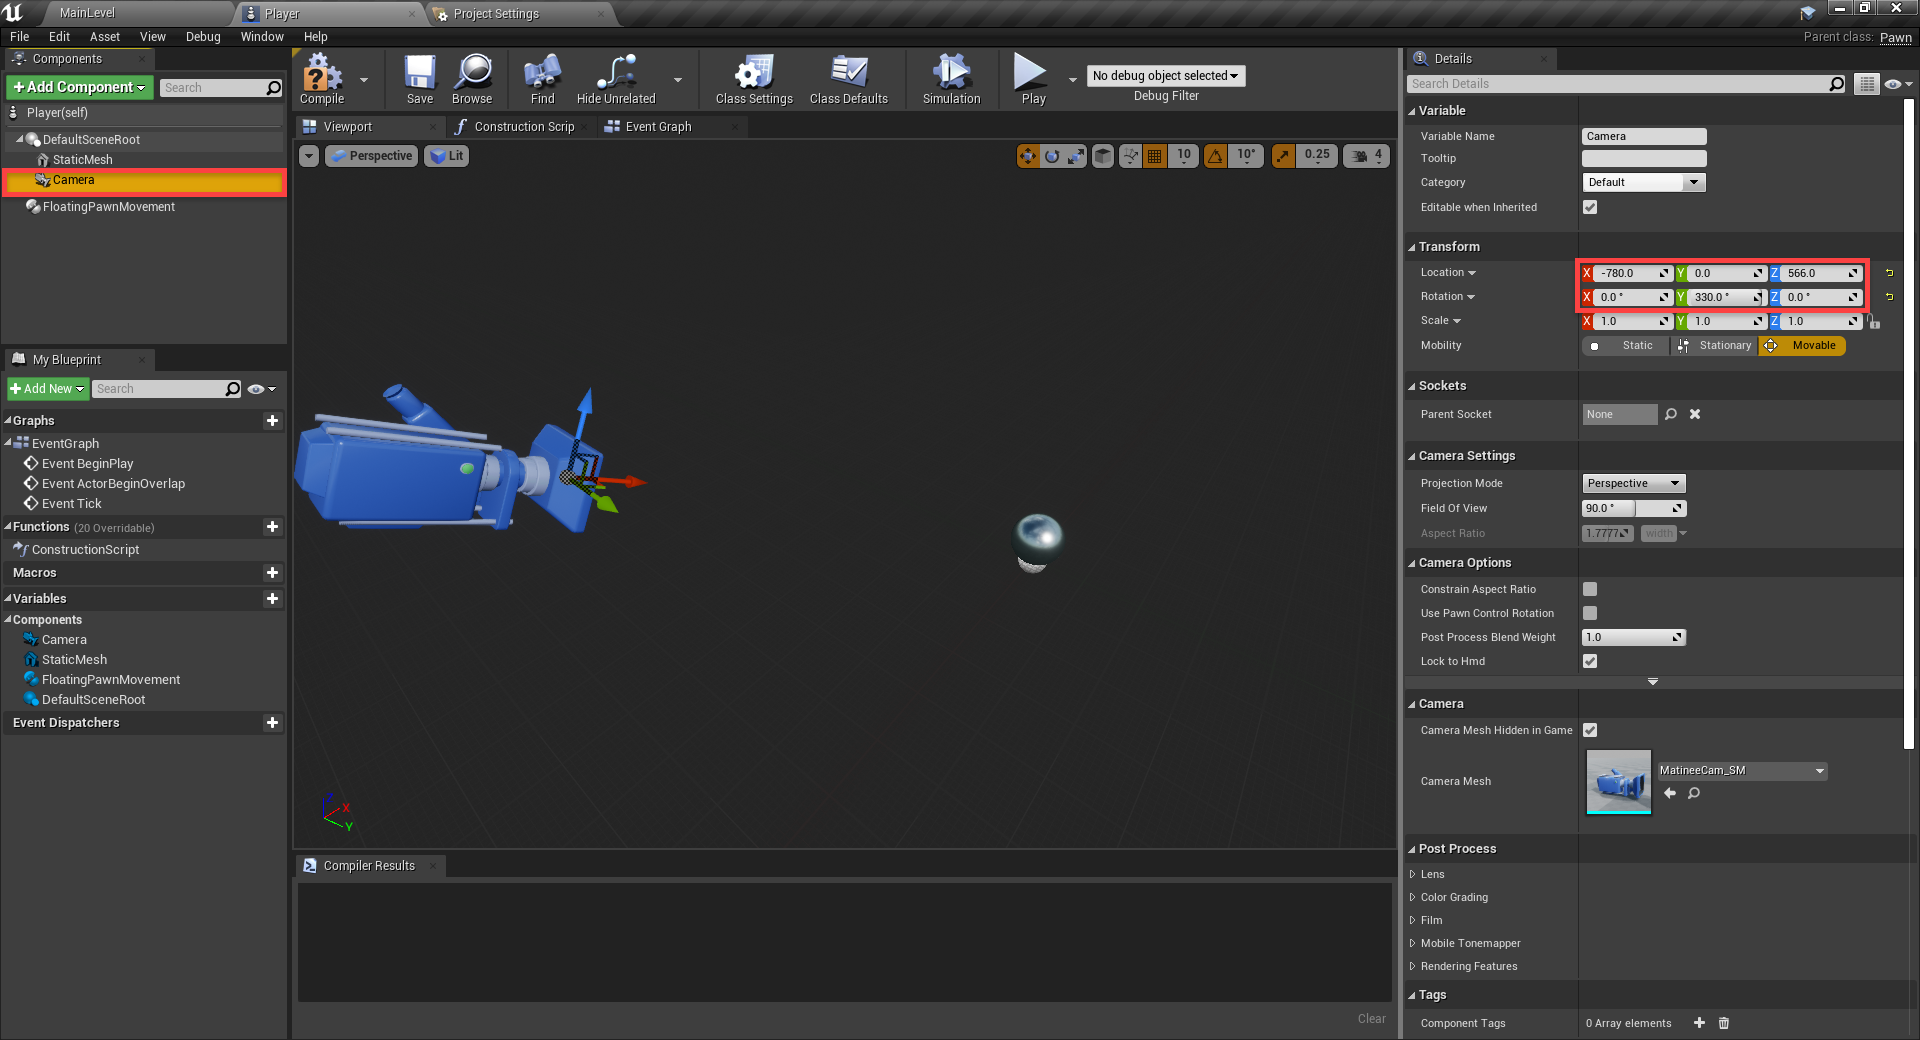
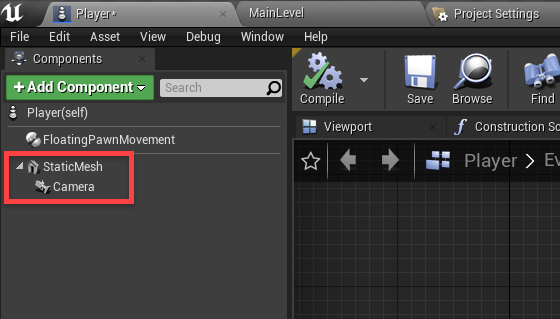
The final component is going to be a camera. Because we need a way of looking into the world and following the player. Add a newCamera component. In theDetails panel…
- Set theLocation to-780, 0, 566
- Set theRotation to0, 330, 0
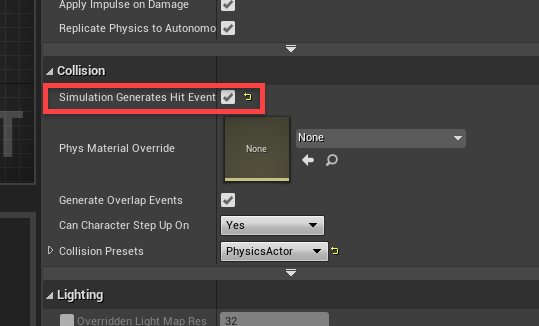
Select theStaticMesh and enableSimulate Physics. This will give us gravity and the ability to collide with things.
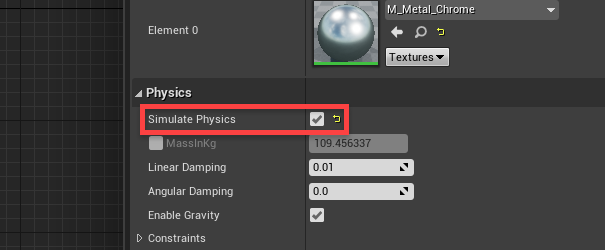
We also need to enableSimulation Generates Hit Events. This will allow us to detect collisions.
To prevent the player from rolling on its own, let's open theConstraints tab and enableLock Rotation on the X, Y and Z axis'.

Finally, let's make the static mesh the root node. To do this, click and drag the static mesh on top of theDefaultSceneRoot. This will replace it and make the camera a child.
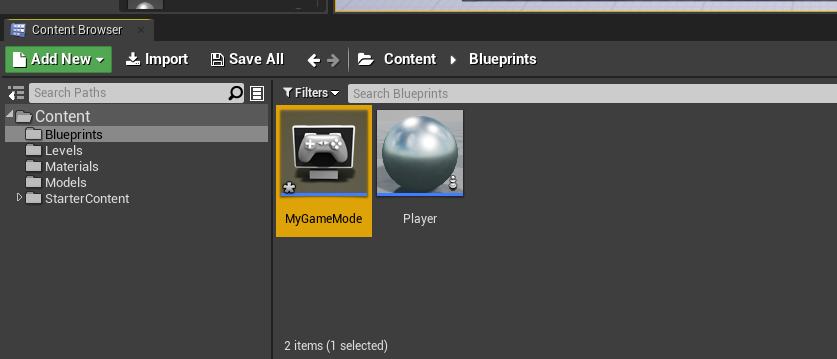
Let's now test this out in our level. Back in the level editor (click on the MainLevel tab), we need to first create a game mode blueprint. This will tell the game what object the player is, etc. In theBlueprints folder, create a new blueprint of typeGame Mode Base and call itMyGameMode.
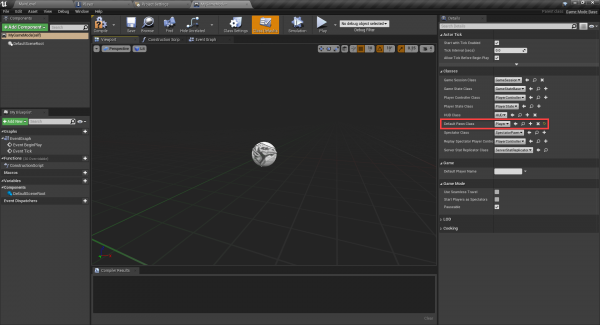
Double click on it to open up the blueprint editor. In theDetails panel, we just want to set theDefault Pawn Class to be ourPlayer.
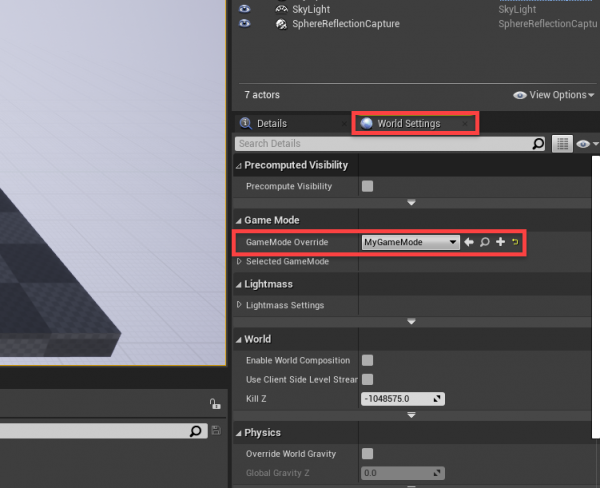
Save that, then return to the level editor. In theDetails panel, click on theWorld Settings tab and set theGameMode Override to be our newMyGameMode.
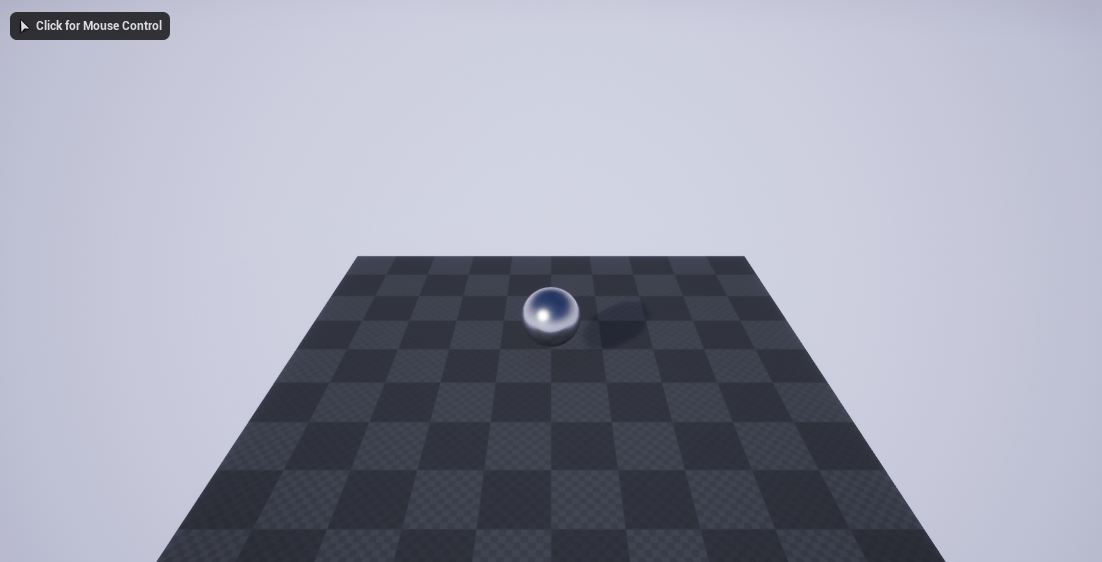
Now if you click thePlay button, you'll see that the center viewport turns into the game and our player spawns in!
Assigning Logic to our Player
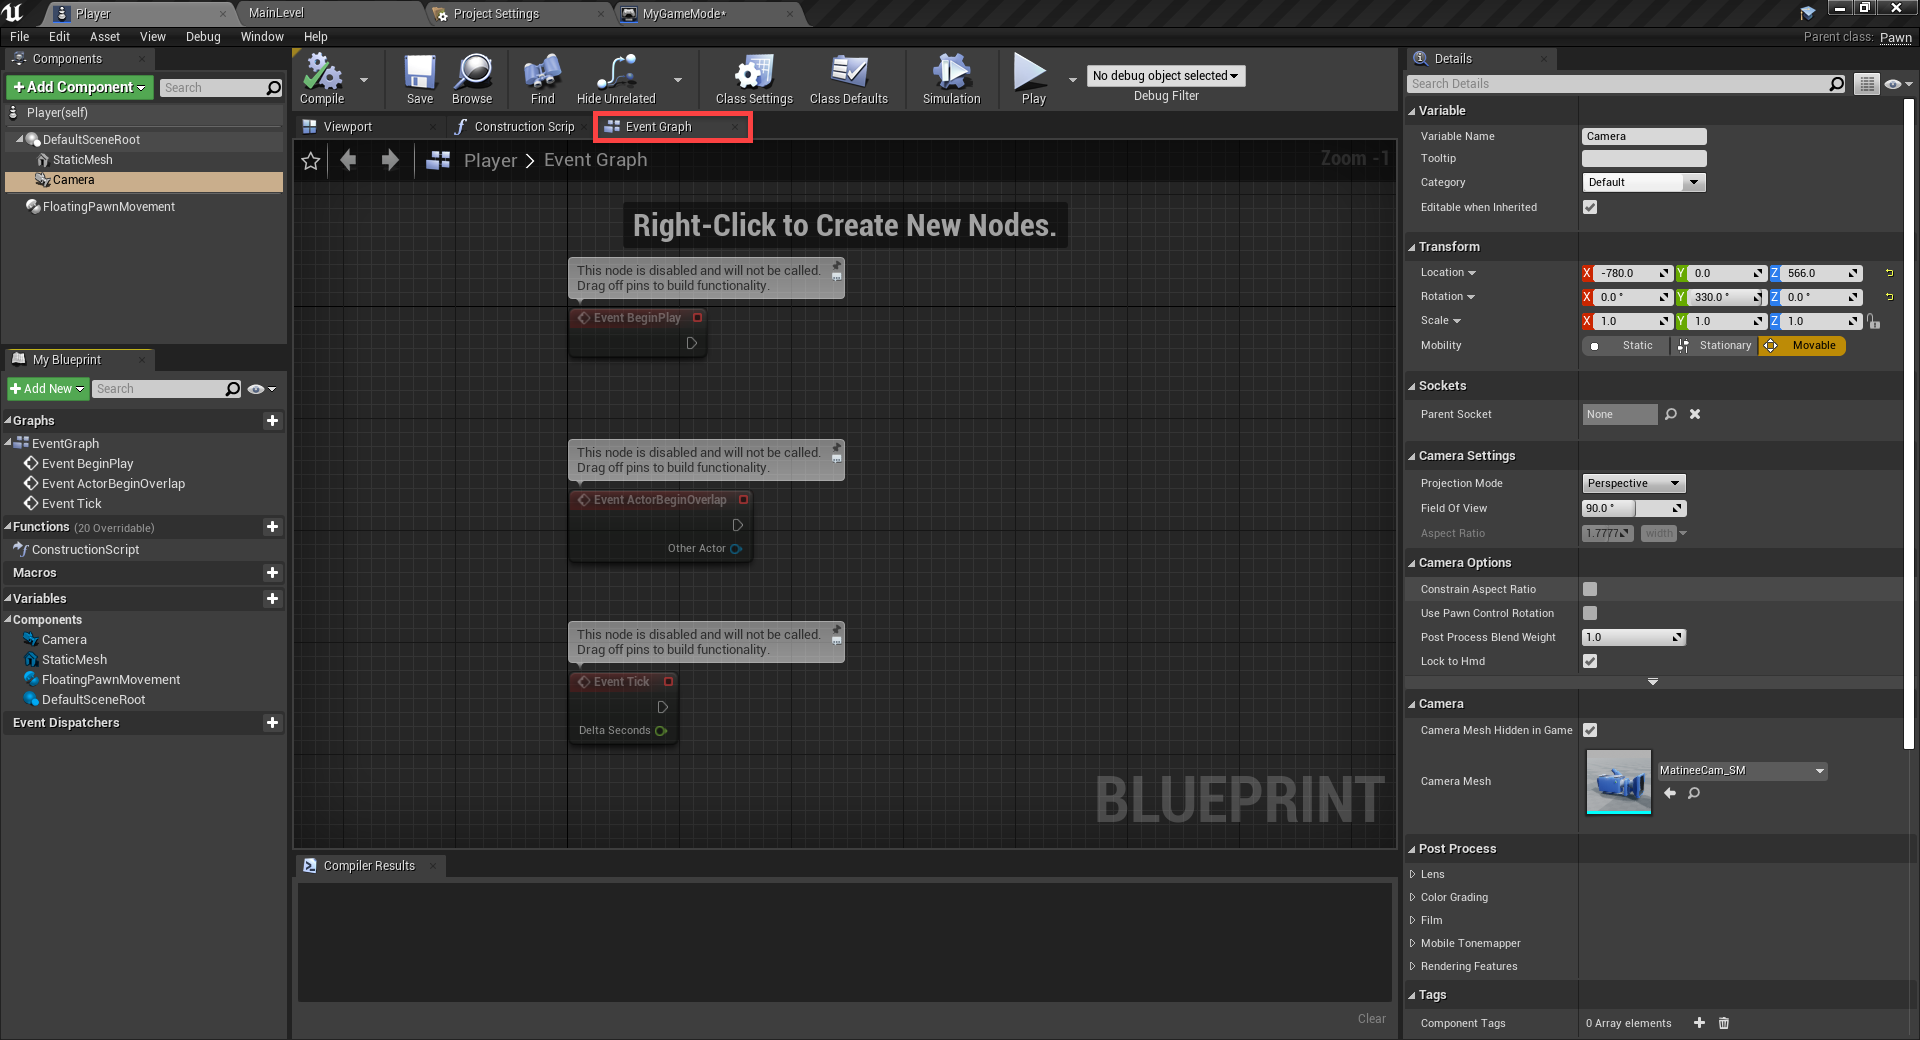
Now that we've got all of the components for our player, let's begin by giving them logic. In thePlayer blueprint, click on theEvent Graph tab. This will take us to the node graph. In Unreal, we can create logic by creating these graphs. They basically consist of nodes with connections. Certain connections will trigger when certain things happen. We can also have conditions, so when something happens, we can check if it wasa orb then do something based on that.
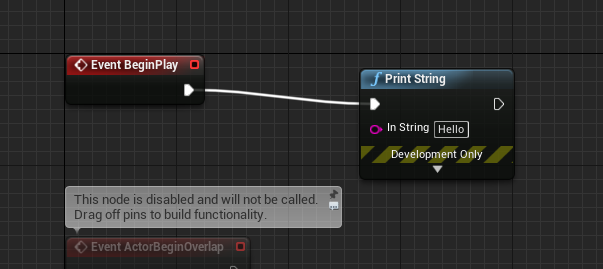
You'll see that there are three nodes already there. These are event nodes (the red ones) and trigger when something happens.
- BeginPlay triggers once right at the start of the game
- ActorBeginOverlap triggers when we enter the collider of another object
- Tick gets triggered every frame
Let's test this out. Right click and search for a node calledPrint. When triggered, this node can print something to the screen.
You'll see that each node has these white arrows. These are how we connect nodes andpower them. Some such as print have an input and output, white begin play only has an output. This means that when print is powered, it can then move onto another node. Click and hold theBeginPlay node's output and drag that toPrint's input.
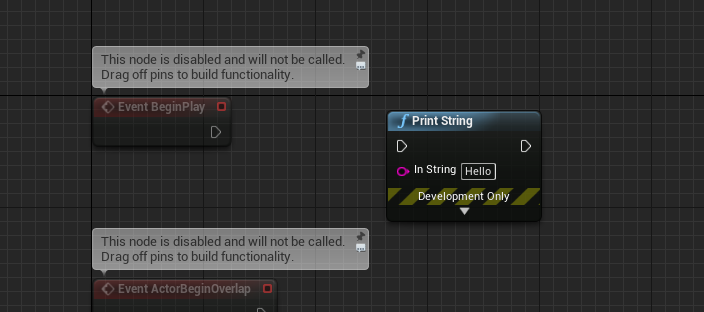
So now whenBeginPlay is triggered (once at the start of the game), the print node will trigger – printinghello to the screen. You can go back to the level editor and test it out.
Now let's get started on moving our player around. Select all of the nodes and delete them (delete key). You can also move around with right mouse button and zoom with the scroll wheel.
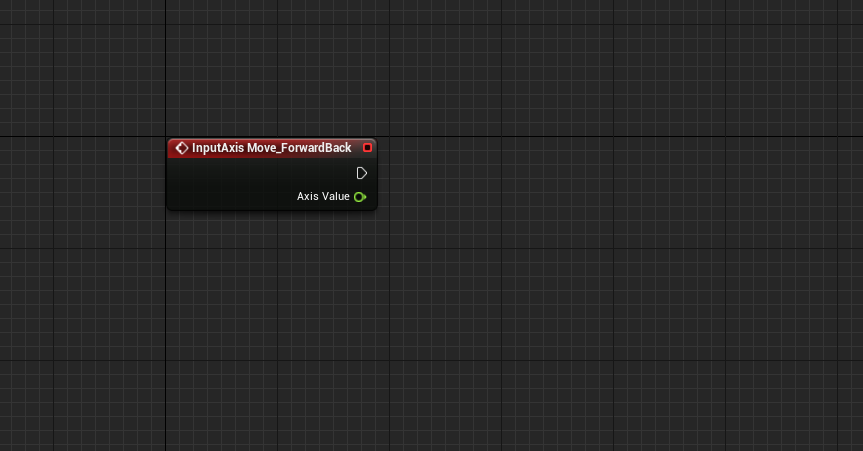
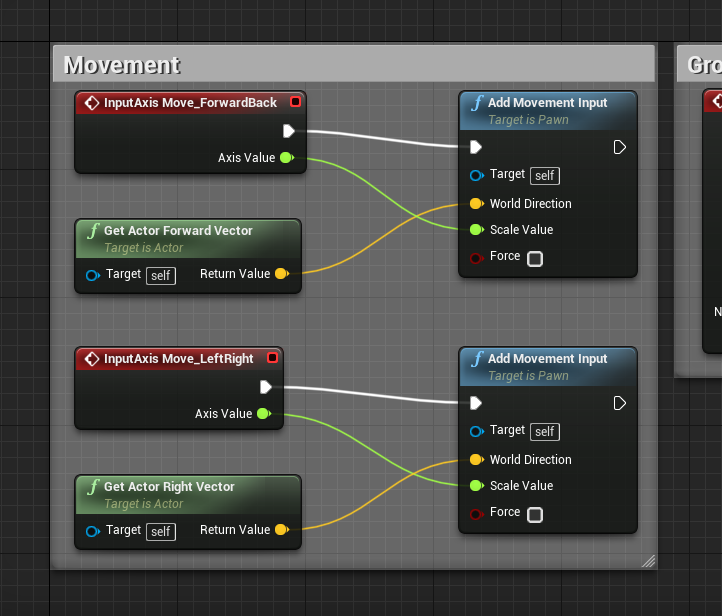
Right click and create a new node calledInputAxis Move_ForwardBack. You'll notice that this is one of the inputs we created. So whenWorSis pressed, this will trigger. It also has this greenAxis Value thing outputting as well. Nodes can have both input and output values. For us, the axis value is just the scale value from -1 to 1.
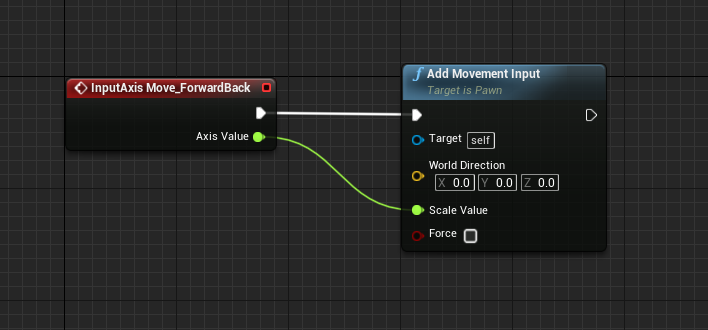
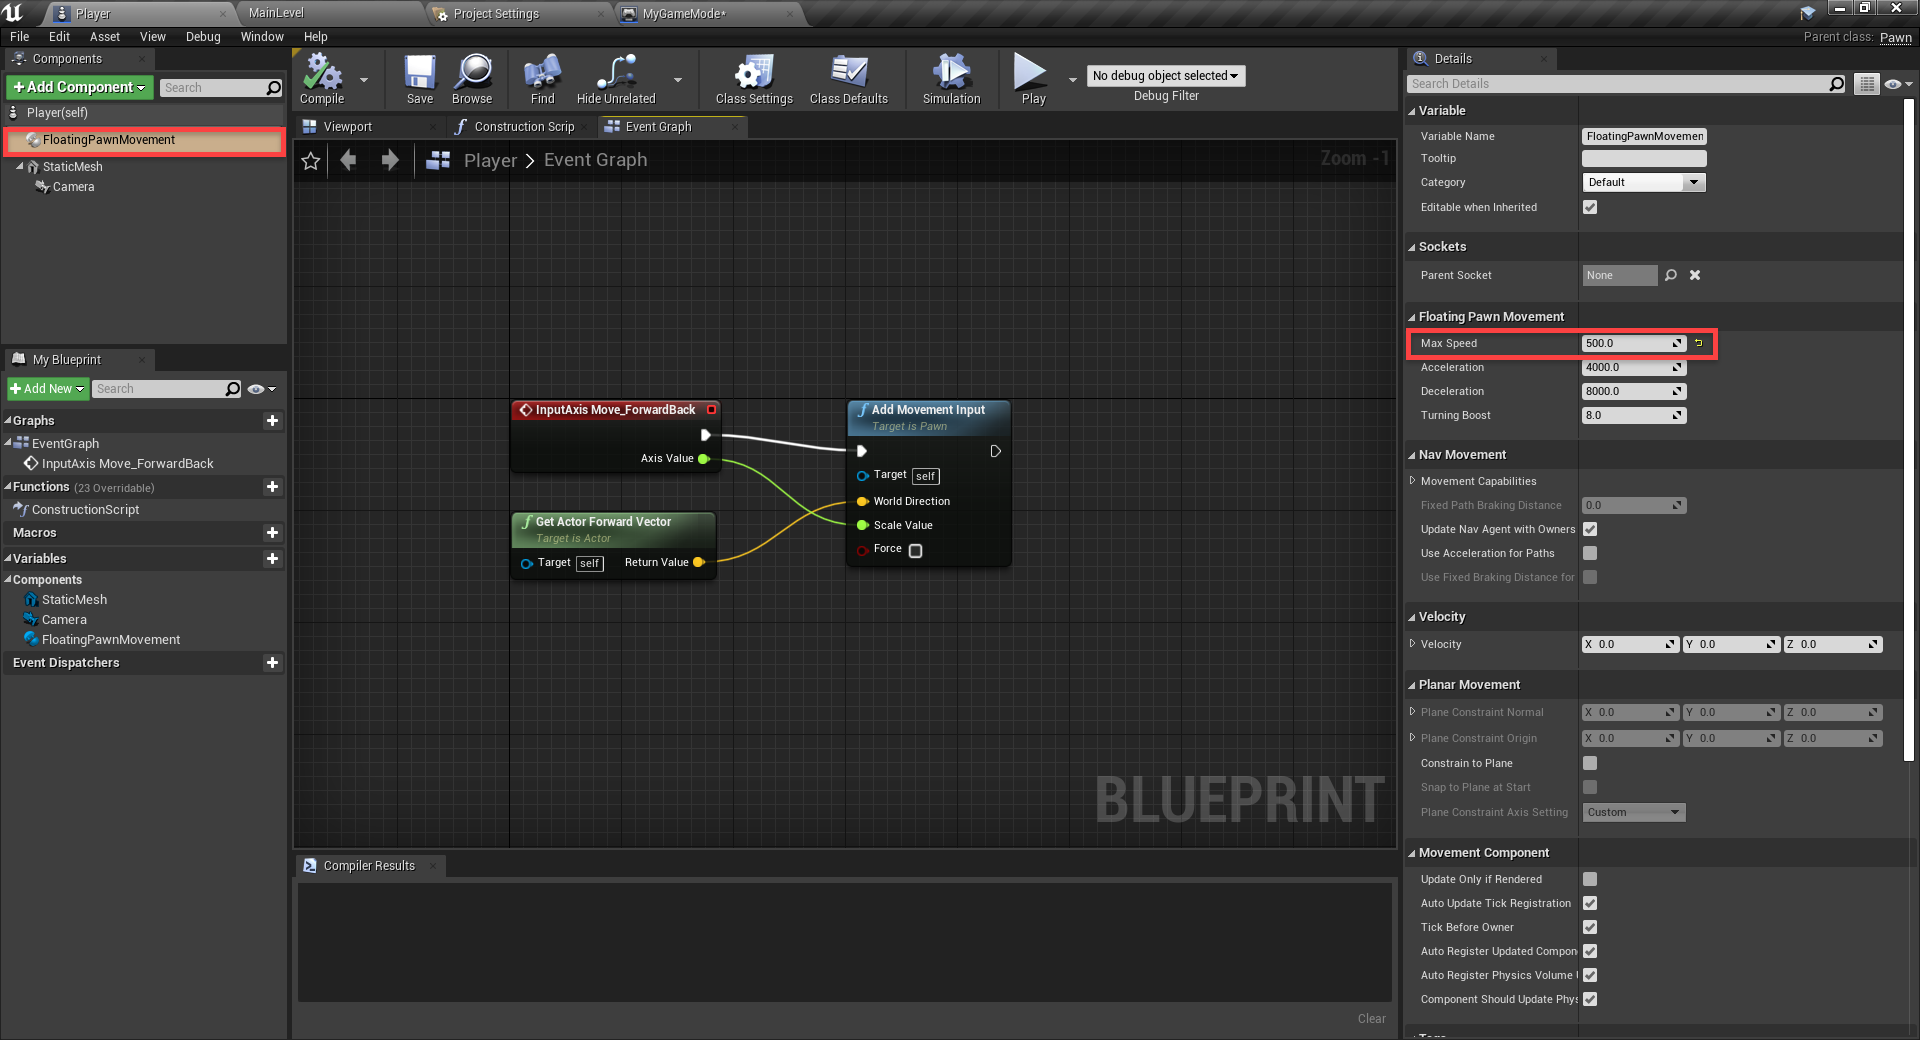
Drag out the node'sflow output (the white arrow) and release it. We can then search for theAdd Movement Input node and it will automatically connect. This node does all the hard work of actually moving the player, with a few given inputs. Since we've already got the scale value, drag ourAxis Value output into theScale Value input.
Finally, we just need to give it the world direction that it will move in. For this, right click and create a new node calledGet Actor Forward Vector and plug that into theWorld Direction input.
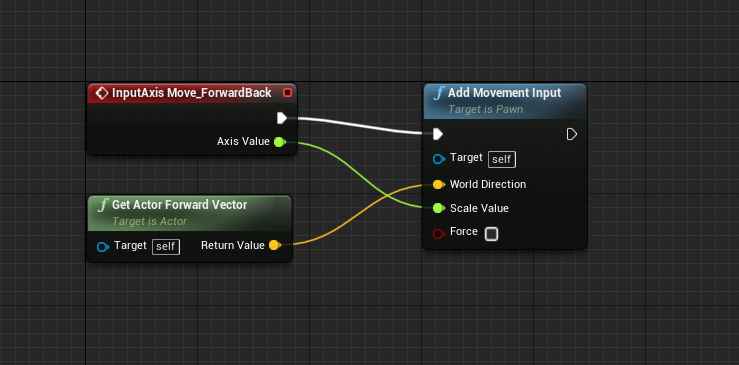
At the top of the screen we can now press thePlaybutton and test it out! You may notice the player is a bit fast. Select theFloatingPawnMovement component and set theMax Speed to500.
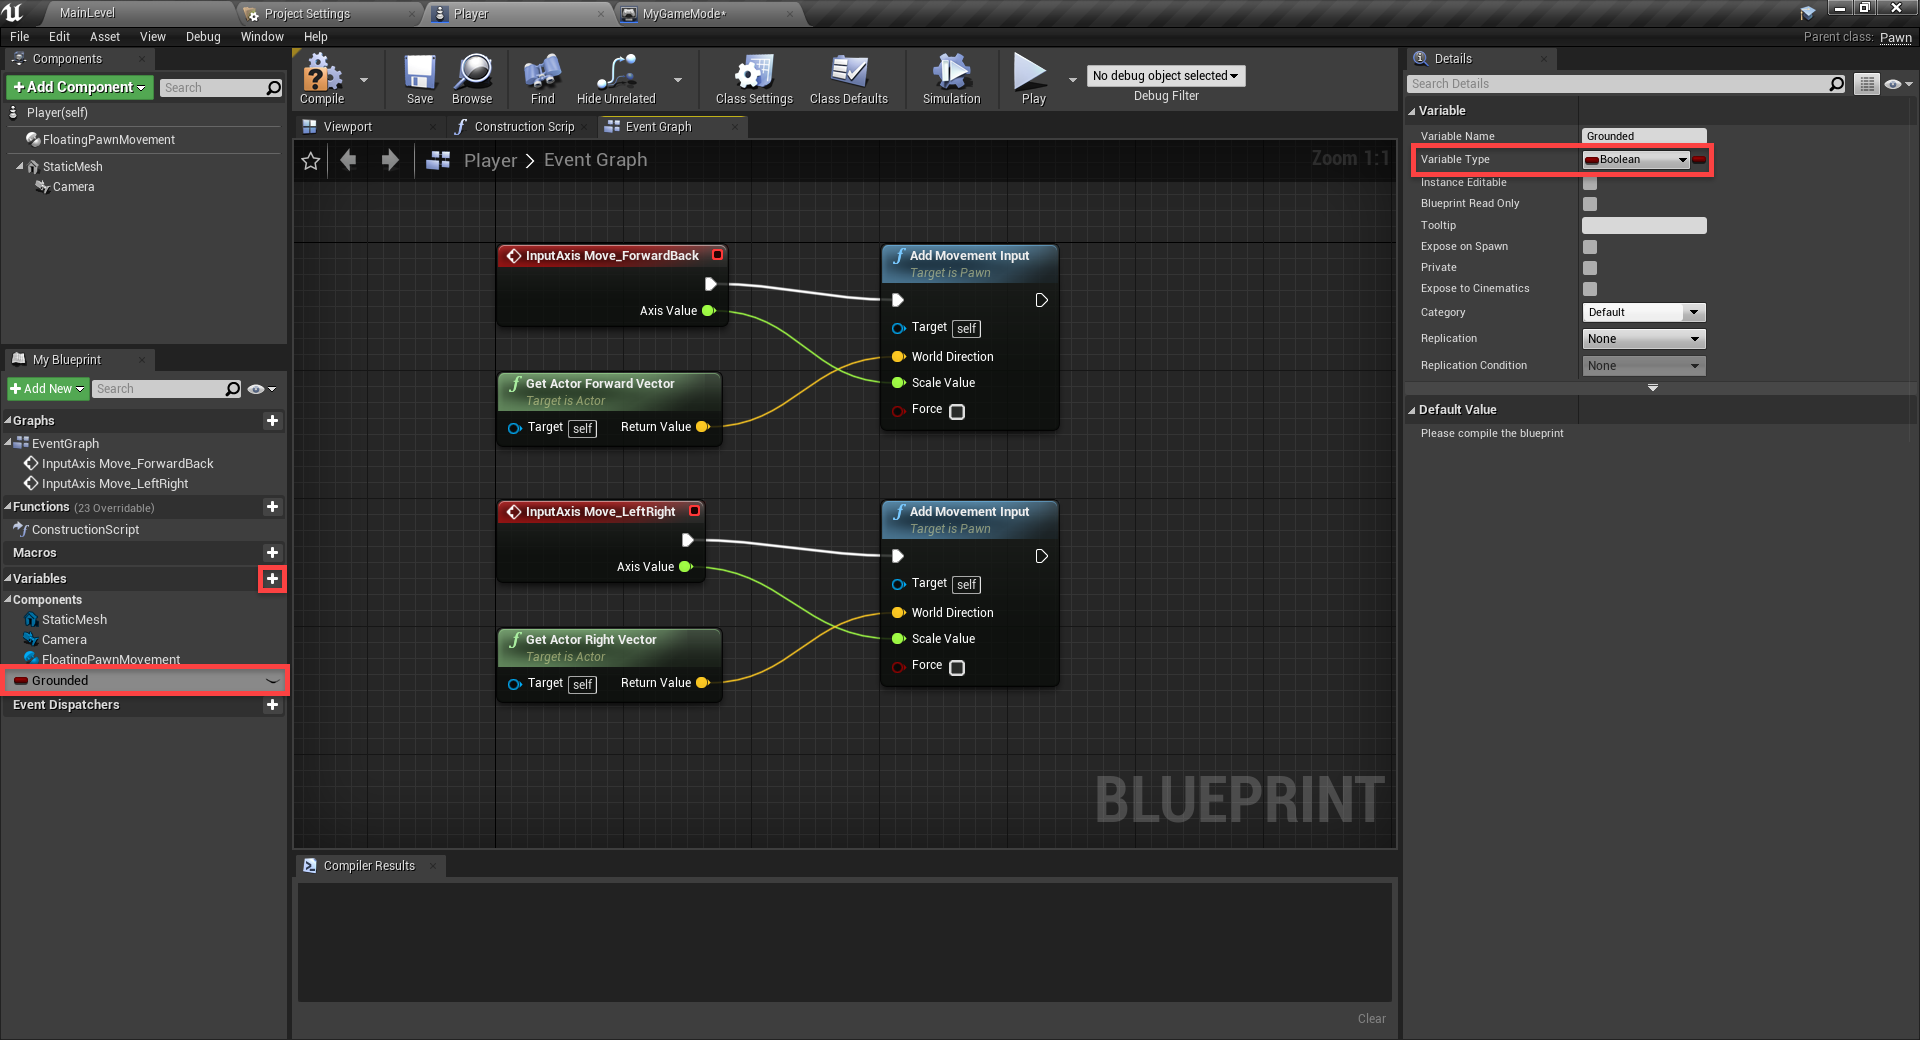
Now we can setup the horizontal movement. This time with theInputAxis Move_LeftRight node which is triggered with theA andD keys. For the world direction, we want to use the actor right direction.

Now you should be able to play the game with the WASD keys.
Next is jumping. For this though, we need to know when we're standing on the ground. Let's begin by creating a new variable. In theMy Blueprint panel, create a new variable calledGrounded. Over in theDetails panel, set theVariable TypetoBoolean. A boolean variable can be true or false.
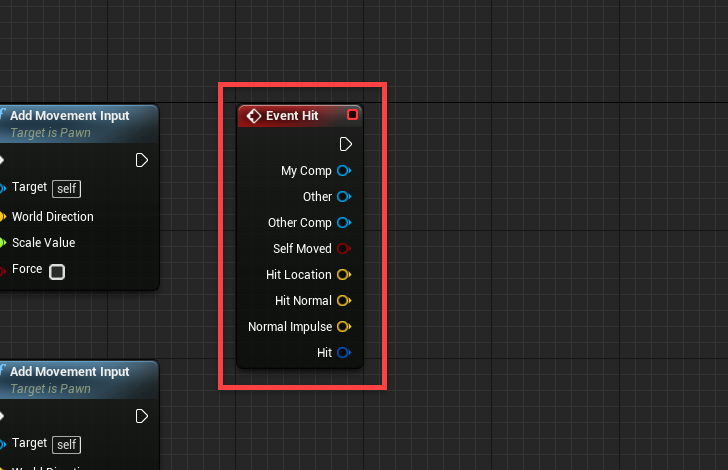
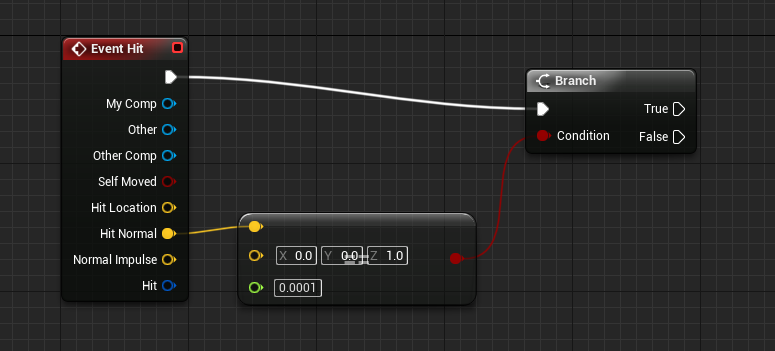
In our graph, create a new node calledEvent Hit. This gets triggered whenever we enter the collider of another object (i.e. the ground). There are many outputs, but we're just going to use one.
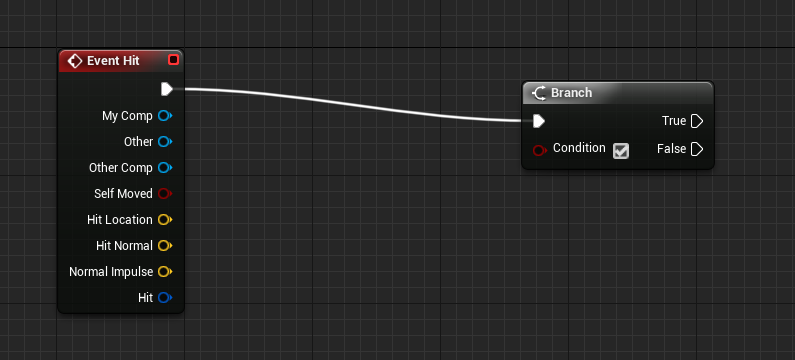
Connect the output flow to a new node calledBranch. This is a very special node which allows us to split up the flow depending on a given condition. When we collide with another object, we don't know if it's above, down or to the side. So we only want to be grounded when we're colliding with an object below us.
To do this, we're going to create a new node calledEqual (Vector). This node takes in two vectors (property containing a X, Y and Z) and compares them. If they're the same, it outputs true, otherwise false.
Connect the Event Hit'sHit Normal output to the node, and set the other input to0, 0, 1. What we're checking here is if the object we hit, has a collision normal (direction the collision point is facing) of up. If so, this means we're standing on something. Connect the node to the Branch.
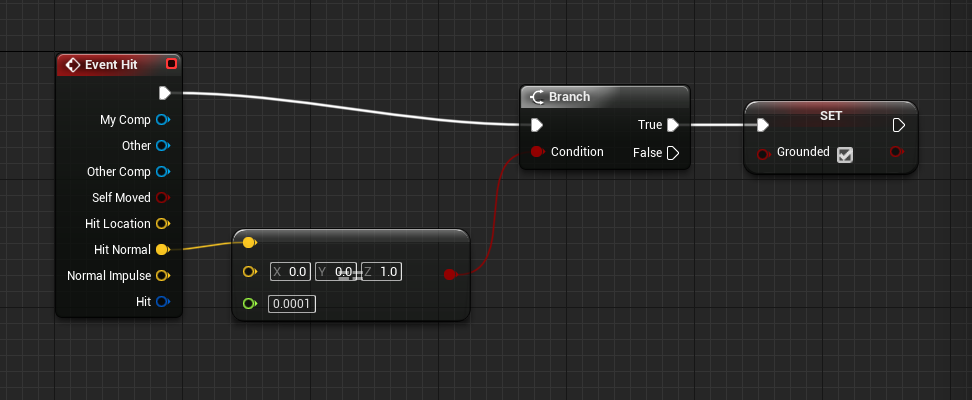
Next, on the branch node we have two flow outputs. One for if the condition is true and one for if it's false. Create a new node calledSet Grounded and connect that to the branch's true output. Make sure to also tick the grounded input. This means that when we collide with an object, we'll check to see if we're standing on something. If so, set theGrounded variable to true.
You may soon notice that the graph can look quite convoluted. A way around this is by categorising different parts. So select all of the movement related nodes, right click and selectCreate Comment From Selection. You can then give it name.
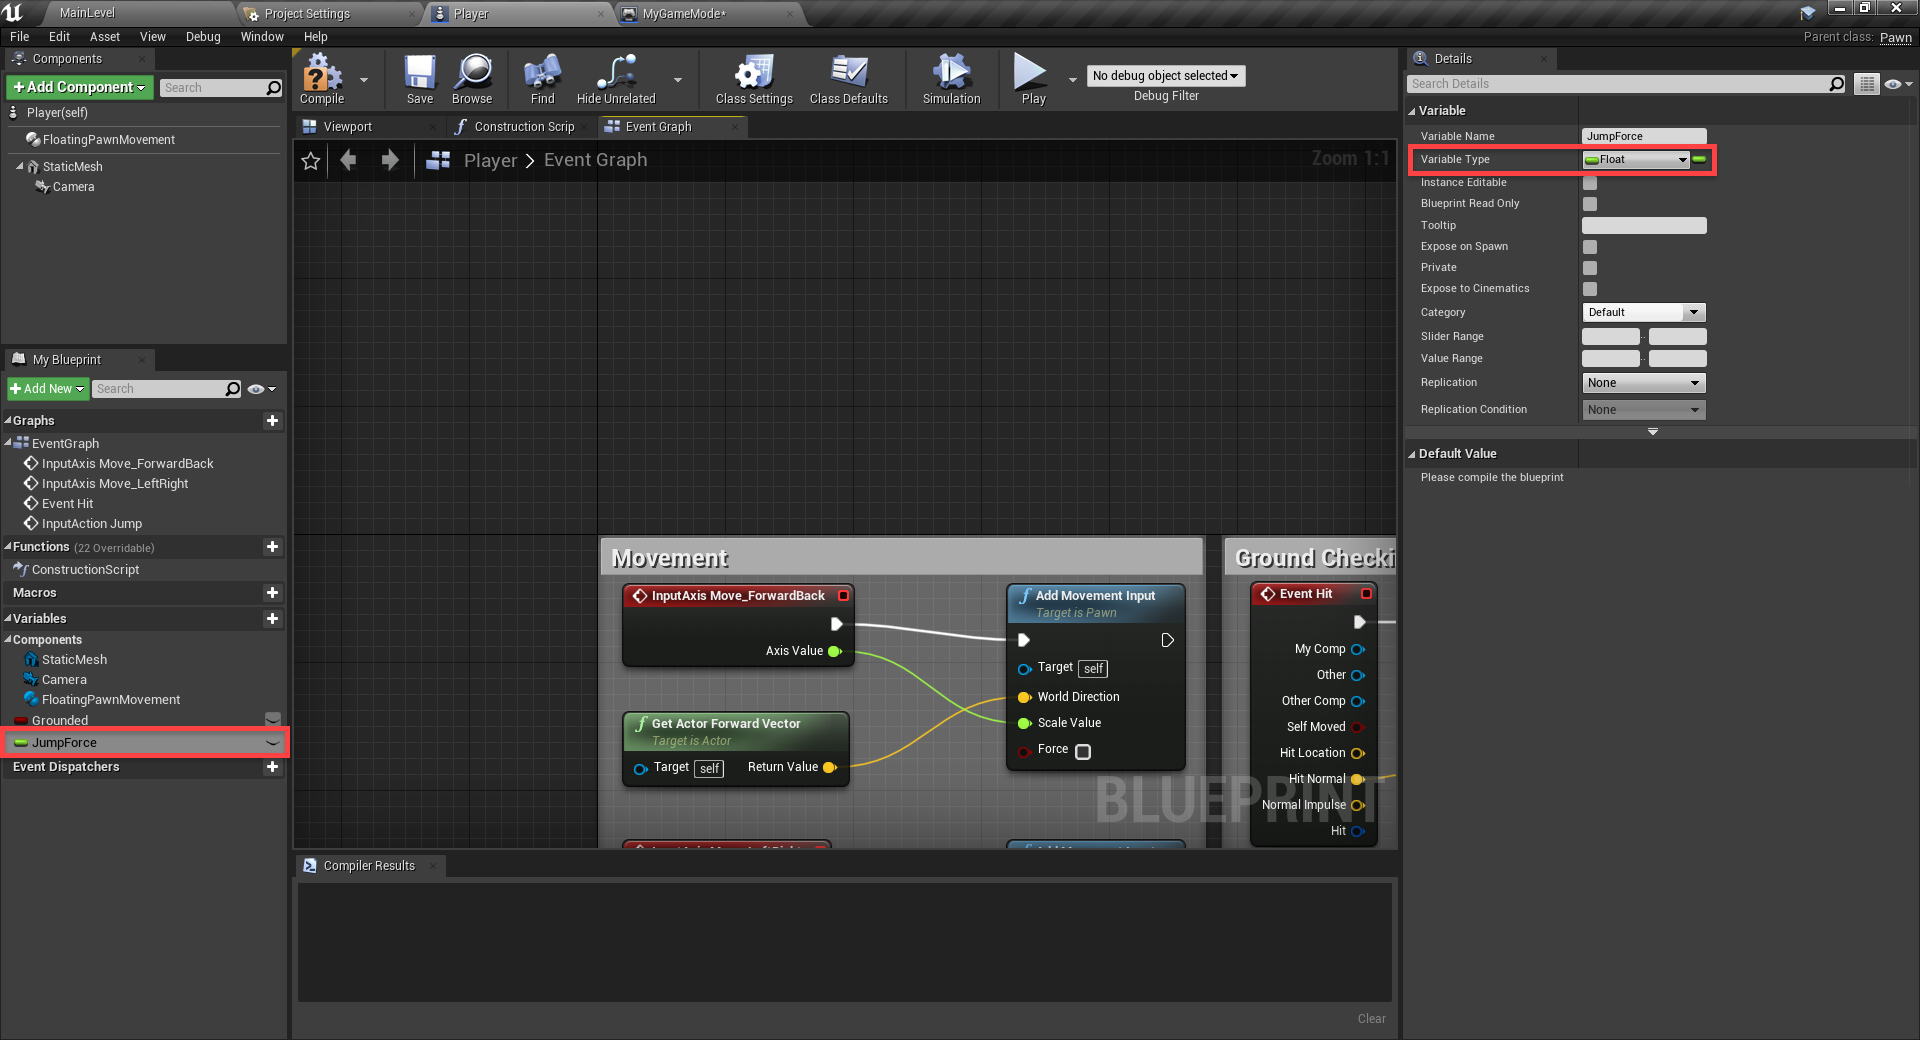
Now that we can detect the ground, let's implement jumping. To begin, we can create a new variable calledJumpForce. Set the variable type toFloat. This is a floating point number (i.e. decimal number like 5.2, 100.1, etc).
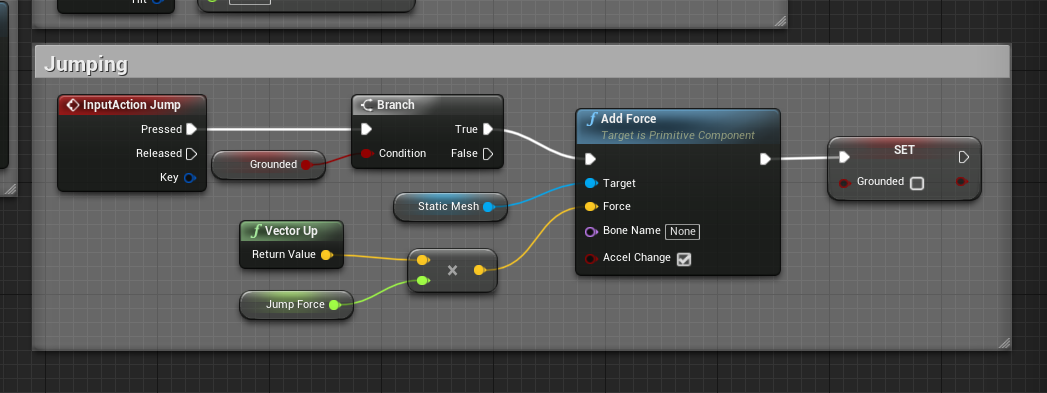
This is what the jumping will look like.
- TheInputAction Jump node gets triggered when we press theSpace button.
- This goes into a branch where we're checking the condition of theGrounded variable.
- If we are grounded, we're going to add force to the static mesh.
- EnableAccel Change.
- The force, is going to be Vector up multiplied by the jump force.
- Then finally, we're settingGrounded to false.
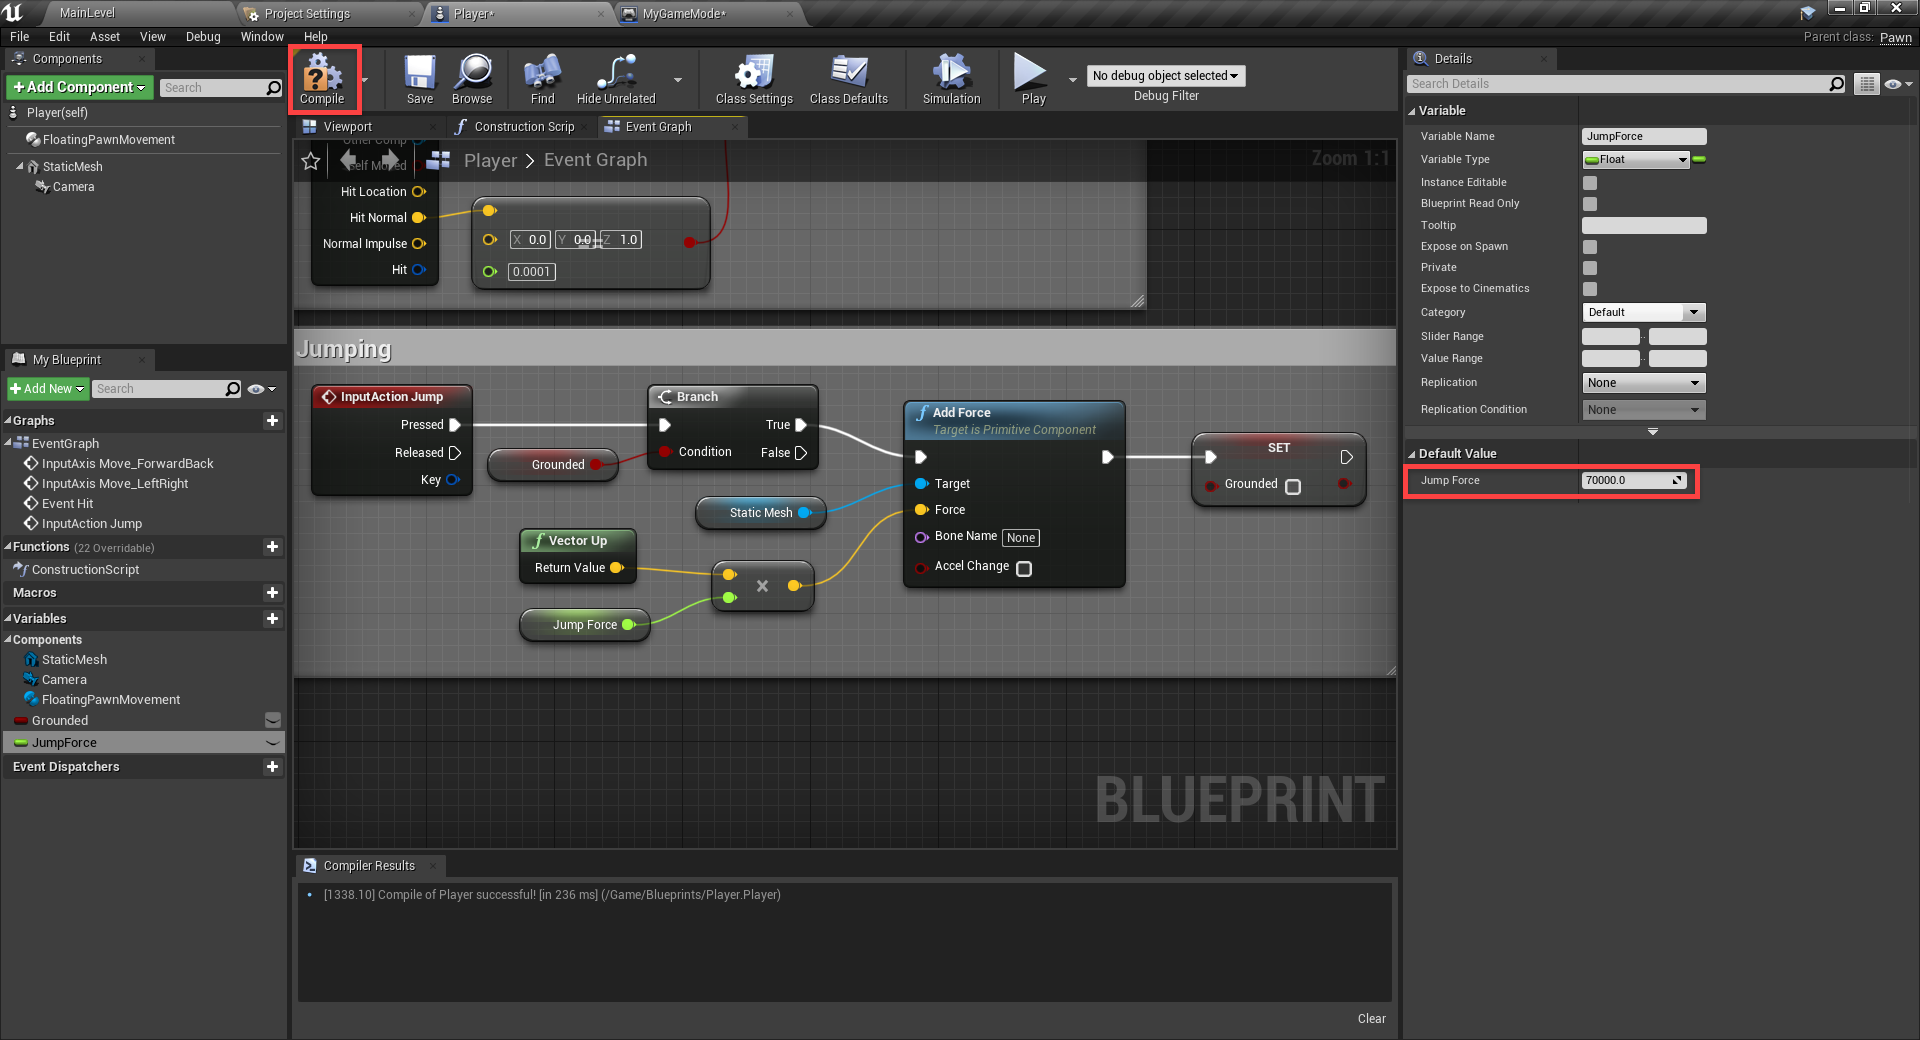
Next, click theCompile button to compile the graph. This will allow us to set the default value for the jump force variable. Set it to70,000. We can then press play and test out the jumping.
Building the Level
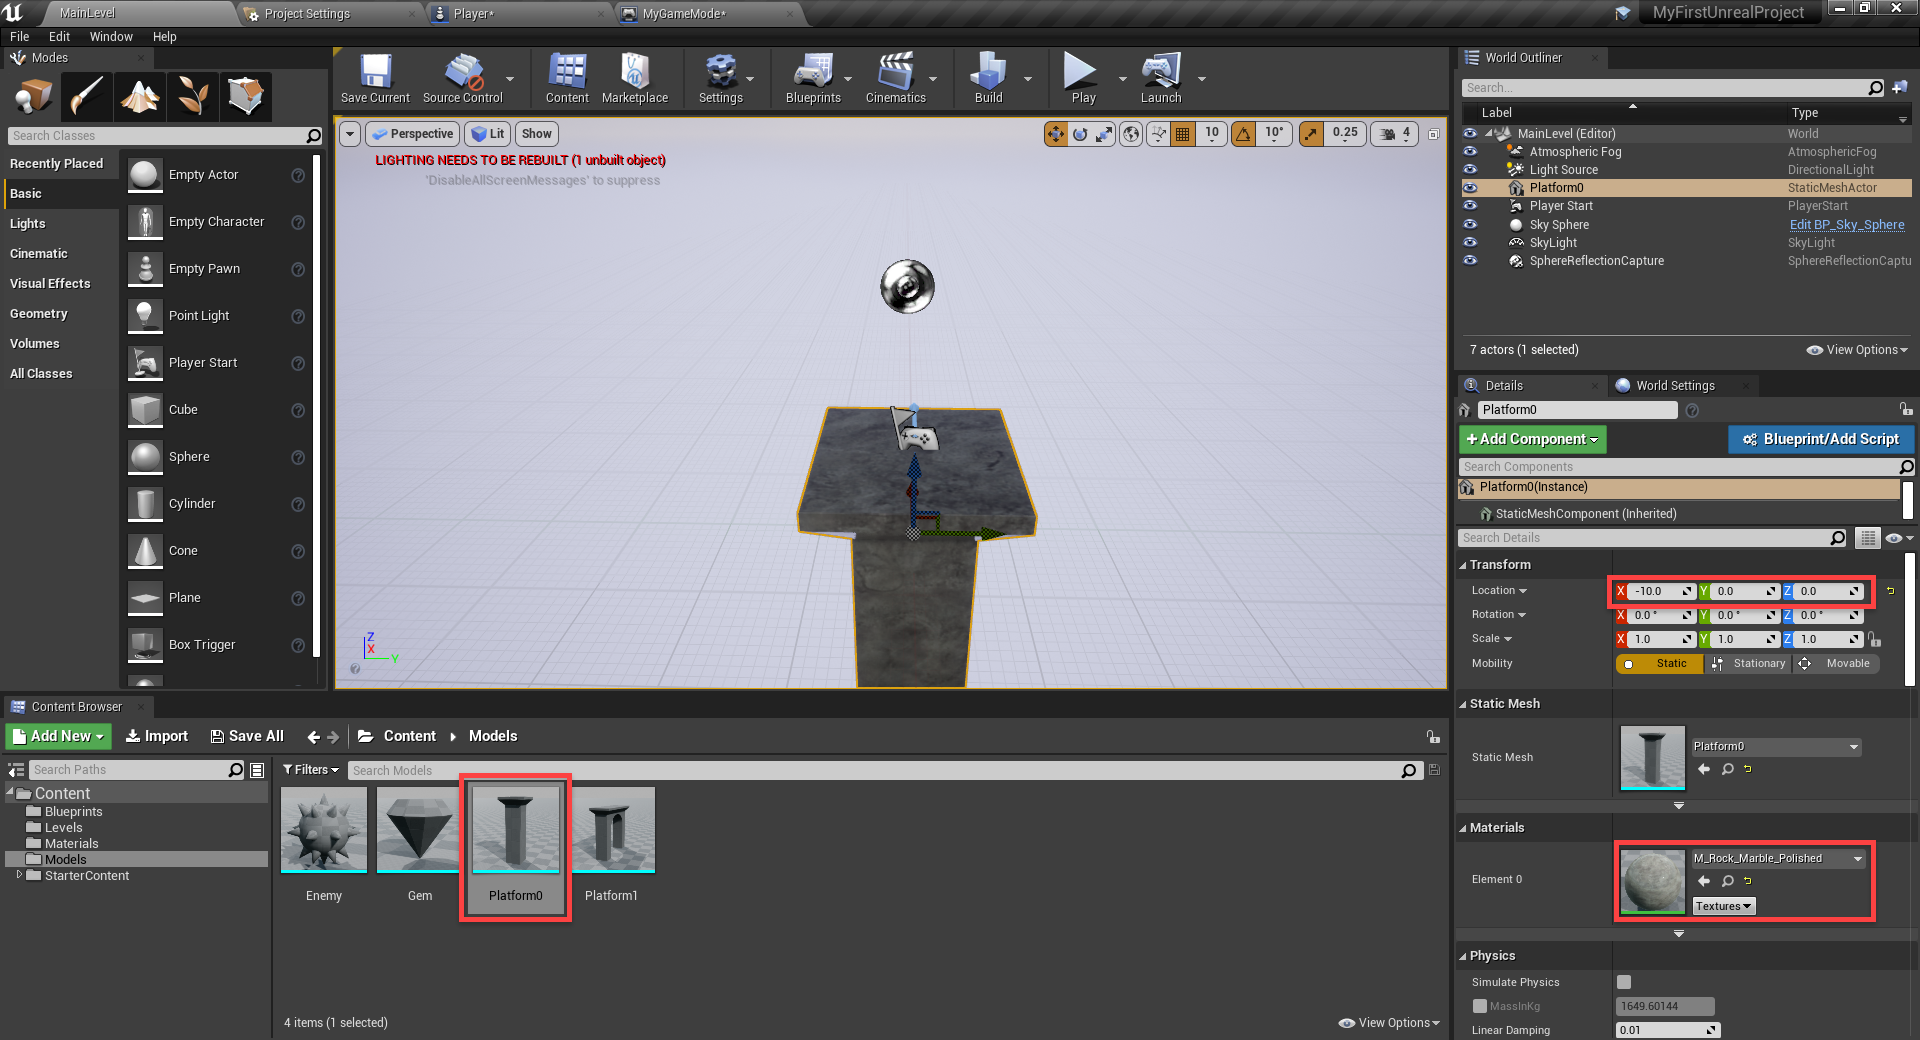
Back in the level editor, our game looks quite bland. Start by selecting then deleting the existing ground. In theModels folder, drag in thePlatform0 model.
- Set theLocation to-10, 0, 0
- Set theMaterial toM_Rock_Marble_Polished
Quick Note : You can use the move gizmo (red, blue and green arrows) to move around a selected object. You can toggle between the rotate (press E), scale (press R) and move (press W) gizmos.
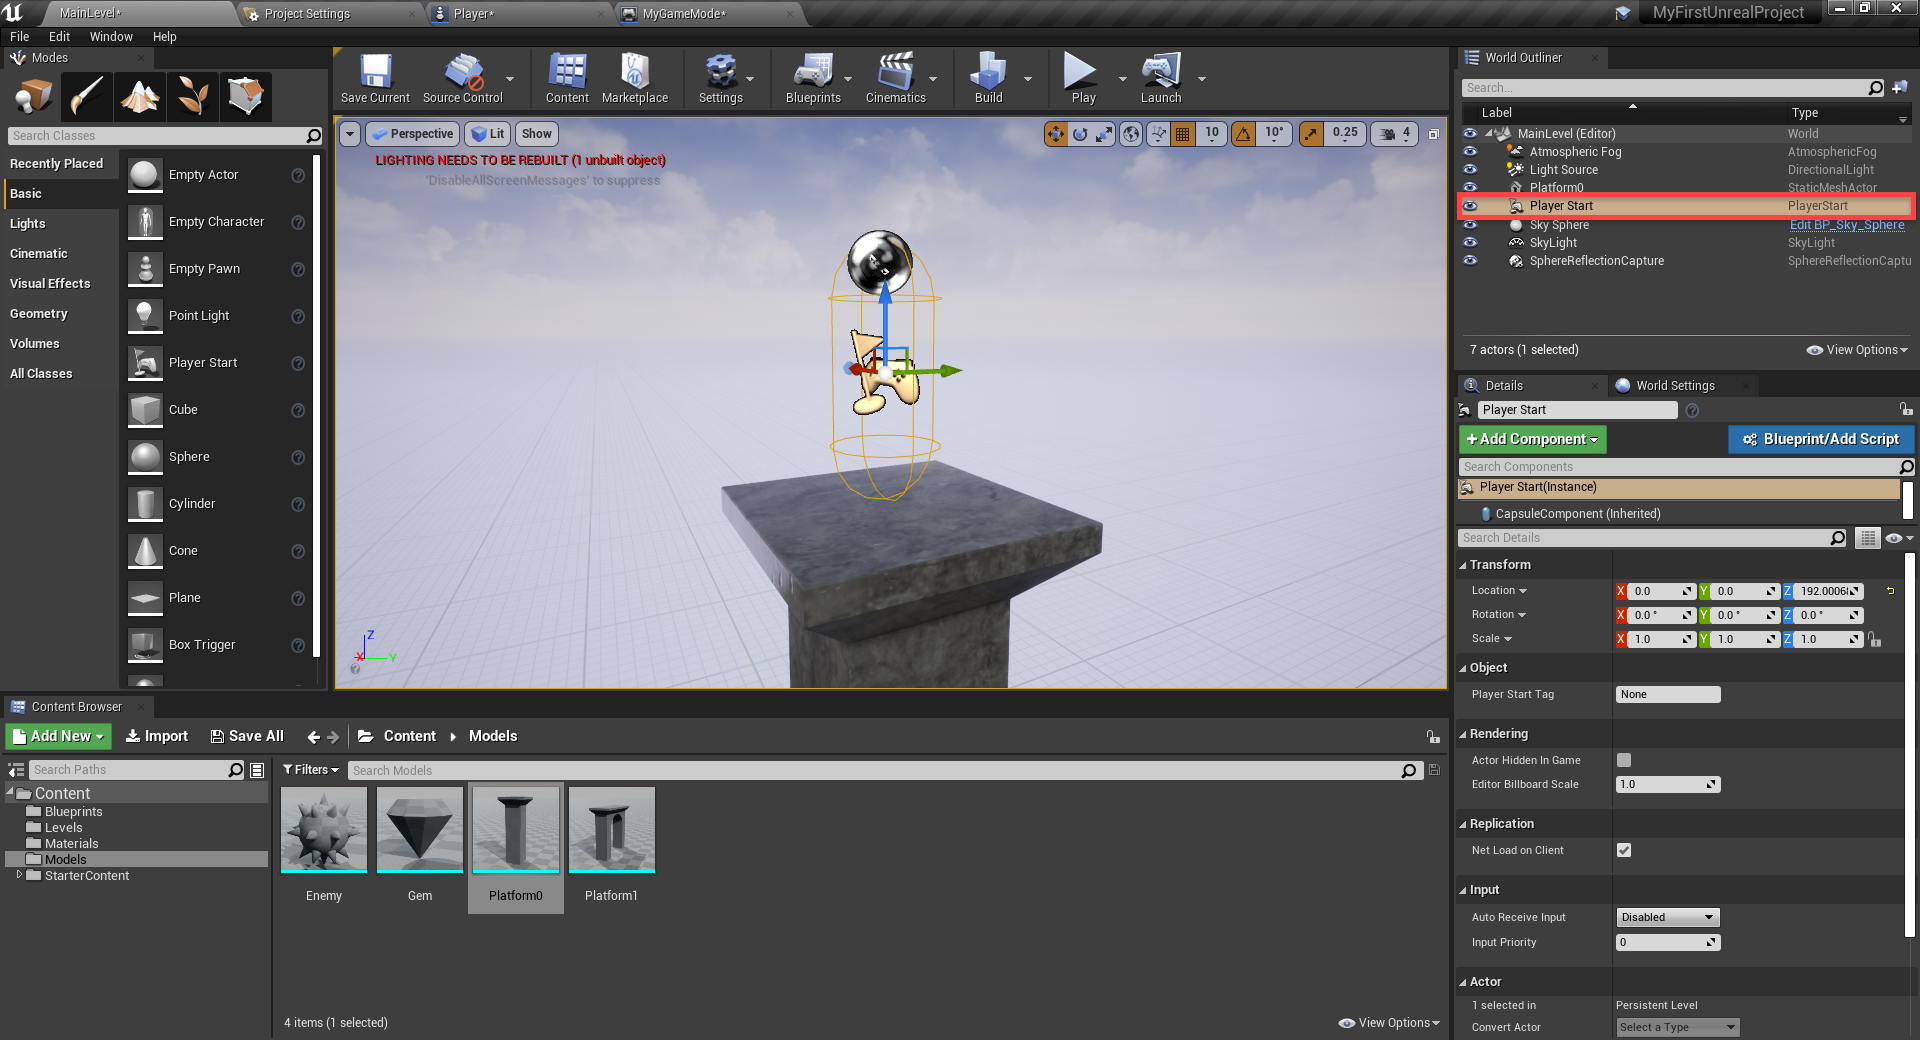
We also need to move the Player Start object up a bit so it's standing on the platform.
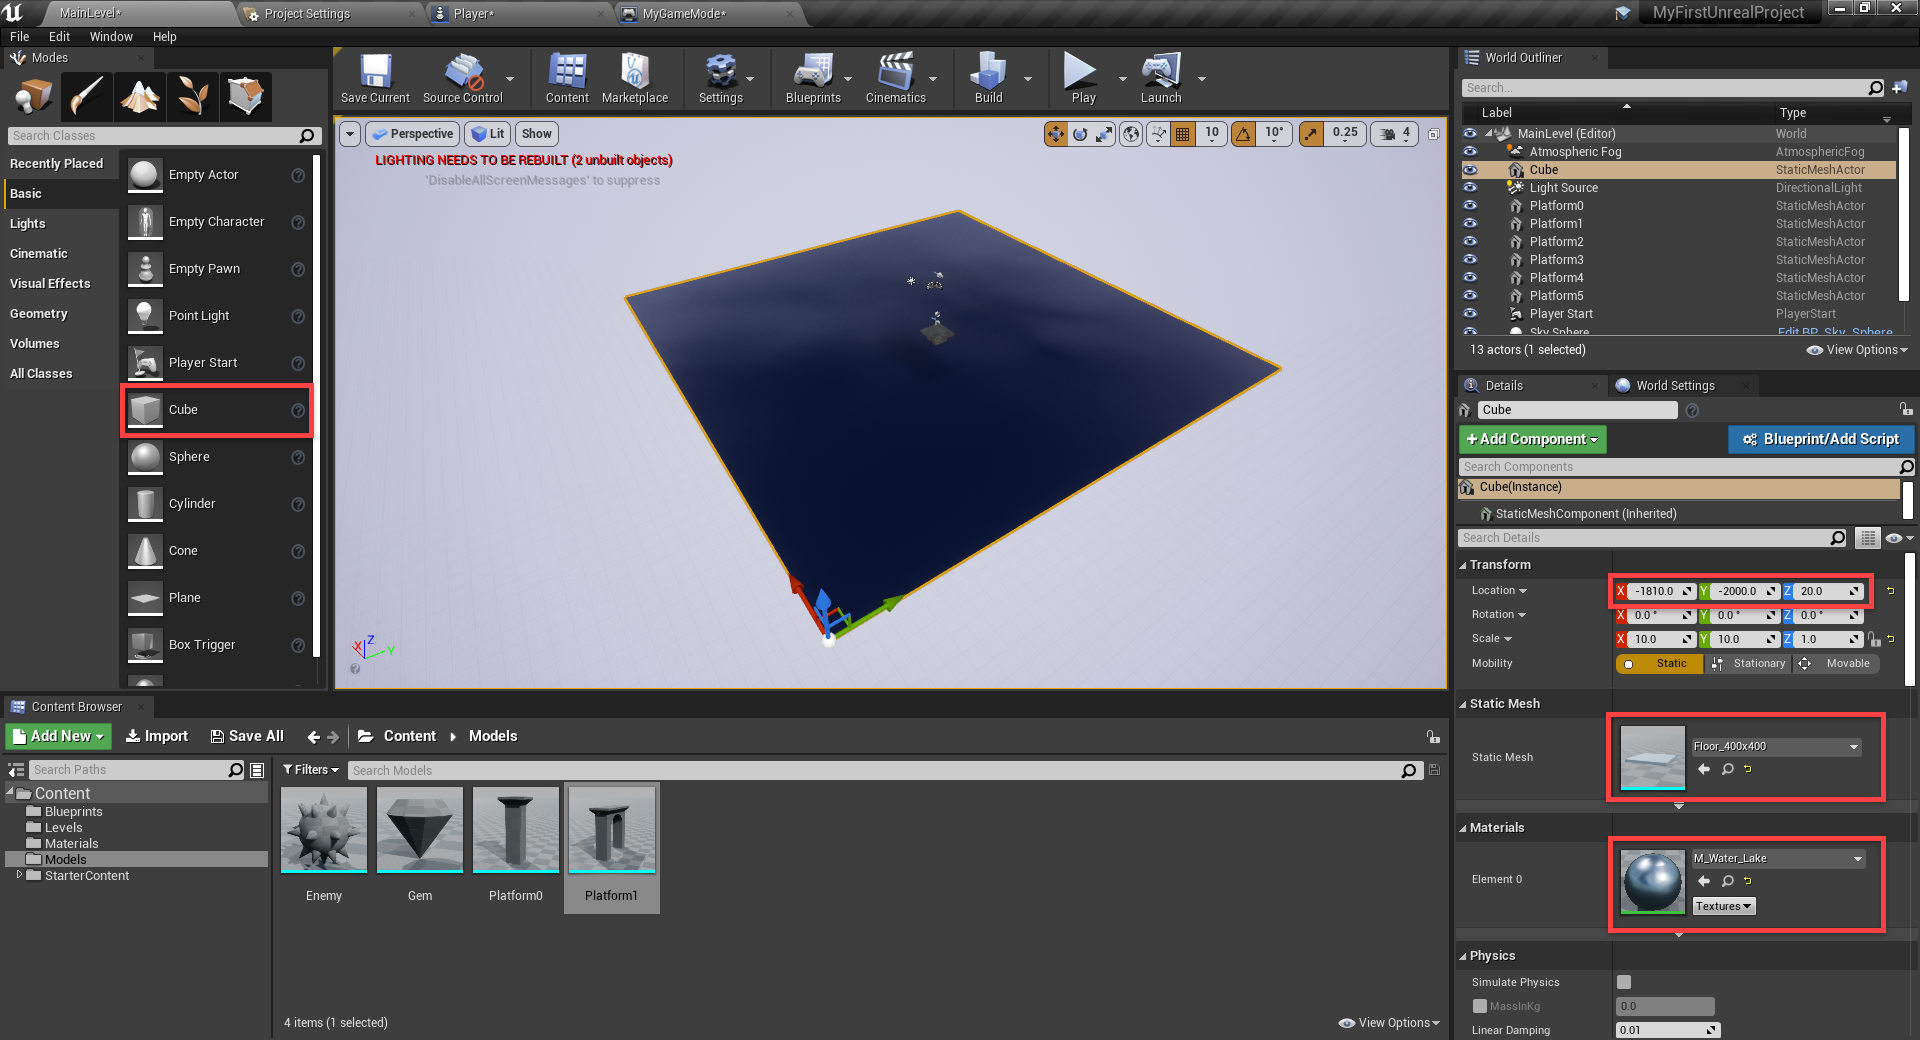
Next, we'll add in some water which will kill the player if they touch it.
In theModes panel, drag the cube object.
- Set theLocation to-1800, -2000, 20
- Set theScale to10, 10, 1
- Set theStatic Mesh toFloor_400x400
- Set theMaterial toM_Water_Lake
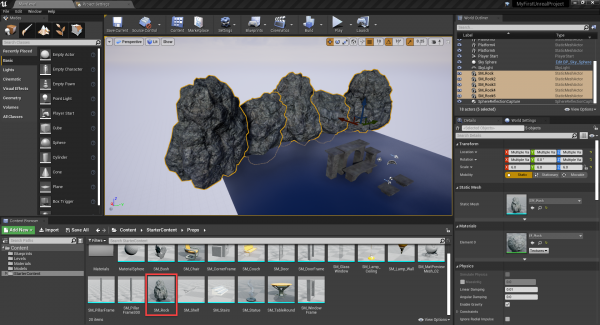
After this, we can go through and add in some more platforms.
Inside of theStarterContent/Props folder, we have aSM_Rock model. Drag that into the scene, position/scale/rotate it. We can then copy and paste it and move it around to look like the image below. This will be a good background for the level.
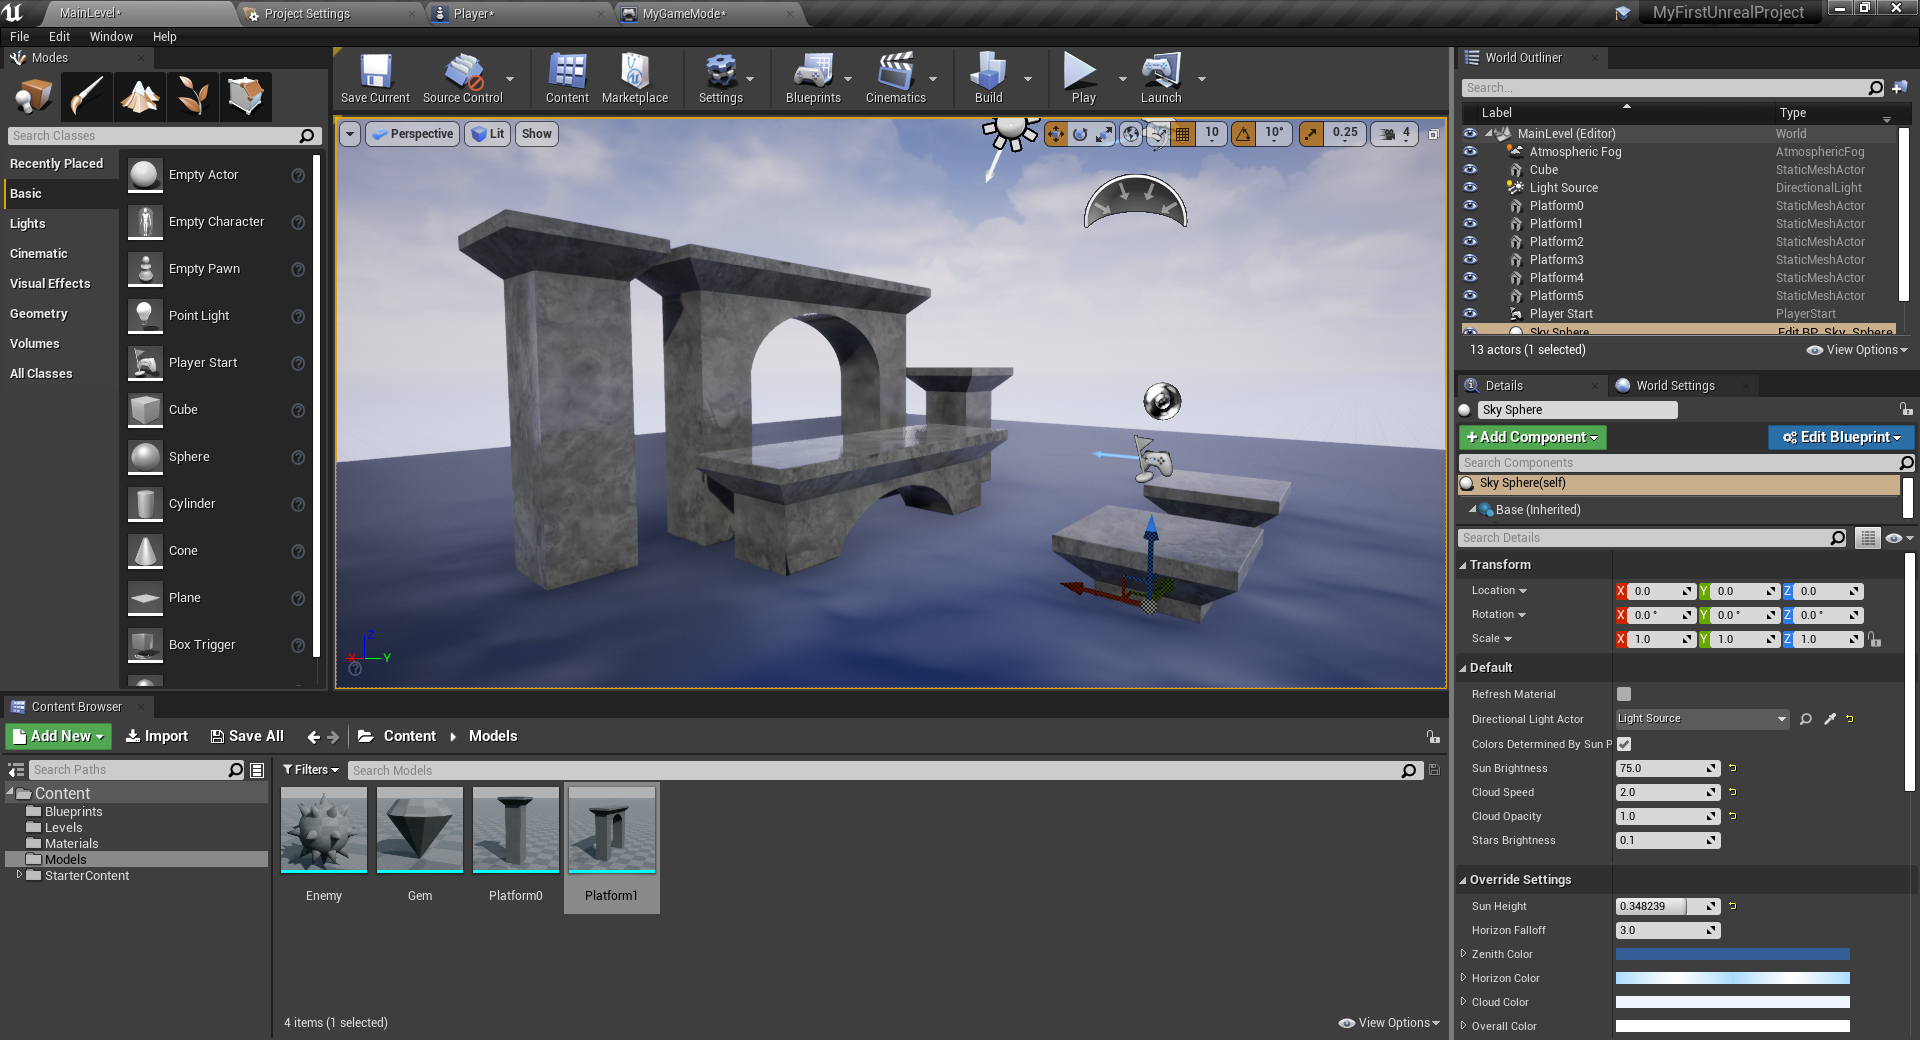
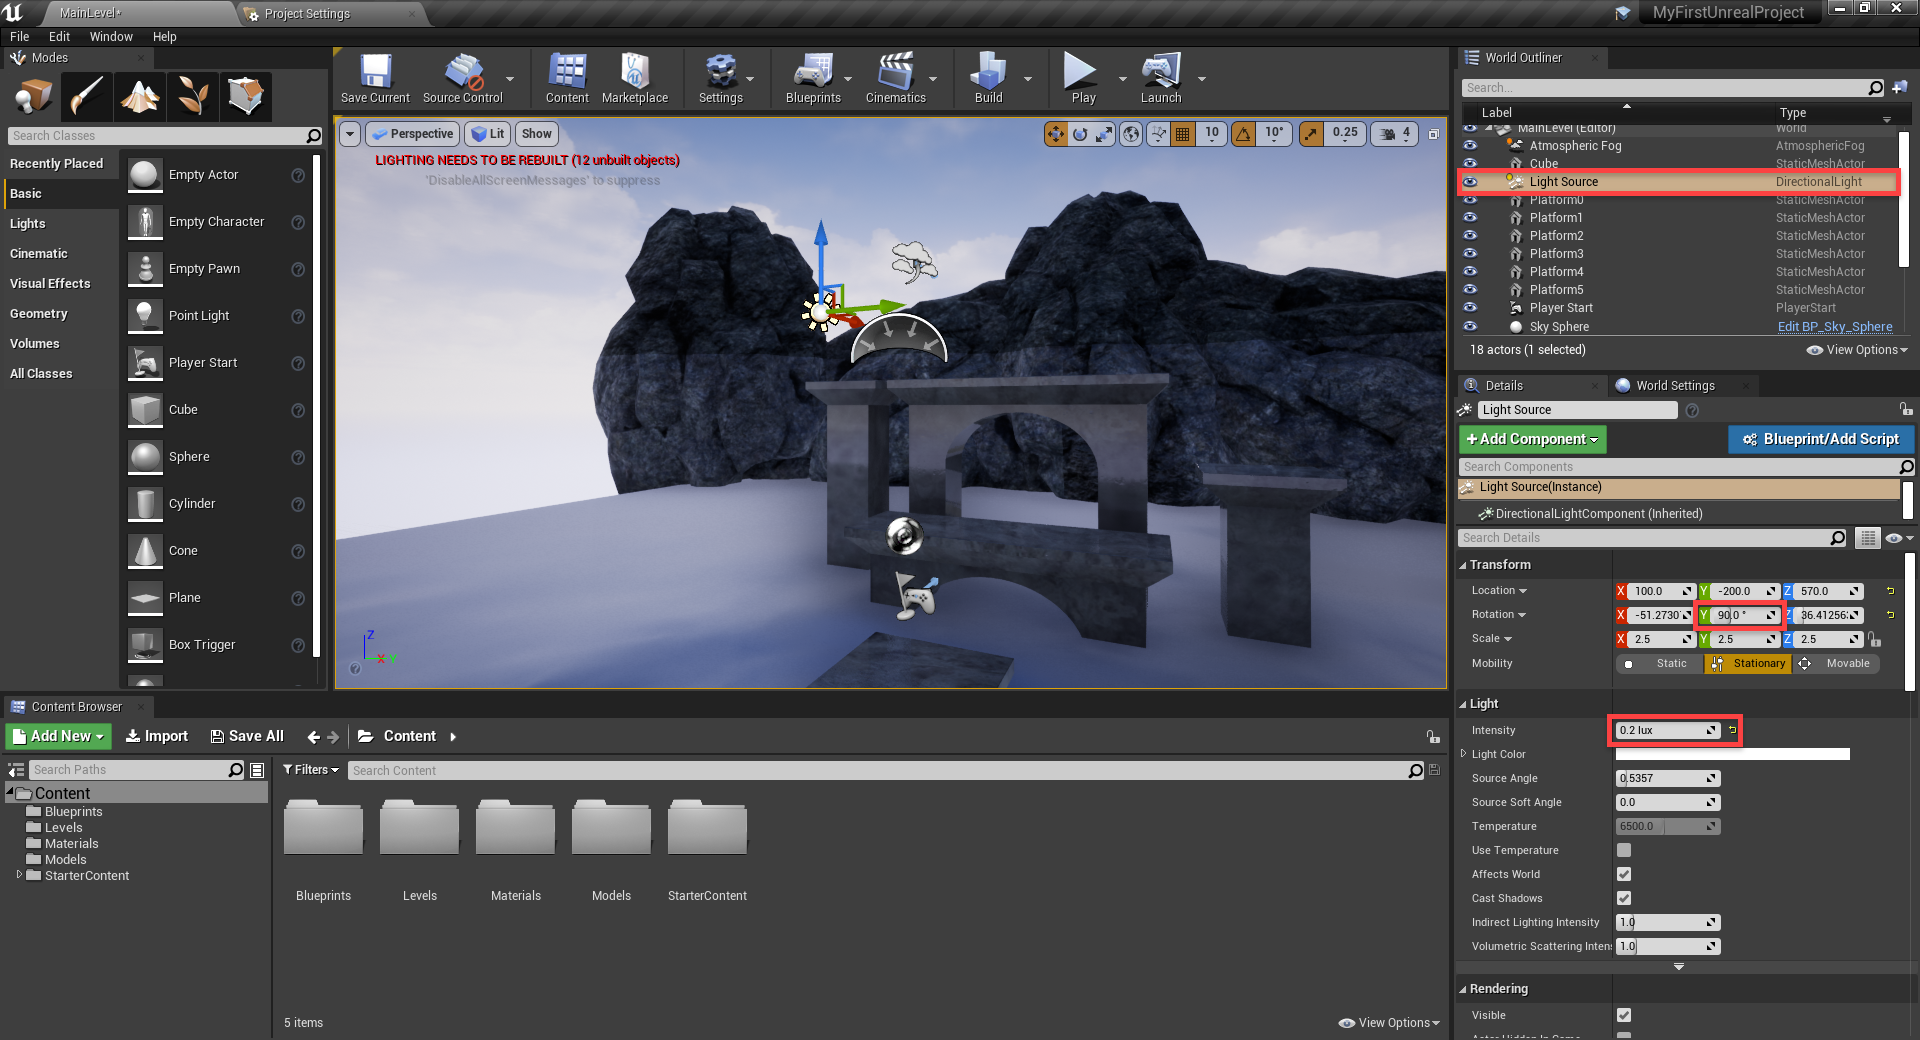
Now let's make it night time. Select theLight Source.
- Set theY Rotation to90
- Set theIntensity to0.2
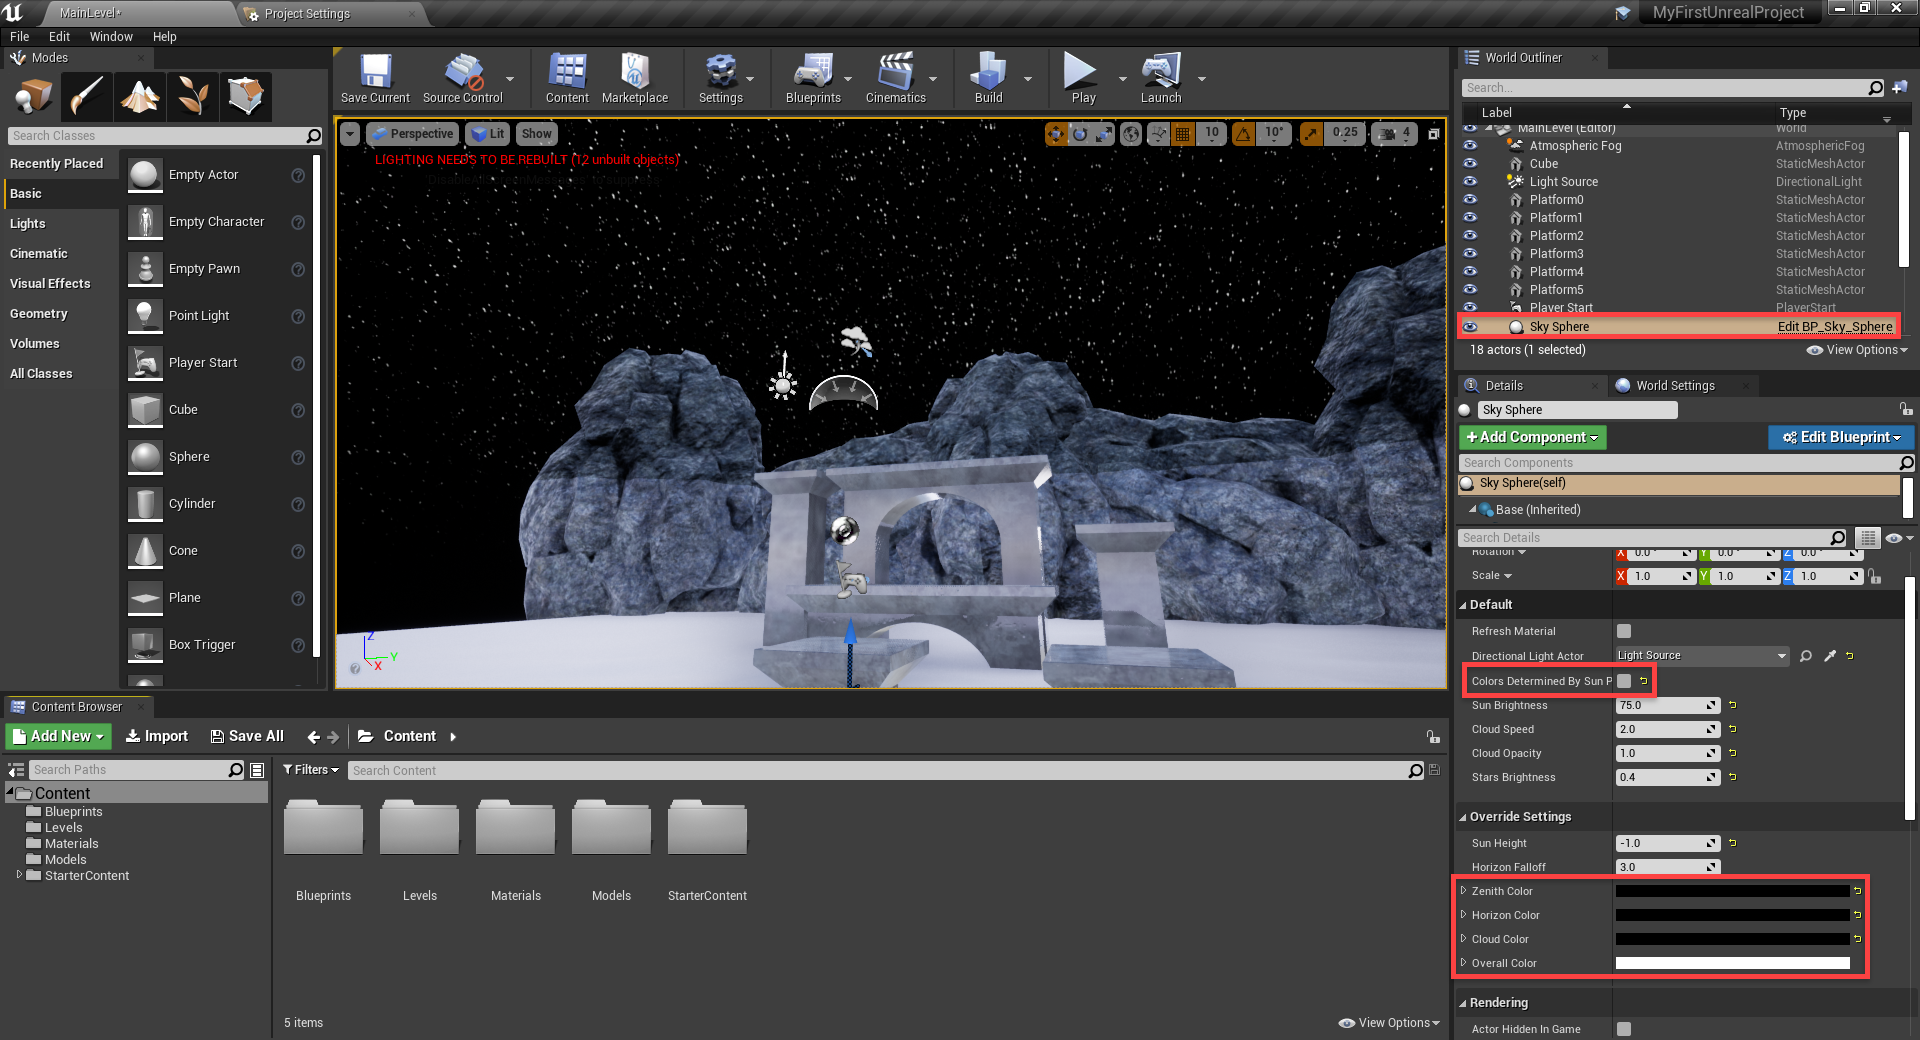
Select theSky Sphere.
- DisableColors Determined By Sun Position
- Set theZenith Color, Horizon Color andCloud Color toBlack
- Set theOverall Color toWhite
- Set theStars Brightness to0.4
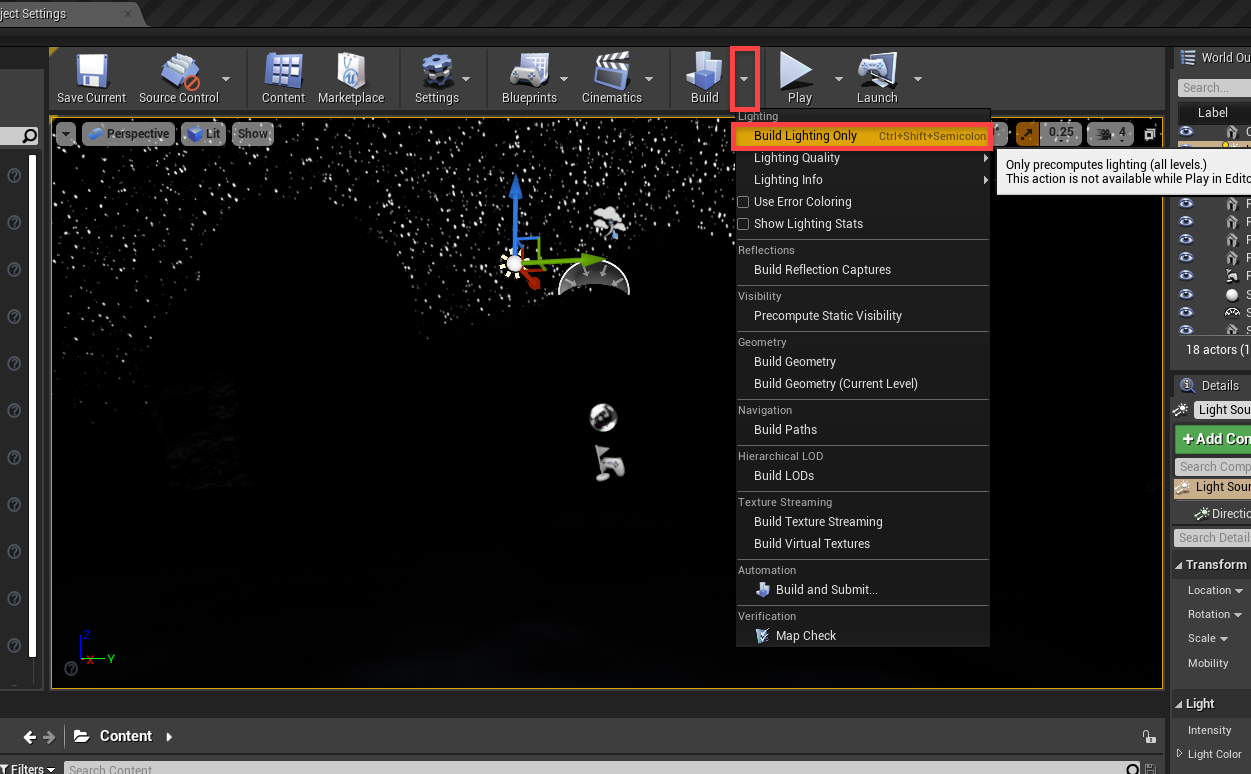
It's not dark though. To fix this, we can click on the arrow near theBuild button and selectBuild Lighting Only. This will build our lighting, causing the scene to become dark.
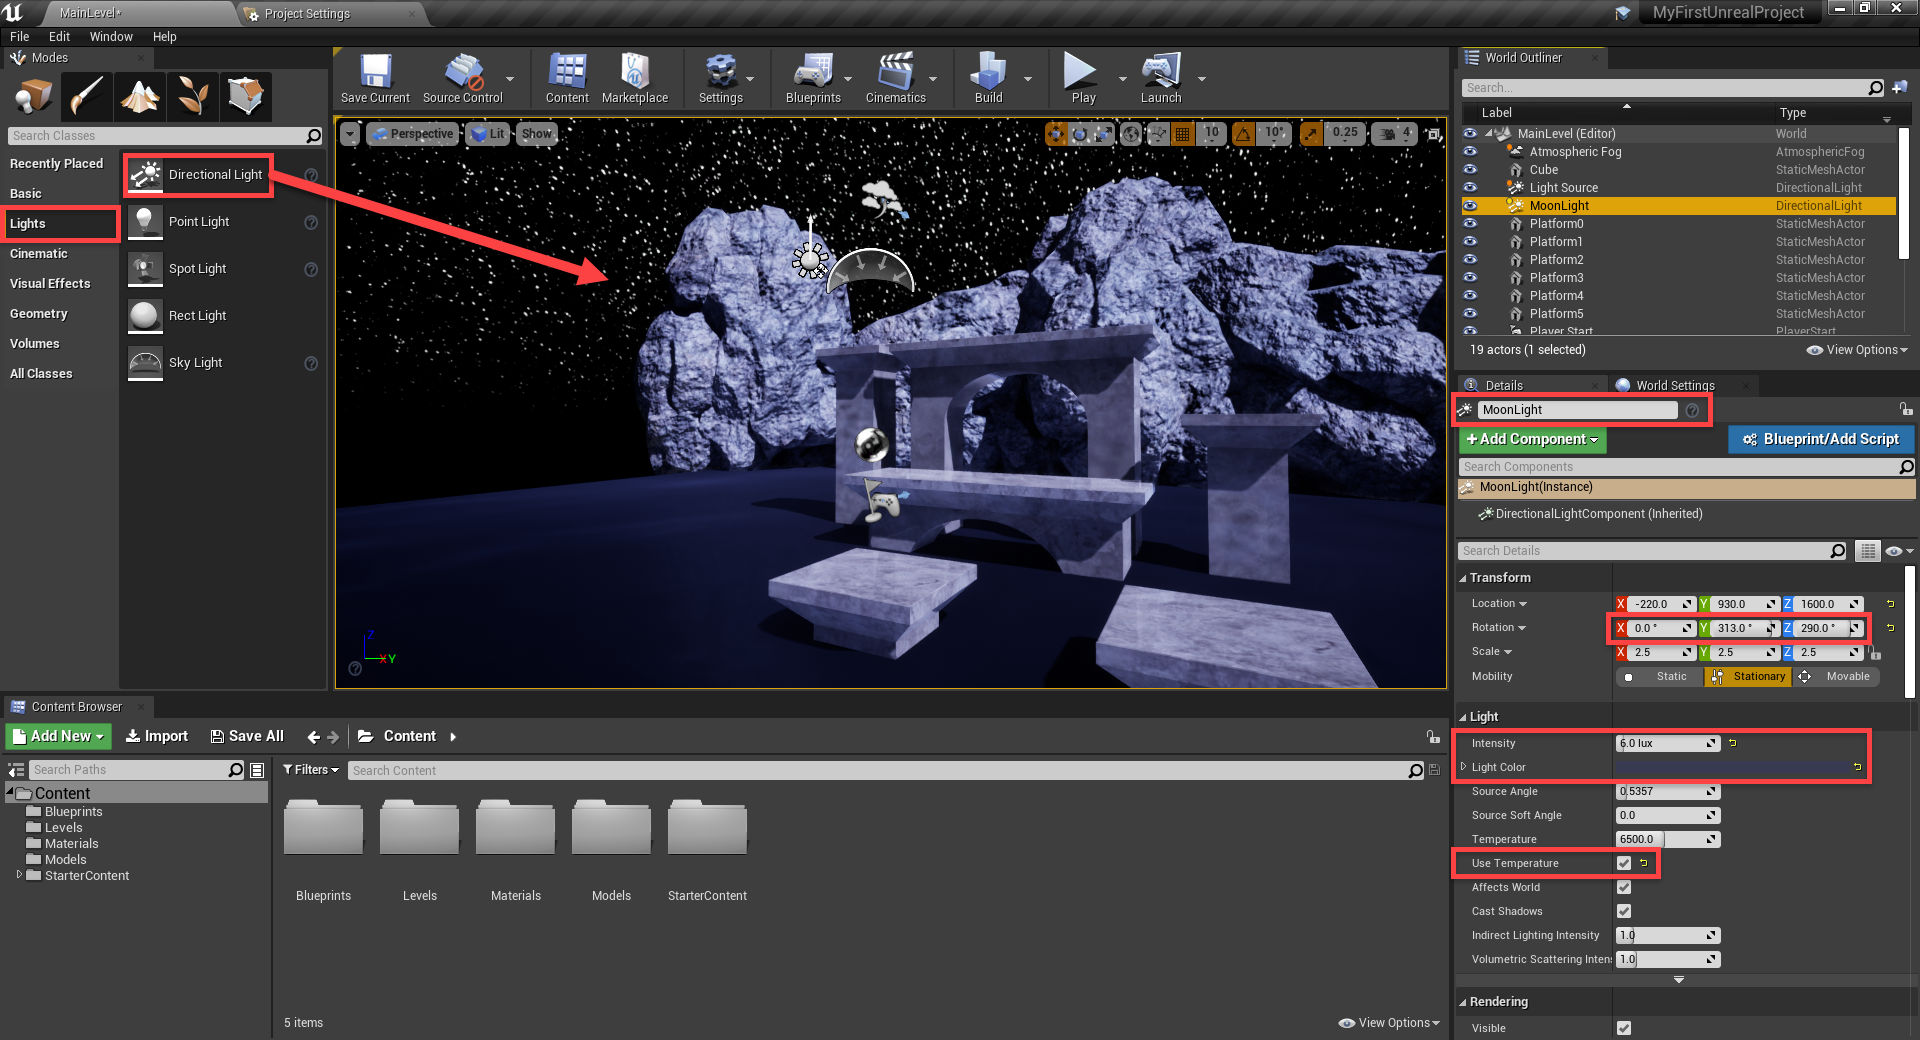
We don't want the scene to be totally dark though. In theModes panel, go to theLights tab and drag in aDirectional Light.
- Set theName toMoonLight
- Set theRotation to0, 313, 290
- Set theIntensity to6
- Set theLight Color to a dark blue (Hex Decimal: 0A0B15FF)
- EnableUse Temperature
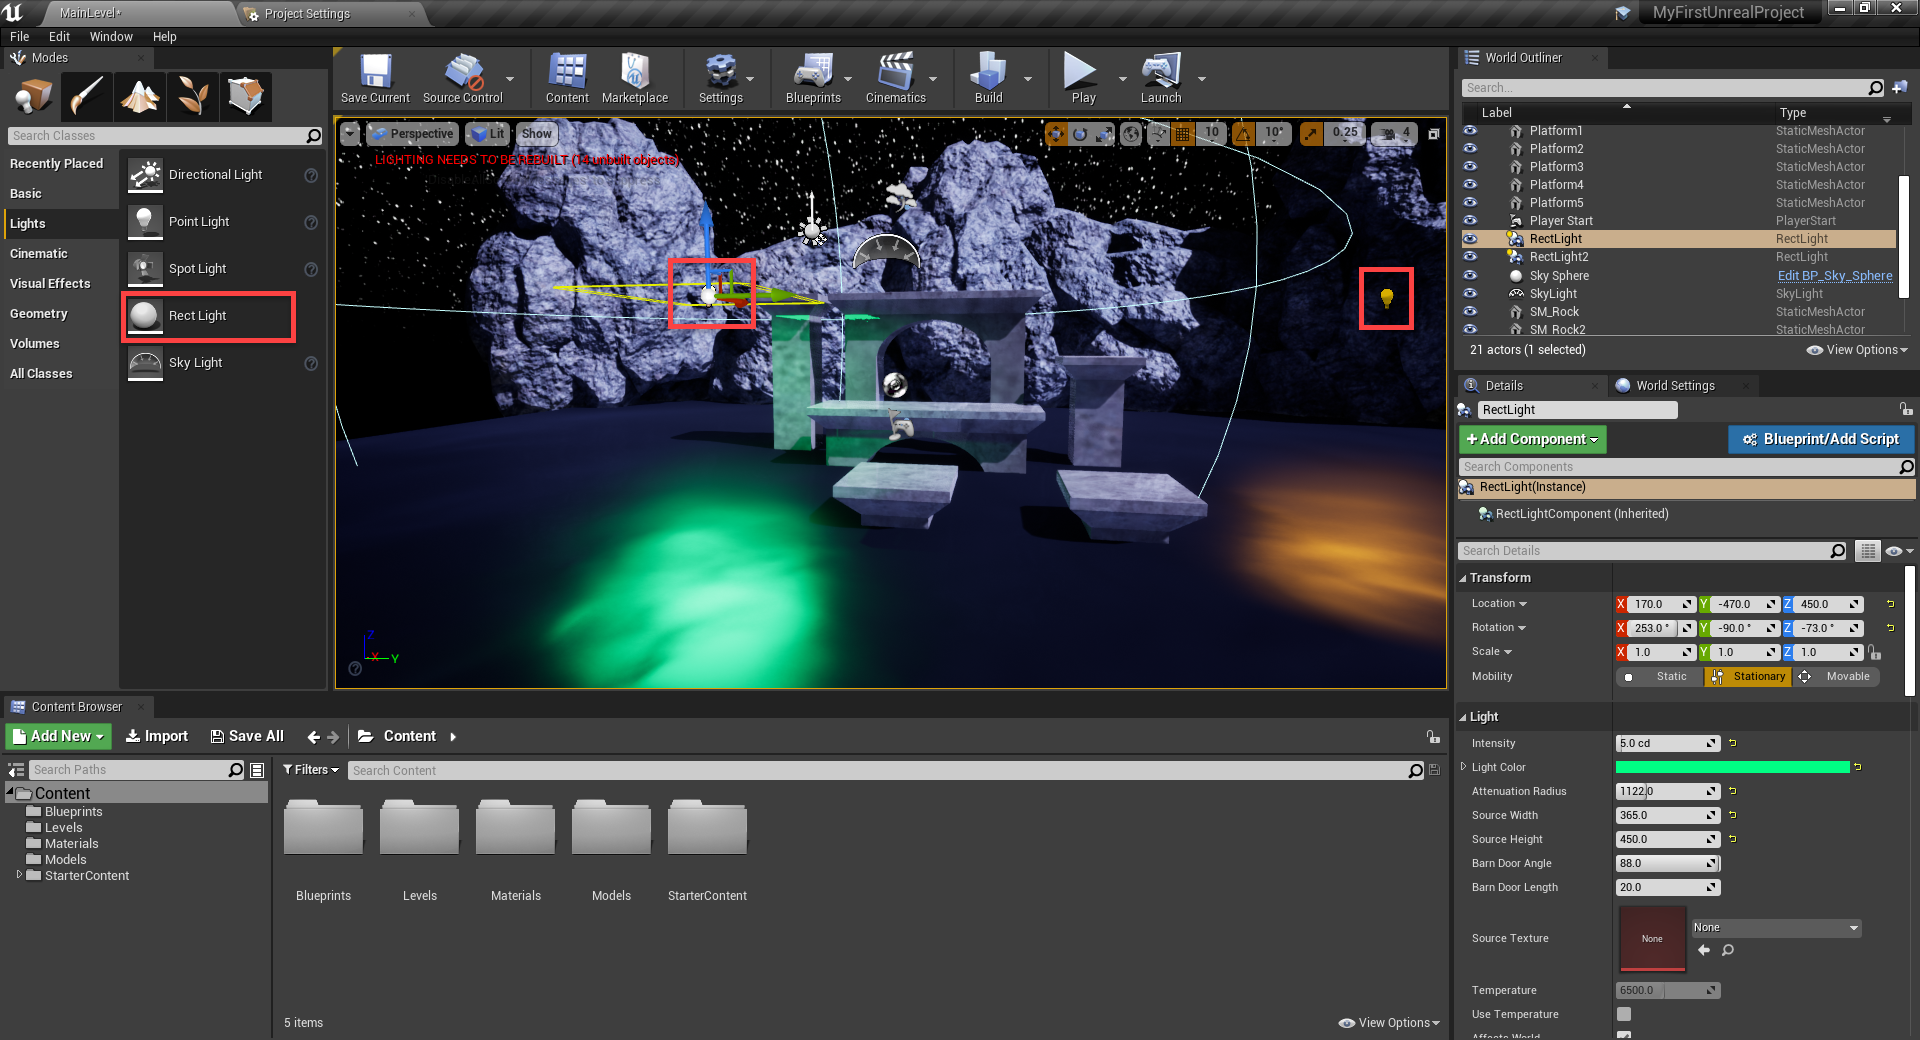
Optionally, we can also create someRect Lights of different colors to add some color. But don't go overboard, as our enemies and gems will also be emitting light.
Collectable Gems
To guide the player through the level, we're going to have some gems for them to collect. In theBlueprints folder, create a new blueprint with a parent class ofActor. Call this blueprint:Gem.
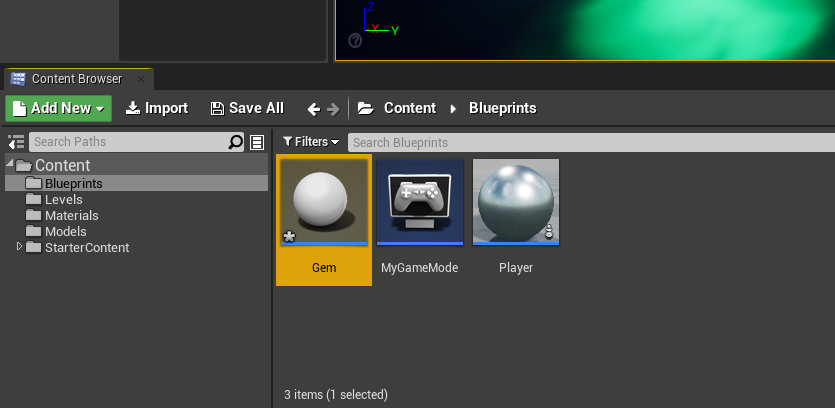
Double click on the blueprint to open up the editor. First, we need to add aStatic Mesh component and drag it onto the scene root to make it the main component.
- Set theScale to0.5, 0.5, 0.5
- Set theStatic Mesh toGem
- Set theMaterialtoGemMaterial
As a child of the mesh, add a newPoint Light component.
- Set theLight Color toYellow
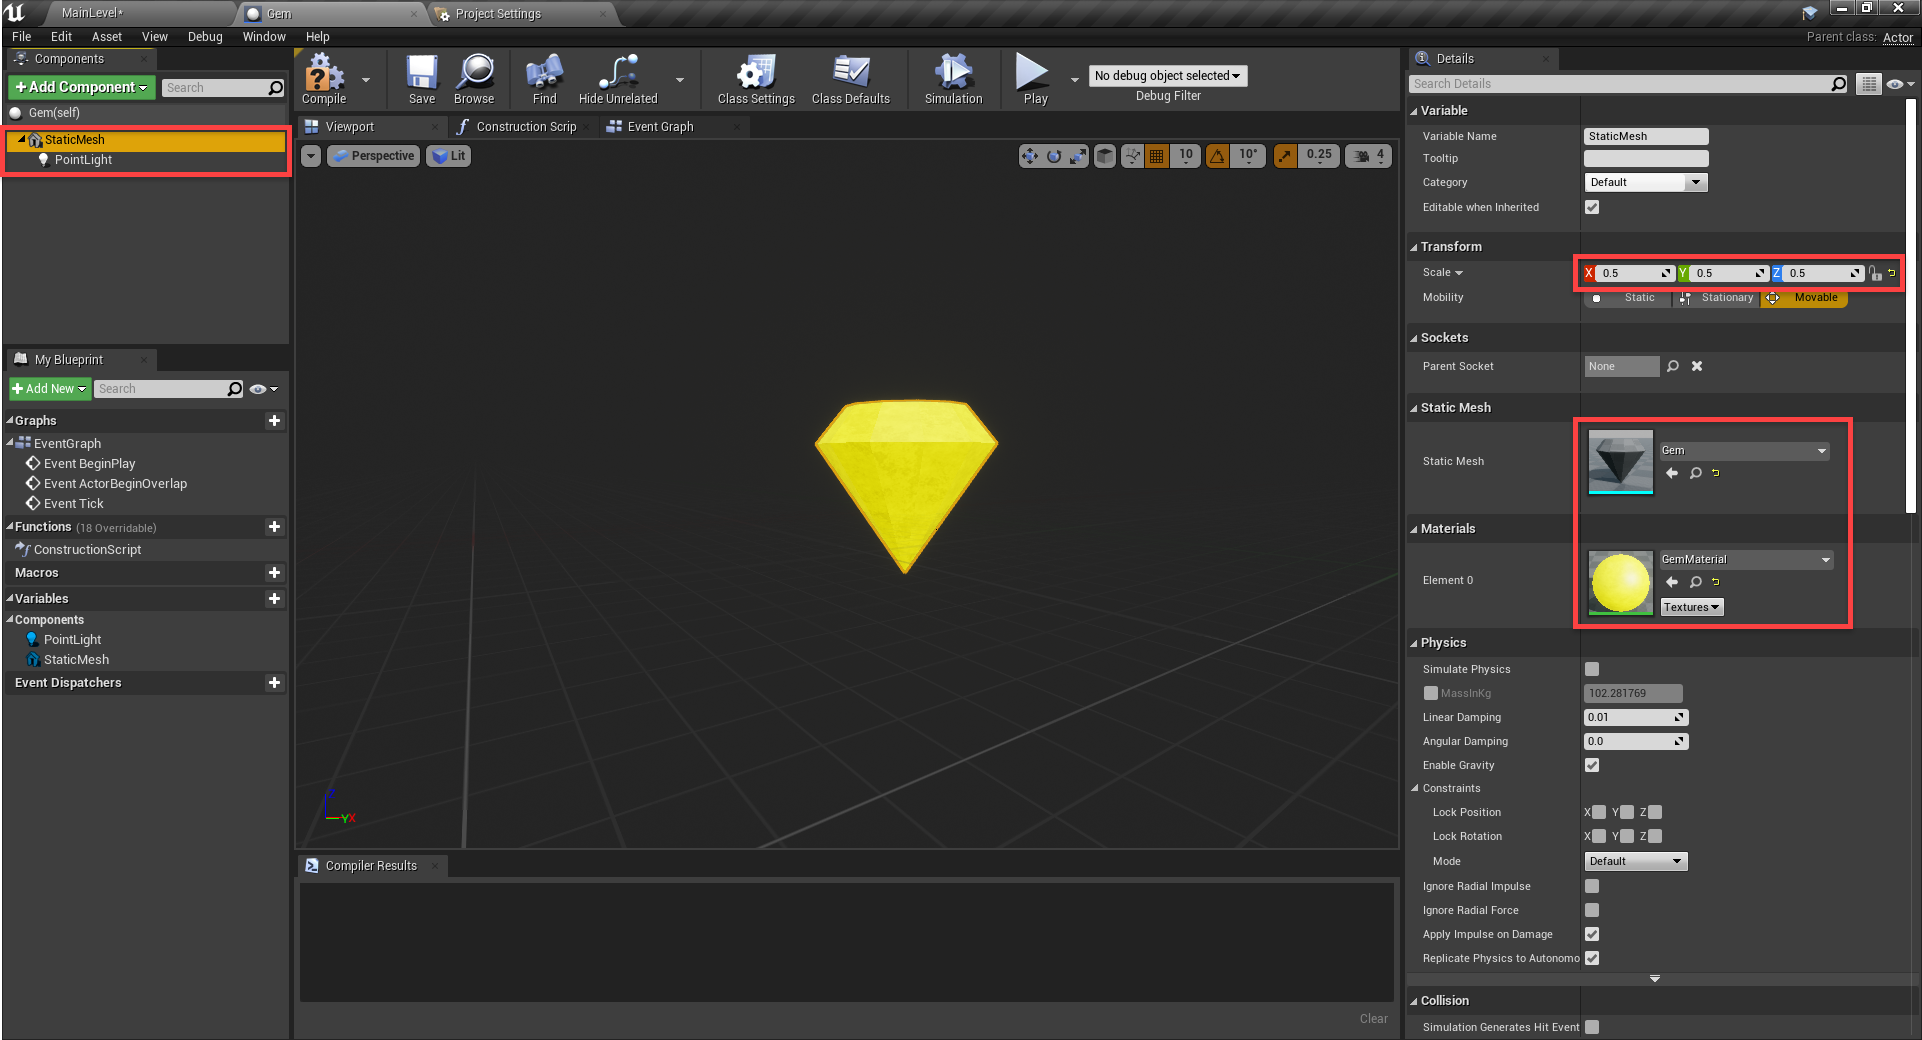
Selecting the static mesh, let's go to theDetails panel.
- EnableSimulation Generates Hit Events
- Set theCollision Presets to Trigger
- This means the gem can go through the player and detect a collision with them

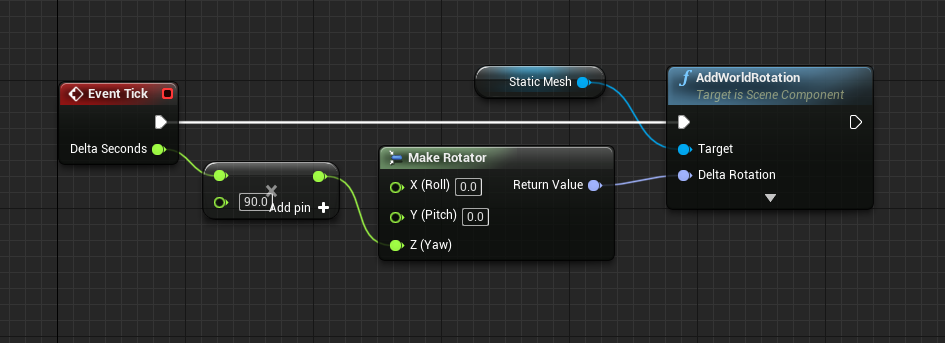
Now let's go over to theEvent Graph. Here, we want to setup the ability for the gem to rotate over time.
- Event Tick gets called every frame
- It triggers theAddWorldRotation node which will add a rotation to our existing one
- The rotation is going to be along the Z (vertical) axis, 90 degrees a second
Save that, then go back to the level editor. Here, we can drag in the blueprint to create a new object. Place the gem on top of the platform like this.
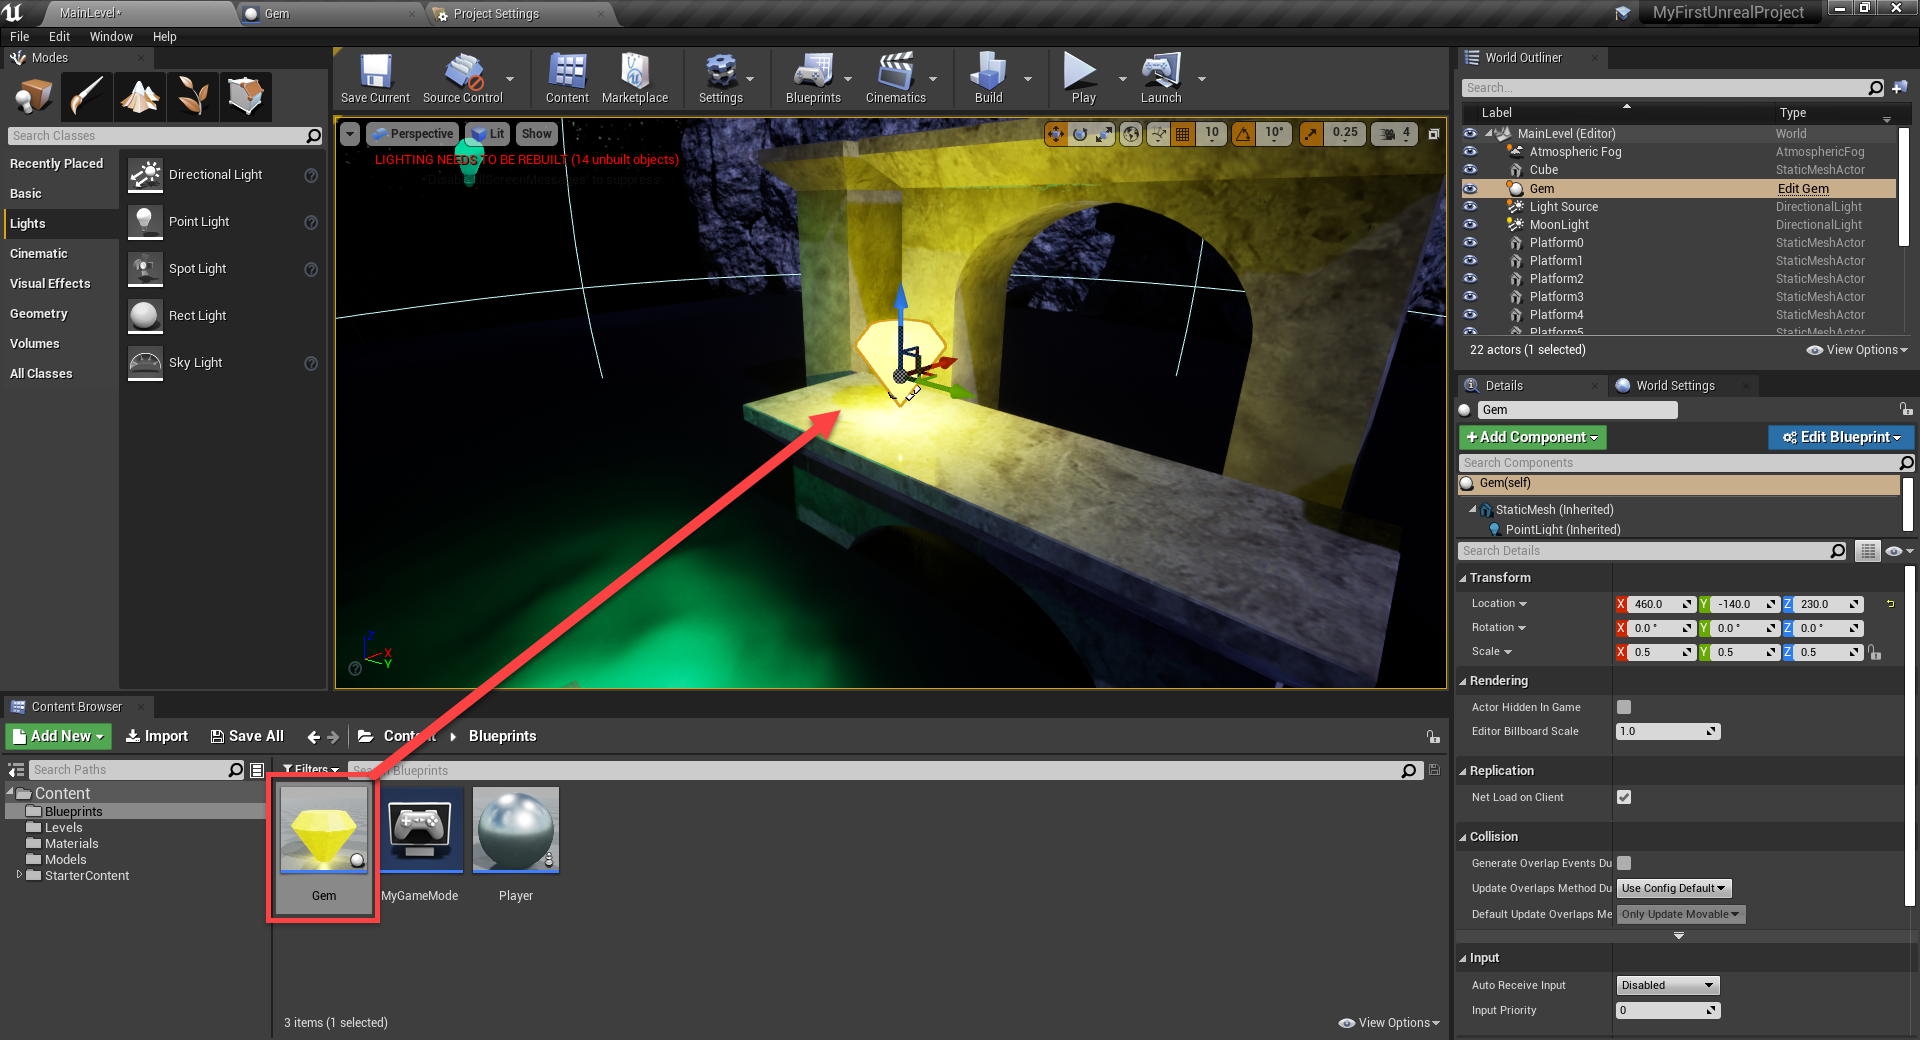
We can then press thePlay button and see that it rotates!
Now we need the gems to give the player some sort of score. Inside of the gem's blueprint graph, let's create a new variable calledScoreToGive of typeInteger (whole number). Also enableInstance Editable. This means that when we create one of these gems in the level, we can set the score to give individually. Each gem can have a different score from the rest. Click theCompile button to make these changes appear in the level editor.
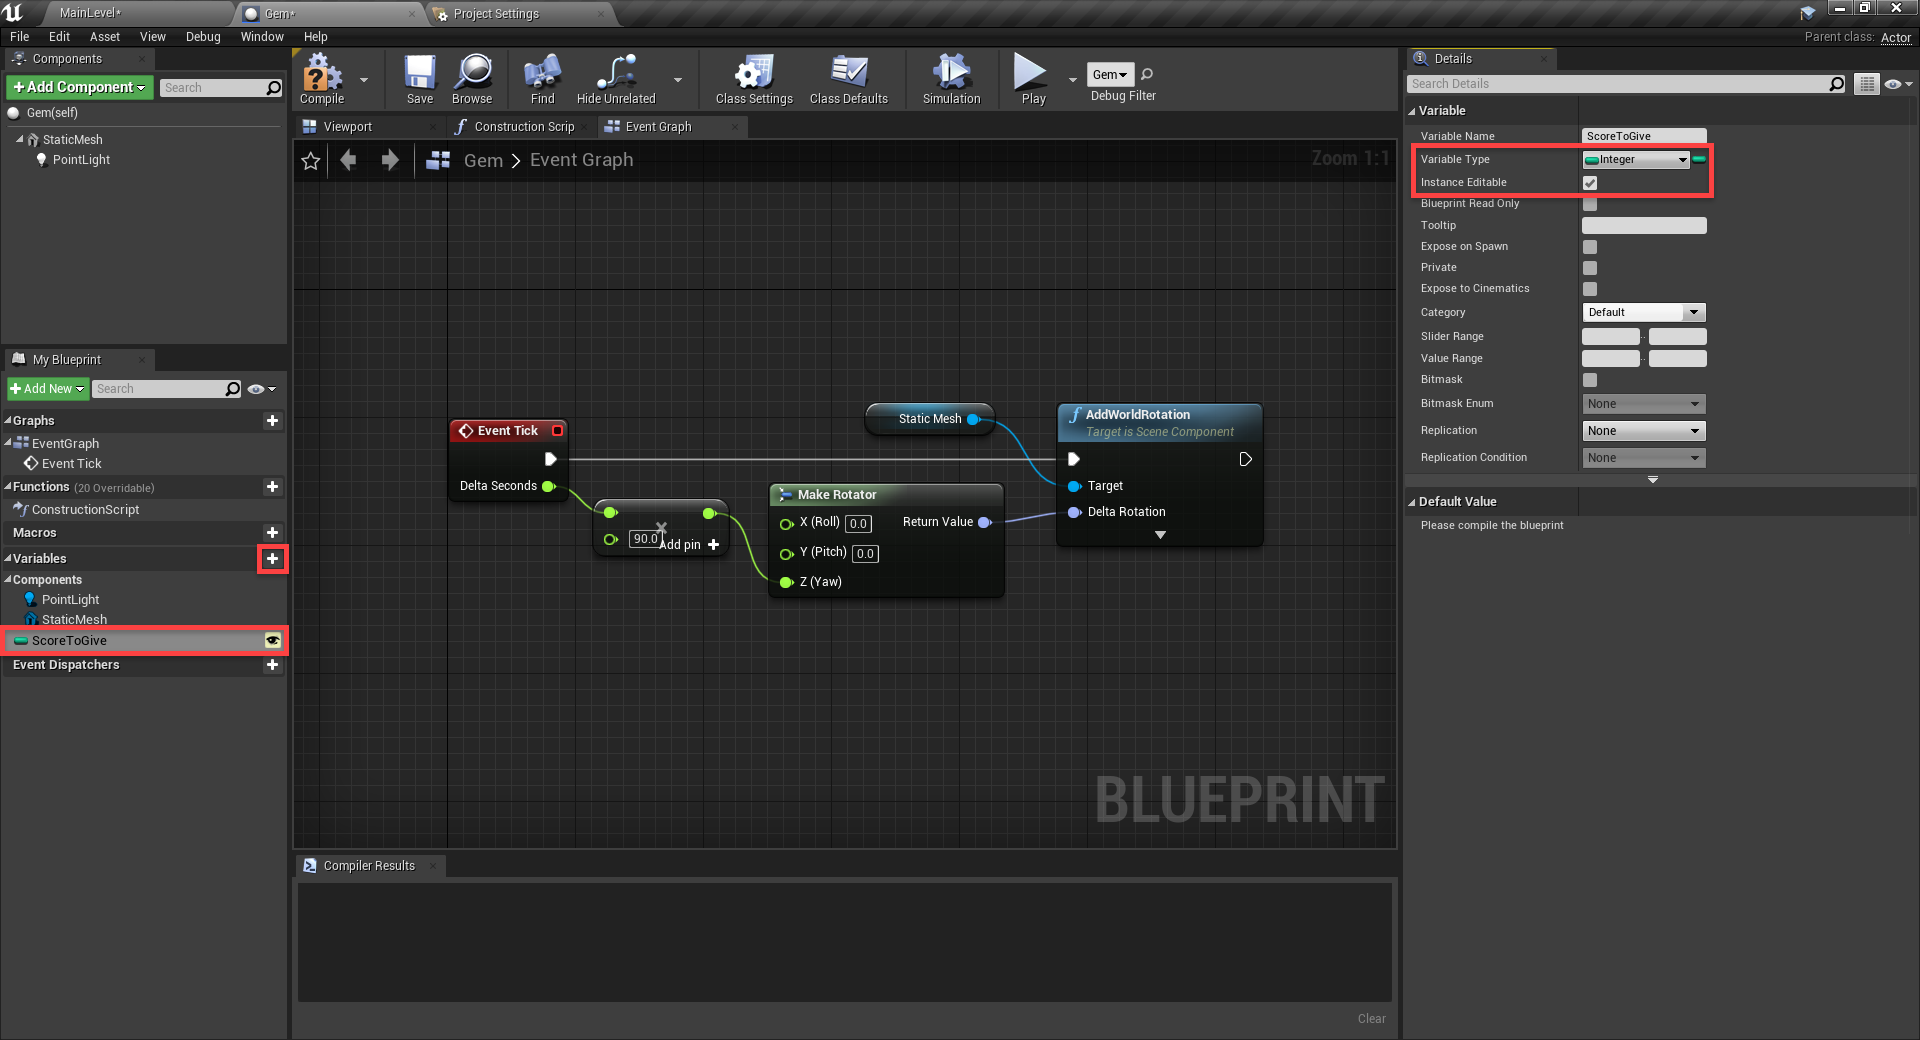
We don't have any score to add to yet. So let's go to thePlayer blueprint and create a new integer variable calledScore.
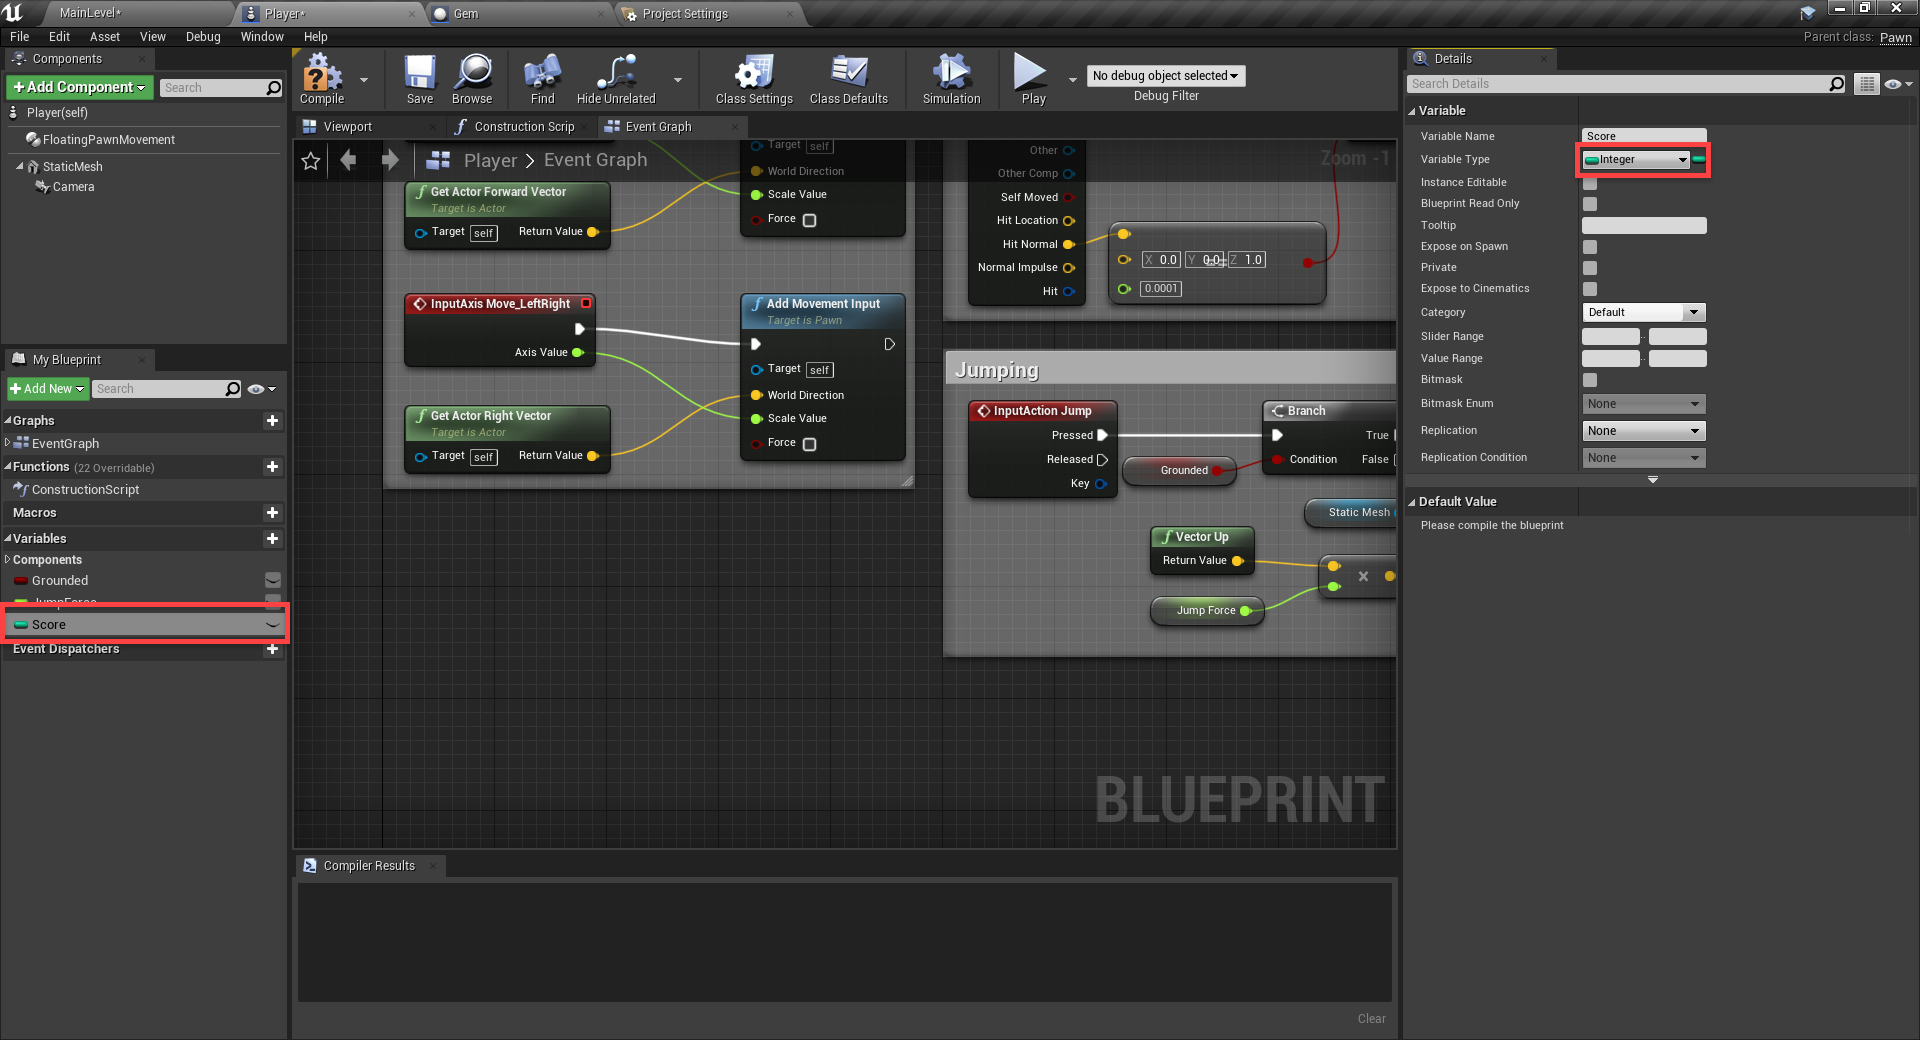
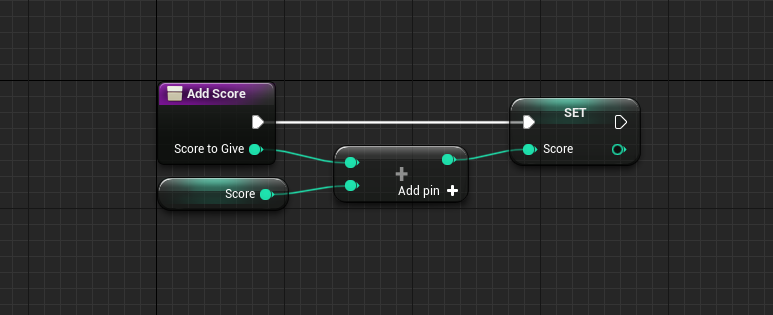
Next, let's create a new function (click on the+ next toFunctions in theMy Blueprint panel) and call itAddScore. A function is basically a bunch of logic that can be triggered whenever we want. So from the gem script, we could call theAddScore function, and the logic in that blueprint will trigger.
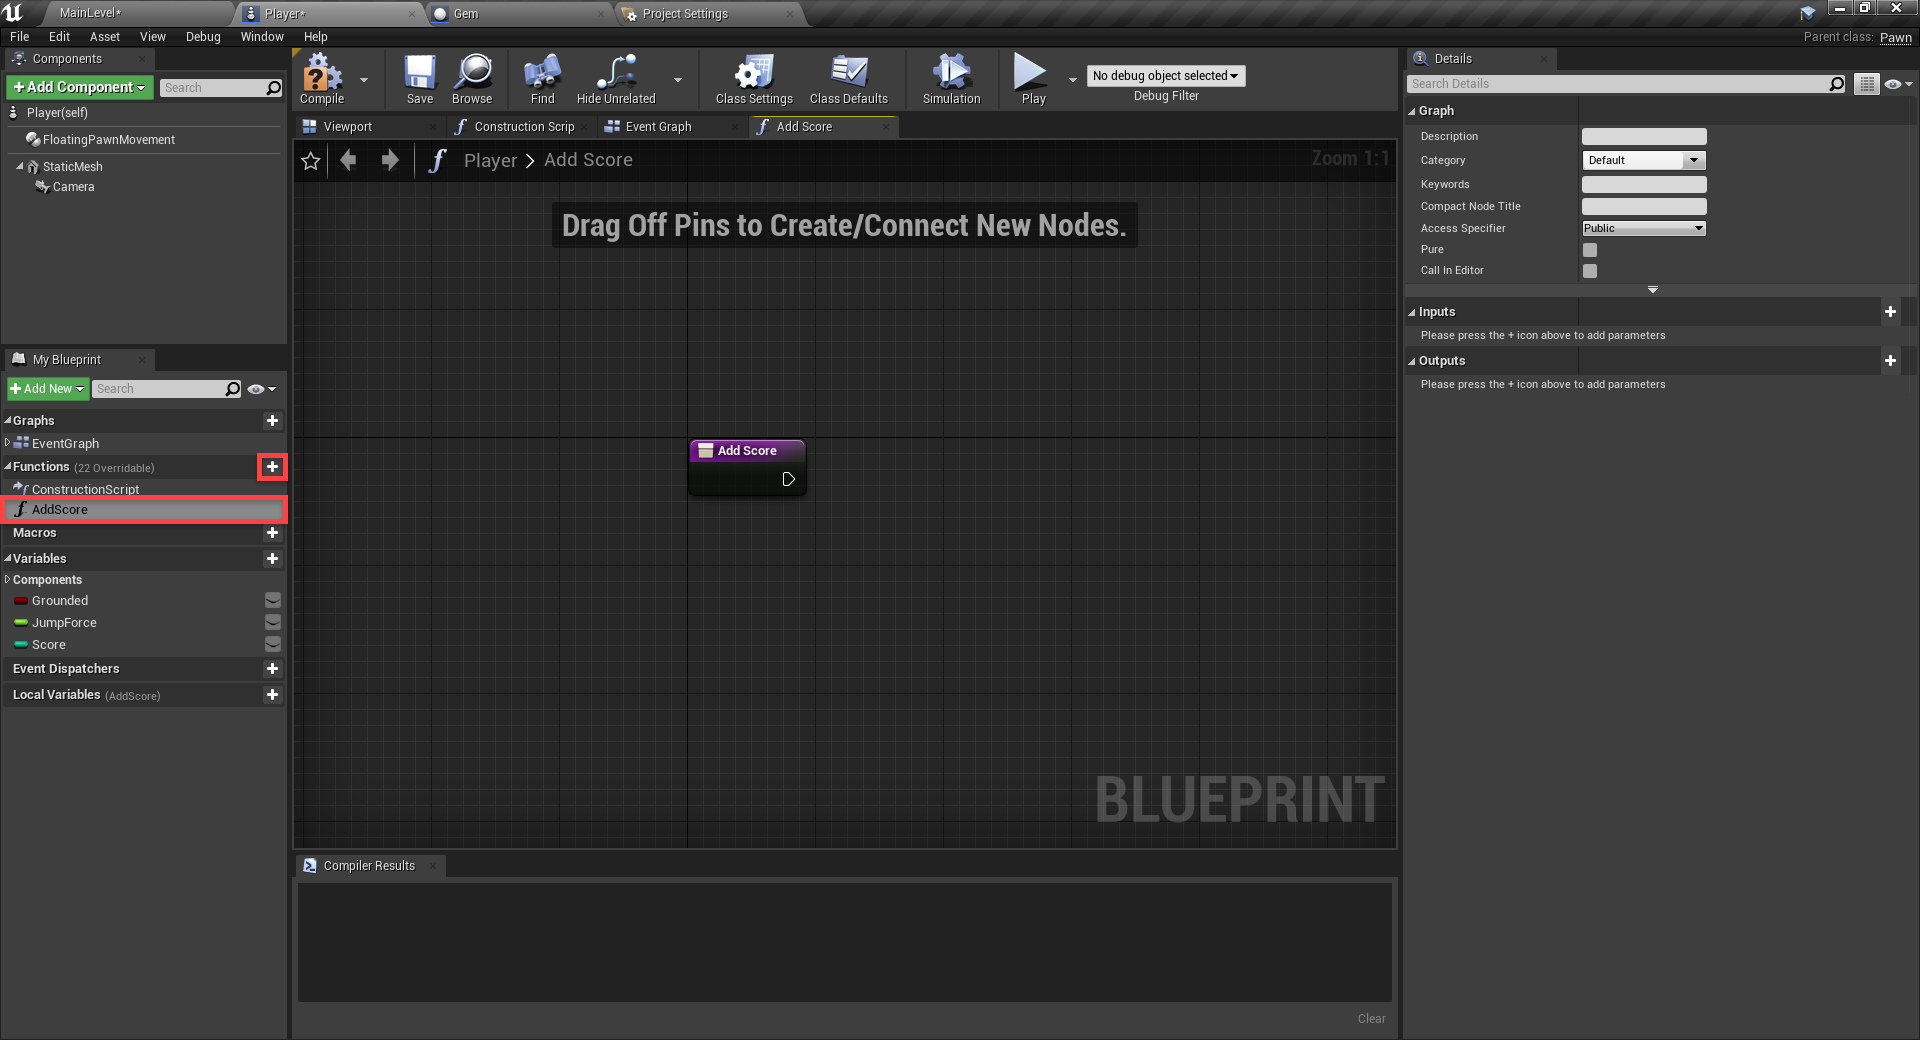
Functions can have inputs and outputs. For add score, we want an input on the amount of score to give to the player.
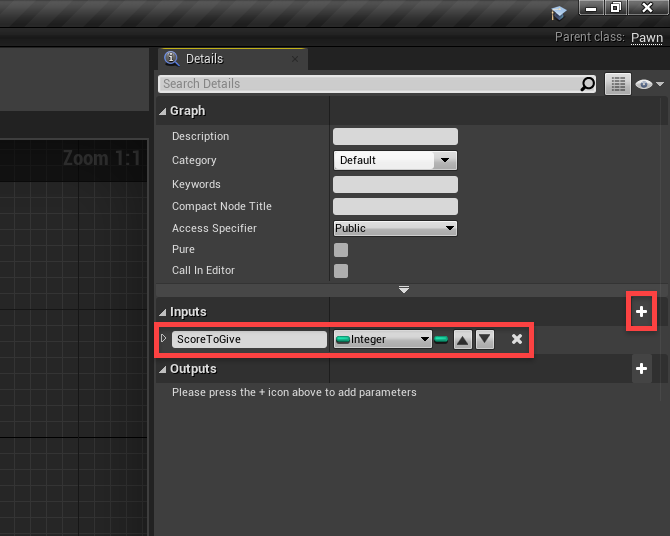
What we want to do in this function is add theScore to Give to ourScore.
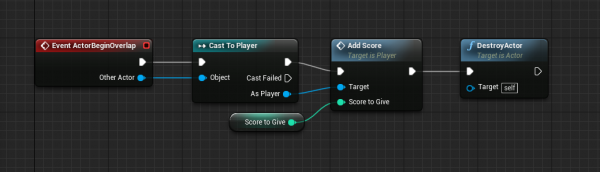
Back in theGem blueprint, let's implement the ability to collect it.
- TheEvent ActorBeginOverlap node gets triggered when another object has entered our collider.
- We then take the object that collided with us and try to cast it to thePlayer class.
- This basically converts the reference to a player blueprint so we can access the player specific things.
- If the cast was successful, we're going to call theAddScore function on the player.
- Then theDestroyActor node will destroy the gem.
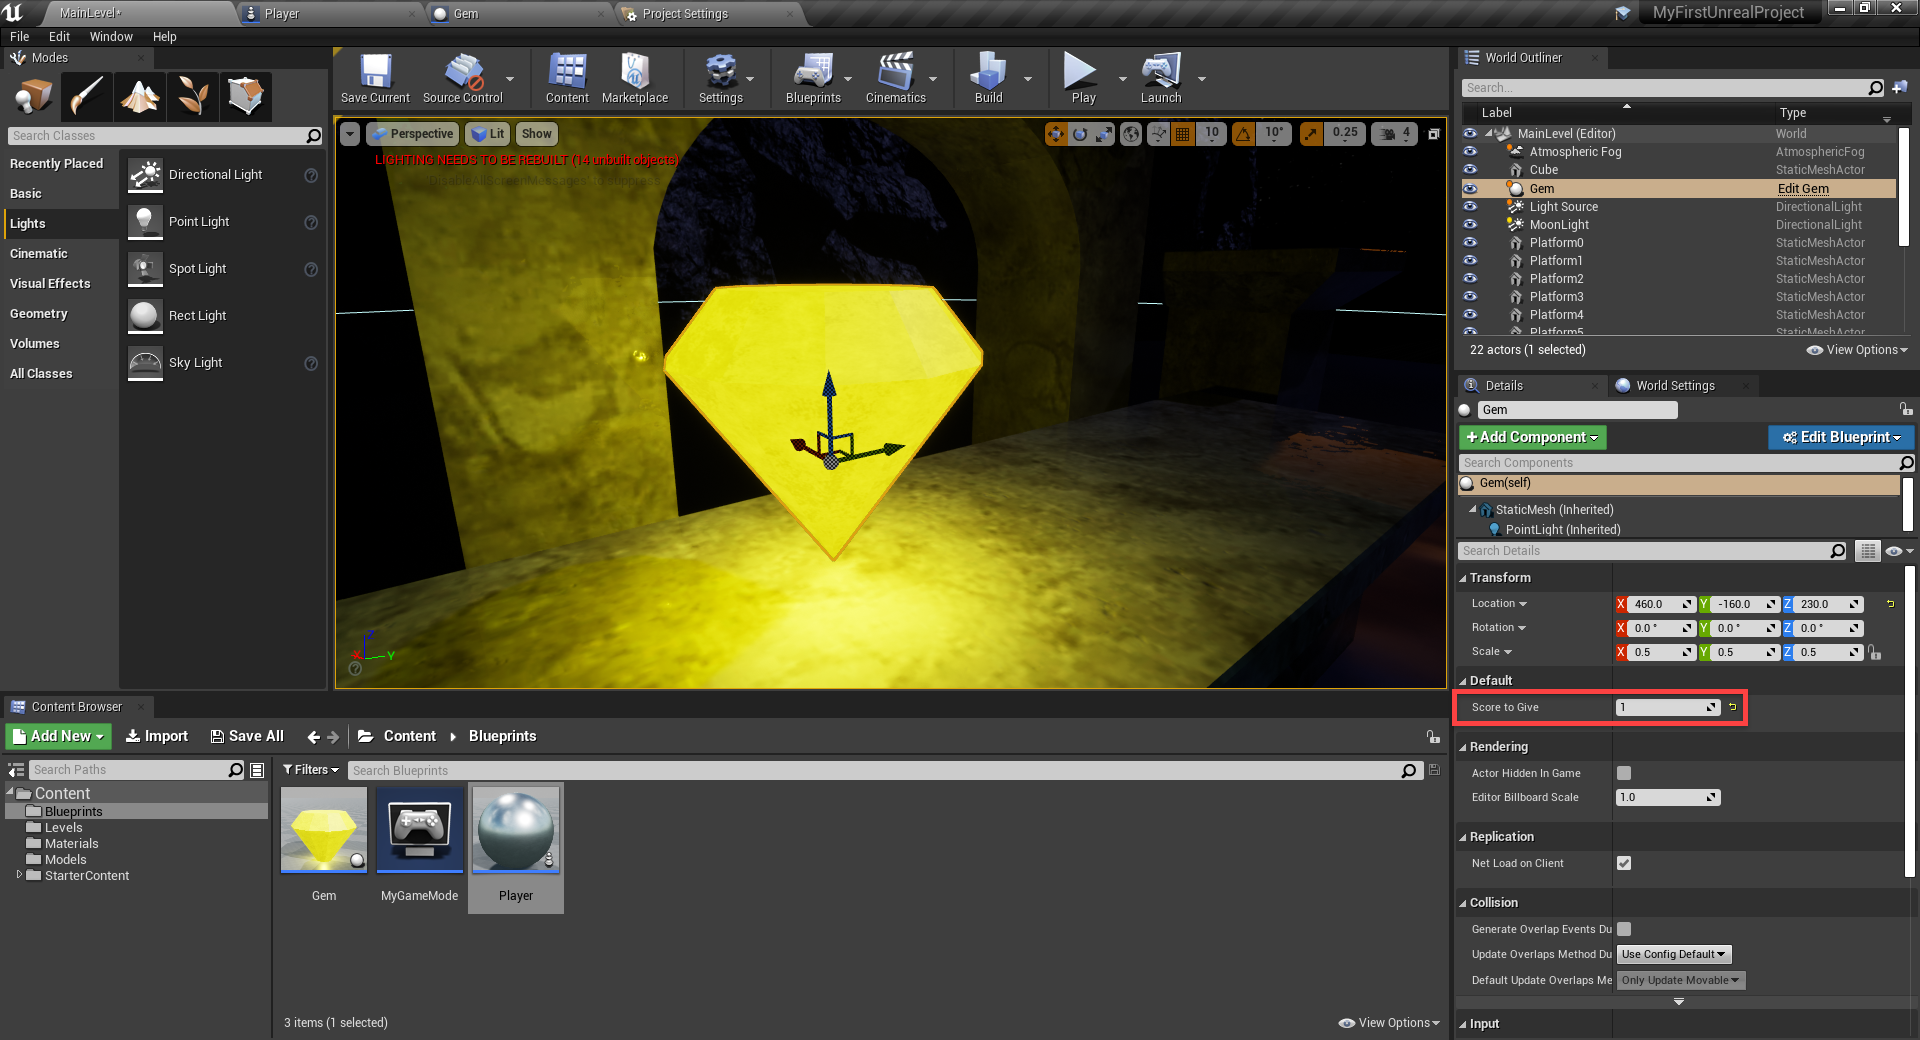
Let's now go back to the level editor. Select the gem and you should see aScore to Give property in the details panel. Set that to1.
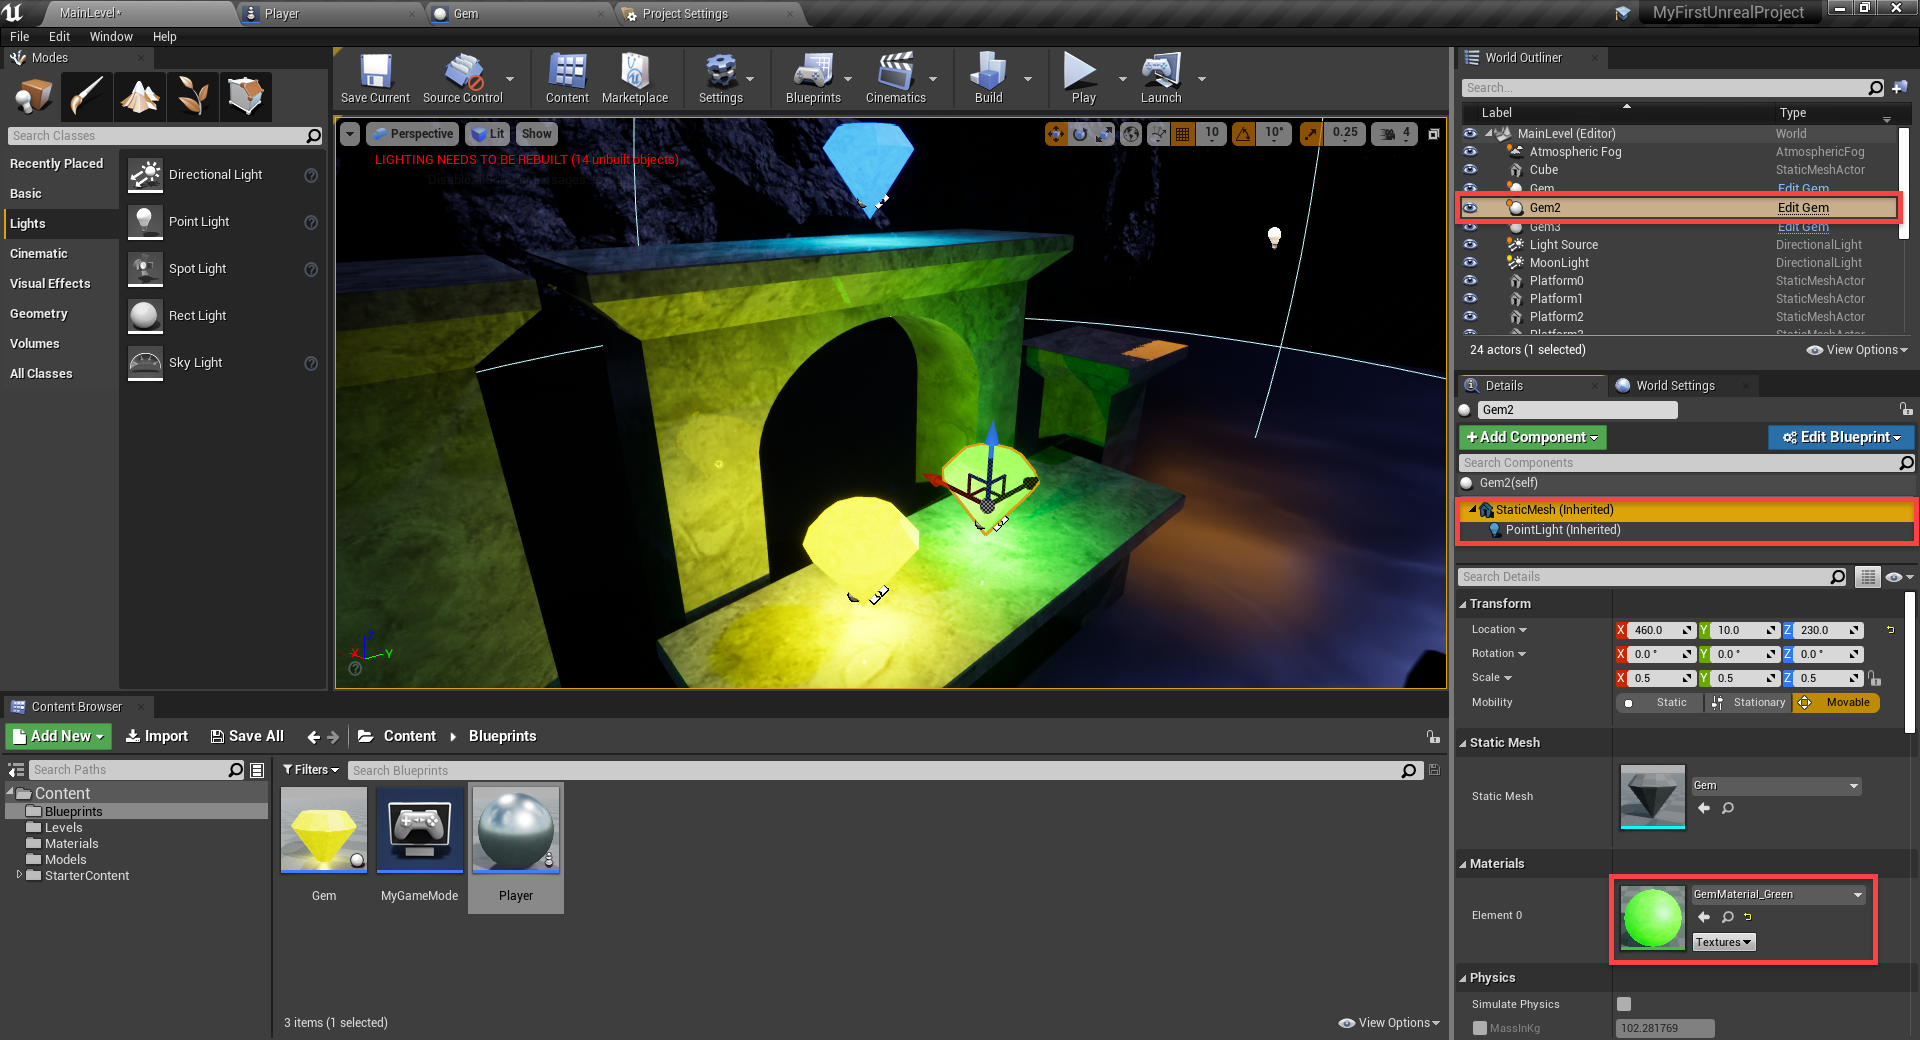
Let's also create multiple gems of different values. Copy and paste a gem…
- In theDetailspanel, select theStatic Mesh component
- Set theMaterial toGemMaterial_Green
- In theDetailspanel, select thePoint Light component
- Set theLight Color togreen
We can also change the score to give value.
Resetting the Player
Right now when the player hits the water, nothing happens. What we want to do, is reset the level when the player "dies". So in thePlayer blueprint, create a new function calledDie.
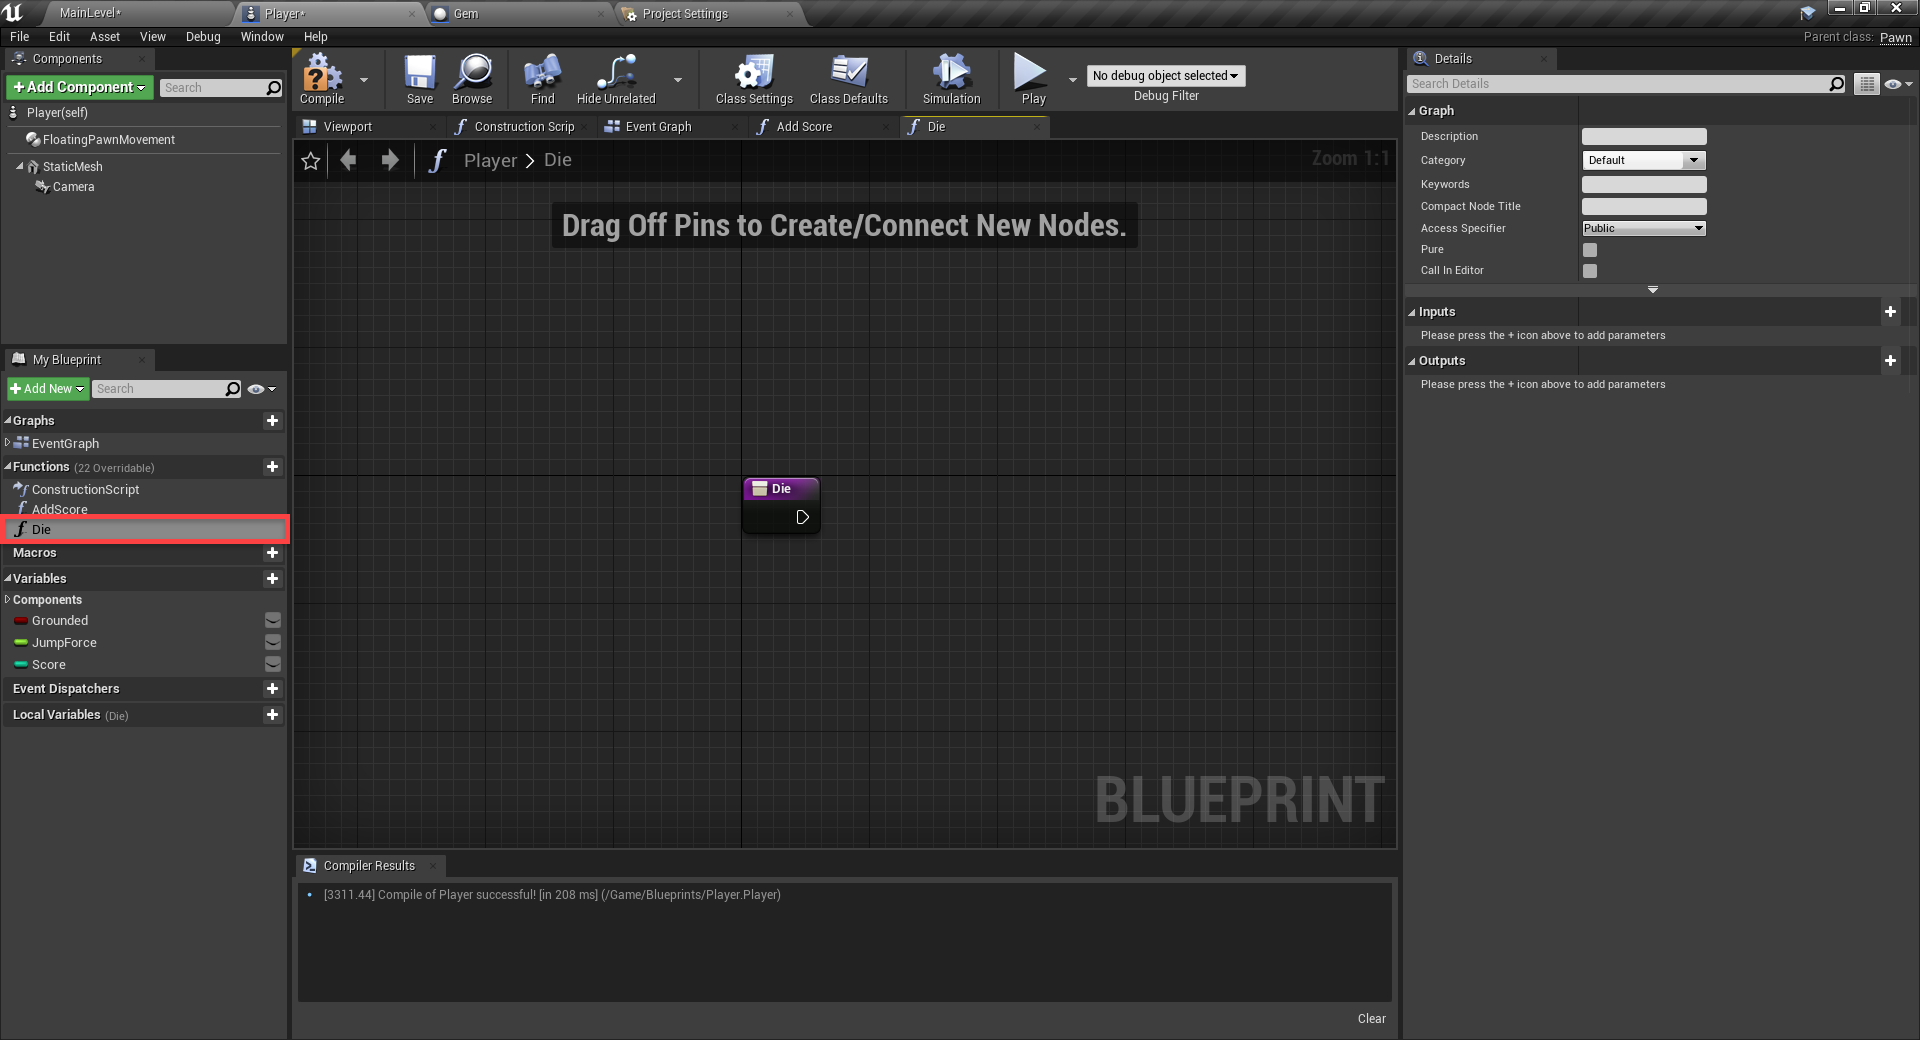
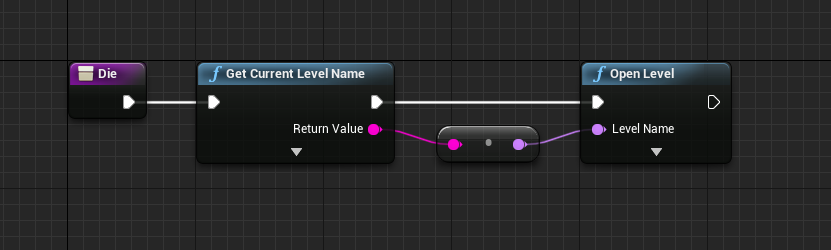
This function will reset the current level.
- We first get the name of the current level.
- Then we trigger theOpen Level node, inputting the level name.
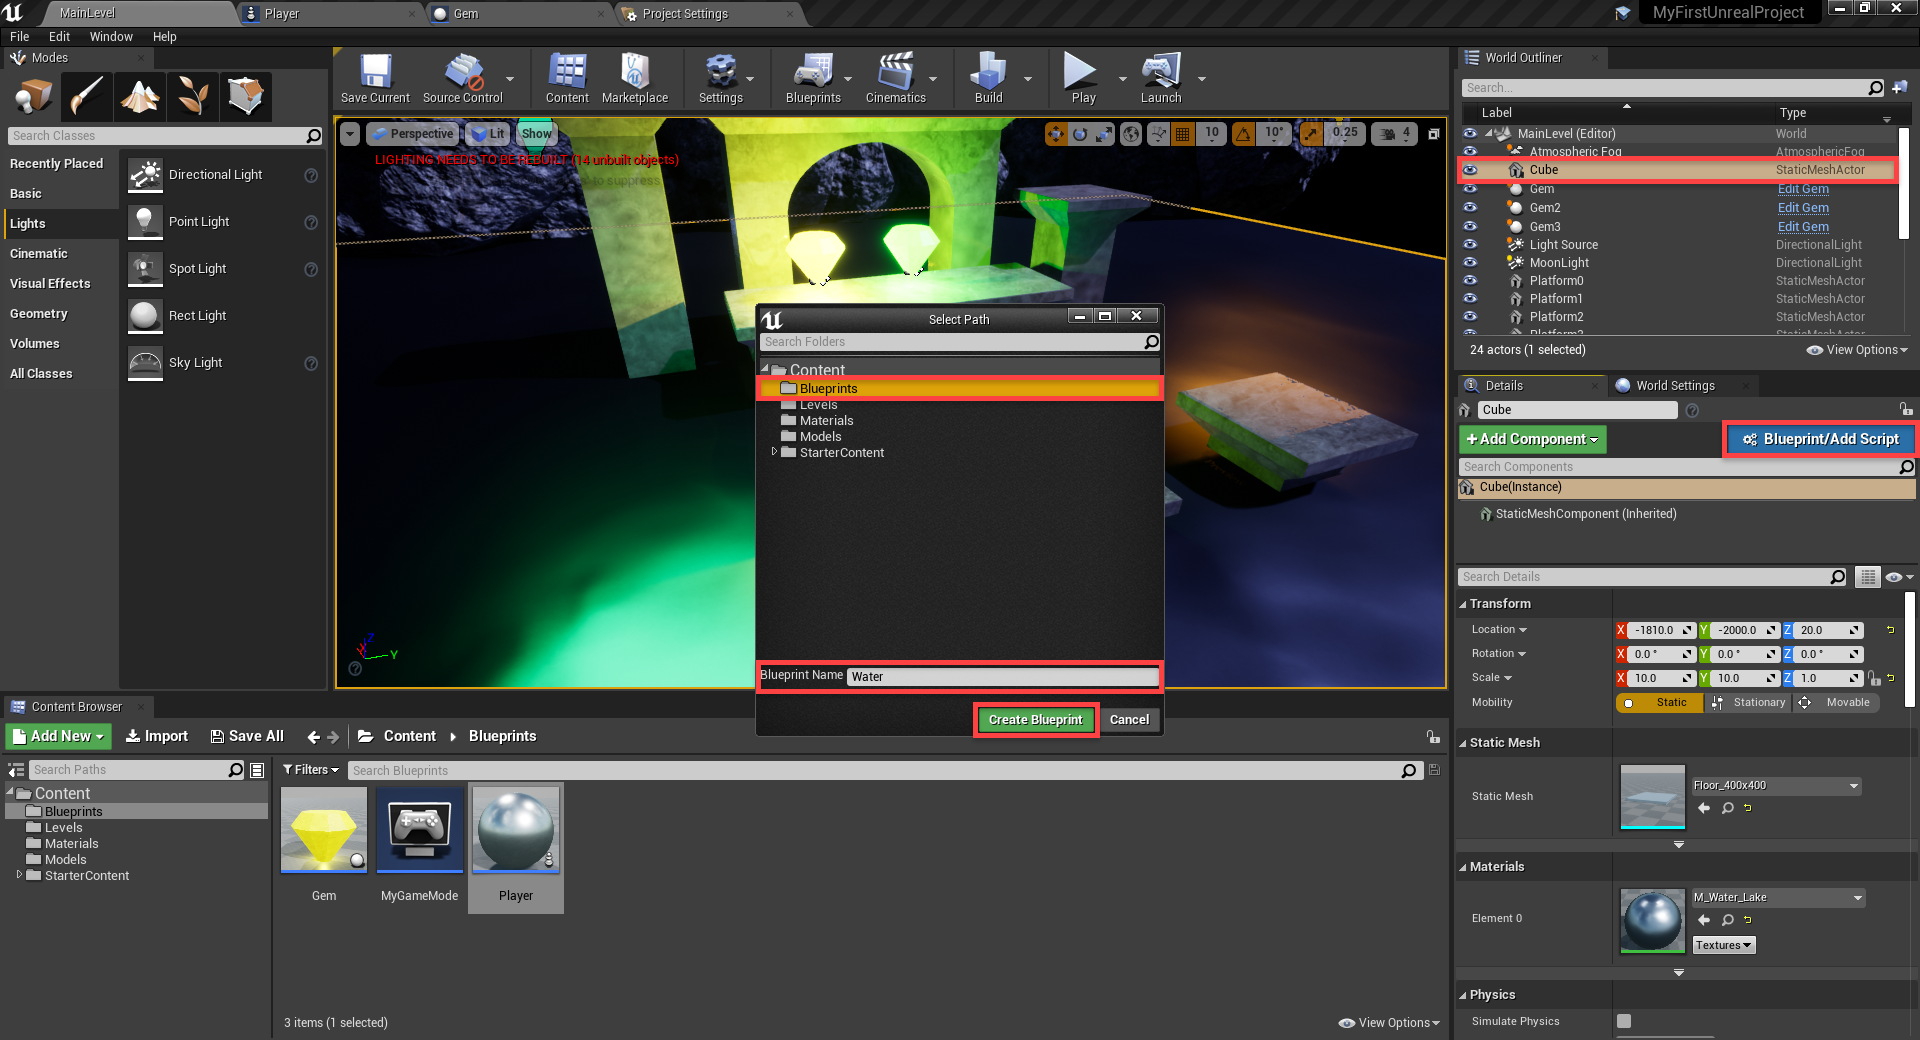
Back in the level editor, let's call this function when the player hits the water.
- Select the water object
- In theDetails panel, clickBlueprint/Add Script
- A window will popup, select theBlueprints folder, rename the blueprint and clickCreate Blueprint
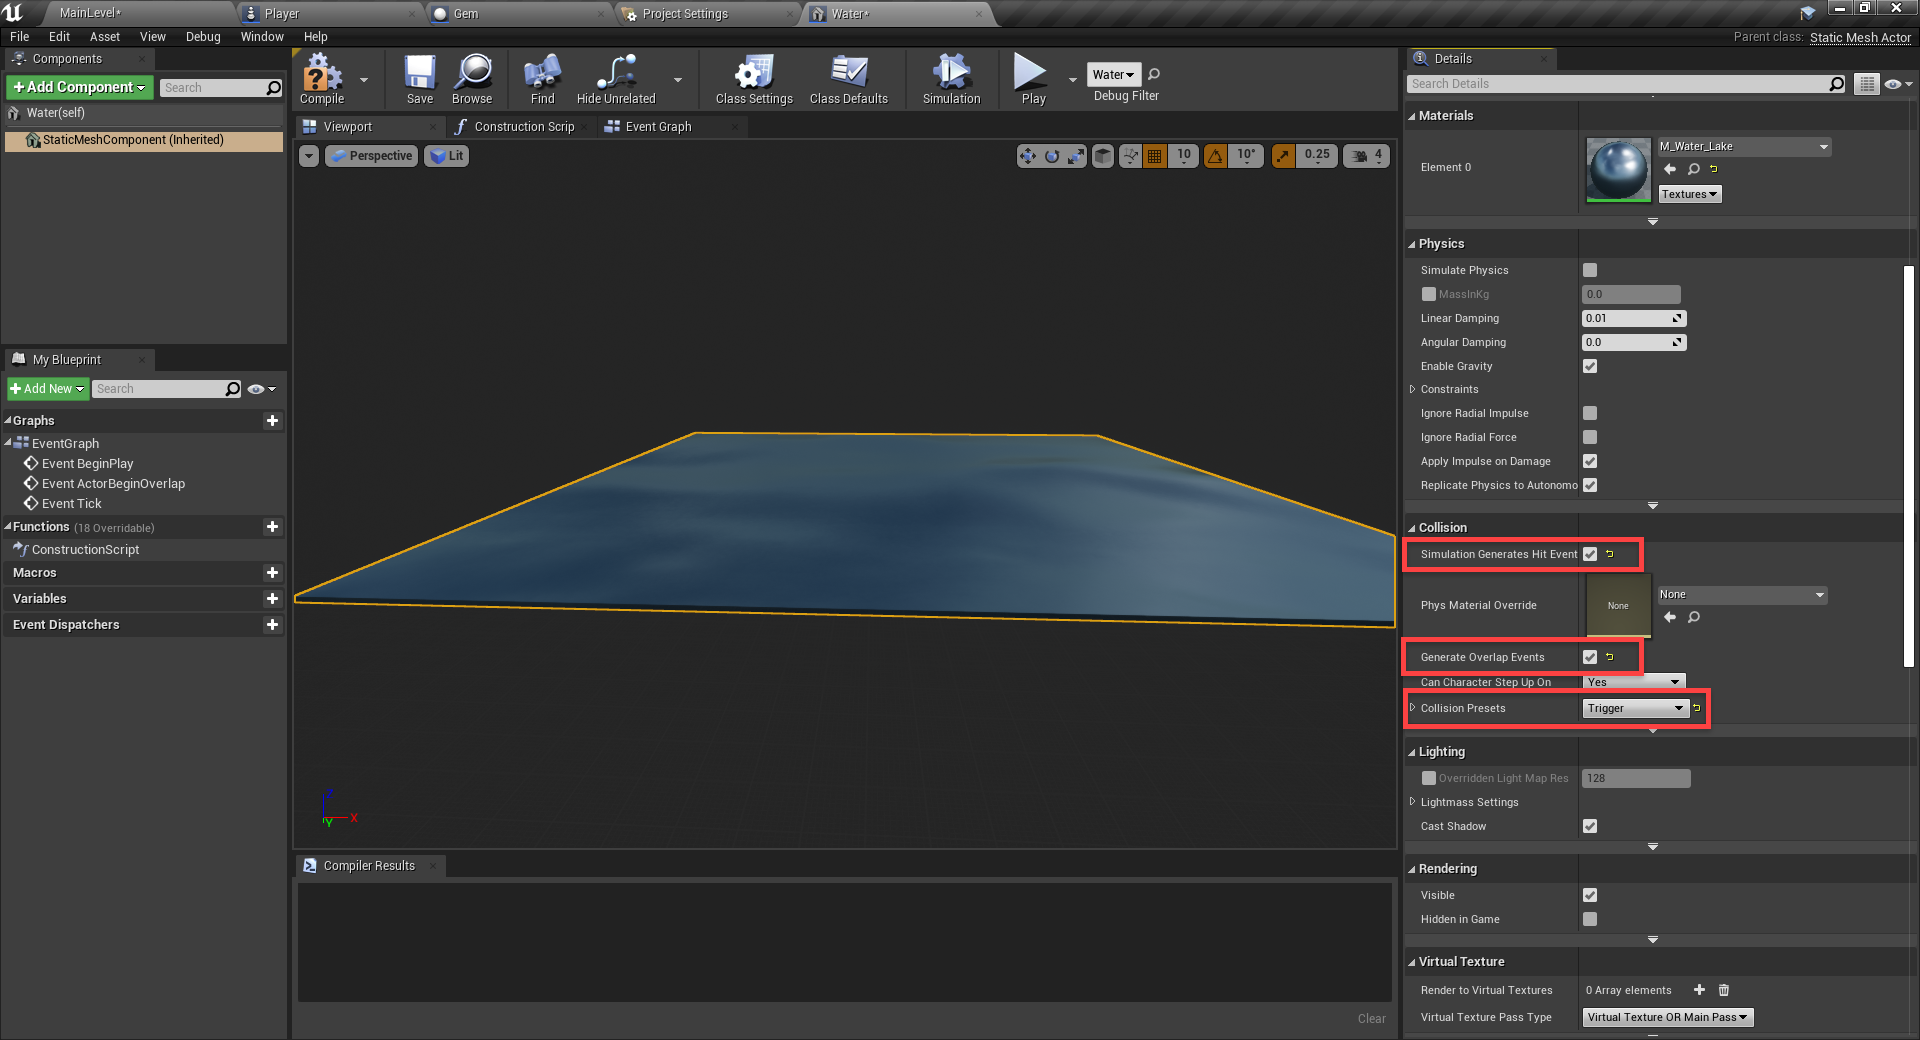
This will open up a new blueprint editor. Select the static mesh component.
- EnableSimulation Generates Hit Events
- EnableGenerate Overlap Events
- Set the Collision Preset toTrigger
Click on theEvent Graph tab as we're going to setup a few nodes.
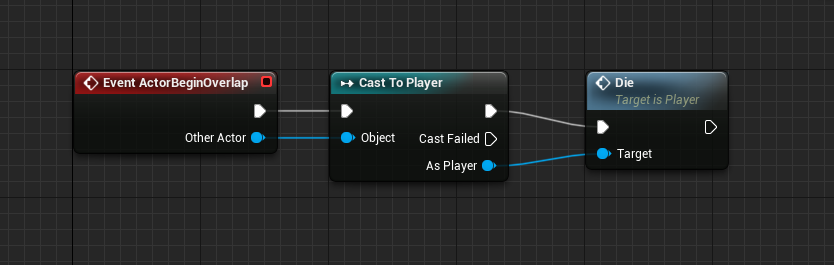
- Event ActorBeginOverlap gets triggered when an object enters the water collider
- We're then going to cast the colliding object to thePlayer class
- If it was the player, then call theDie function
Back in the level editor we can press play and test it out!
Enemy Blueprint
Now it's time to create the enemy blueprint. This enemy will move back and forth between two positions. If the enemy hits the player, the Die function will be called. So to begin, let's create a new actor blueprint calledEnemy.
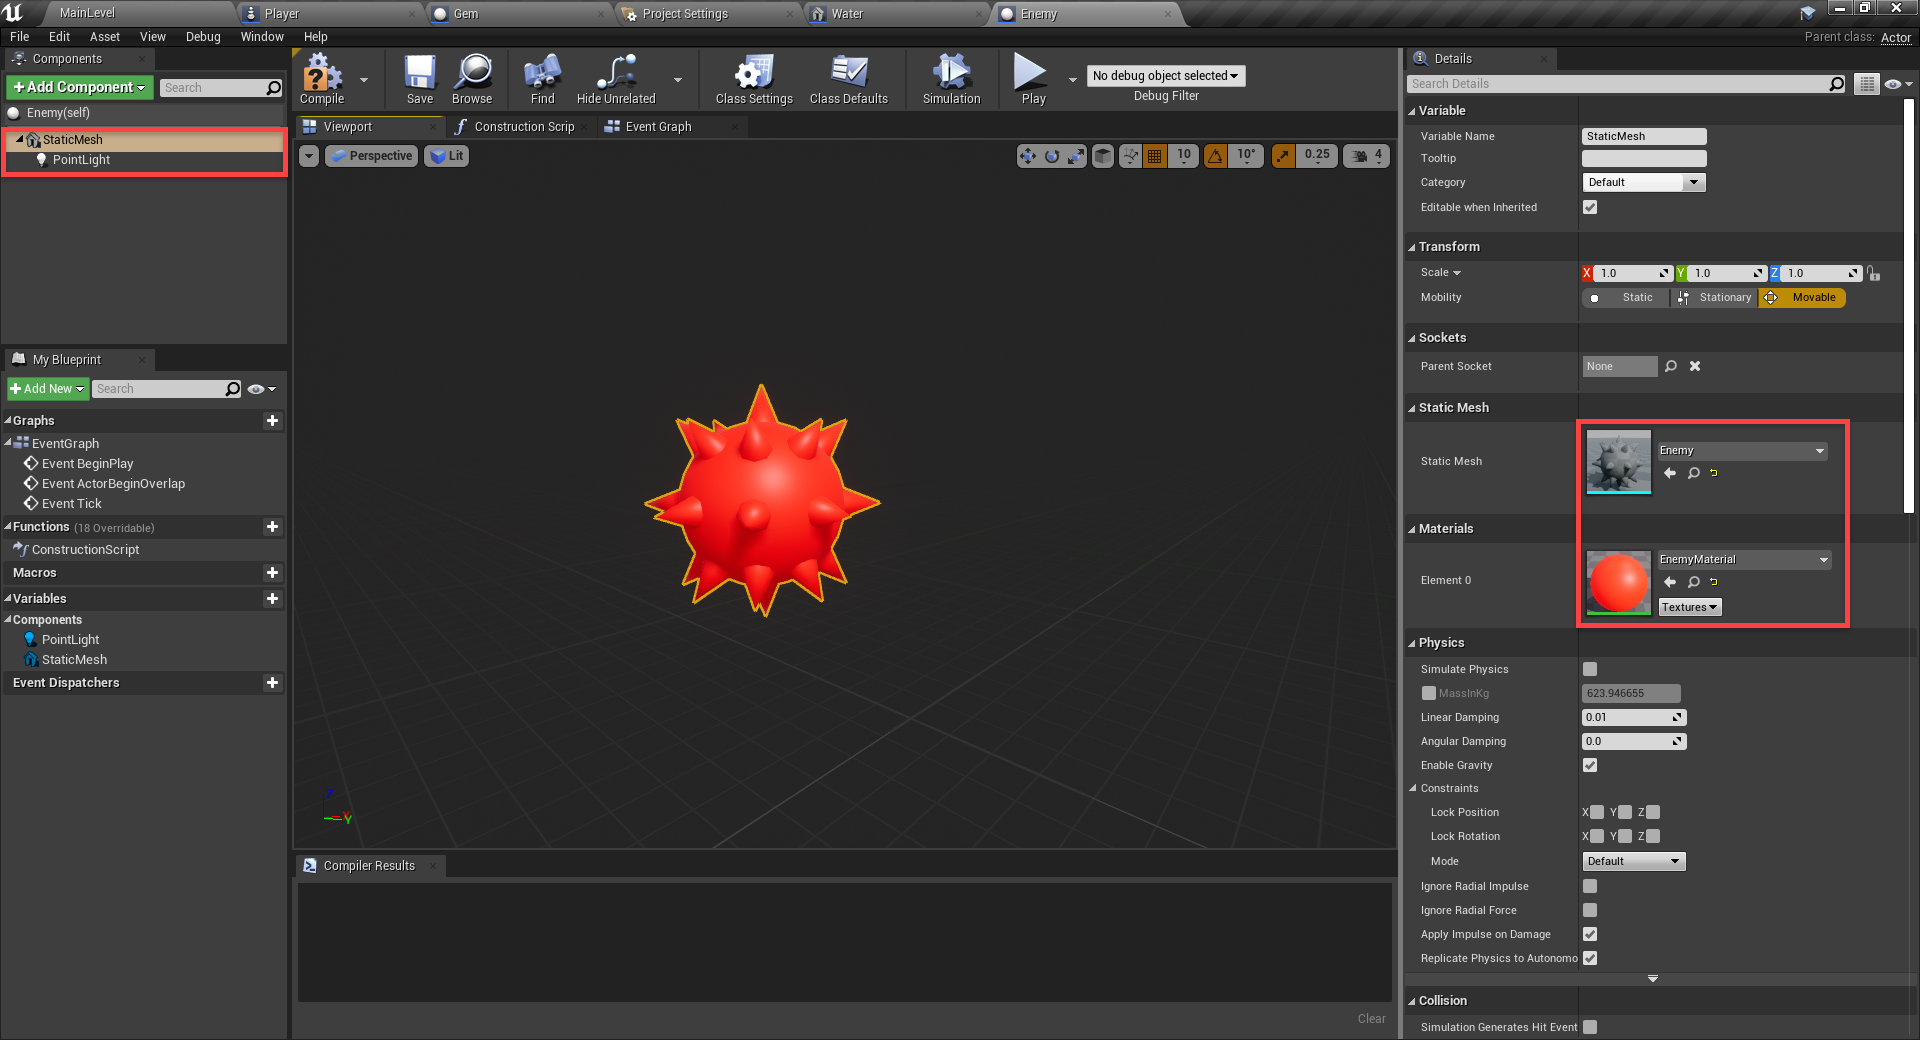
- Create a newStatic Meshcomponent and make that the parent component.
- Set theStatic Mesh toEnemy
- Set theMaterial toEnemyMaterial
- Create a newPoint Light component and make it the child of static mesh
- Set theColor tored
- Set theIntensityto3000
The component layout is very similar to the gem.
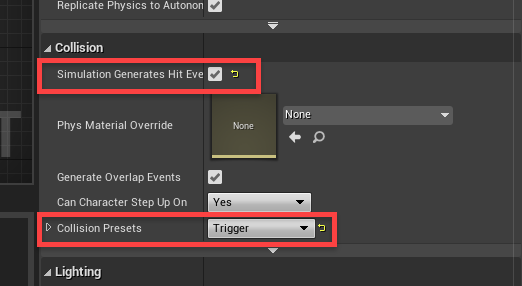
Select theStatic Mesh component.
- EnableSimulation Generates Hit Events
- Set theCollision Presets toTrigger
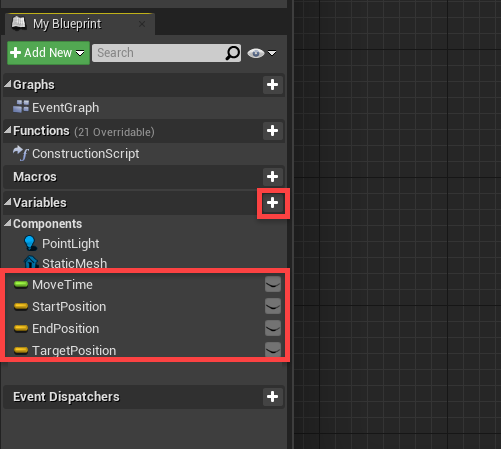
Next, we can head over to theEvent Graph and begin to create the logic. We'll start with the variables.
- MoveTime (Float) the time it takes to move to a point.
- StartPosition (Vector) starting position of the enemy.
- EndPosition (Vector) position to move to.
- TargetPosition (Vector) position the enemy is currently moving to.
Click theCompile button so we can set some variable properties in theDetailspanel.
- MoveTime – enableInstance Editable
- EndPosition – enable Instance Editable
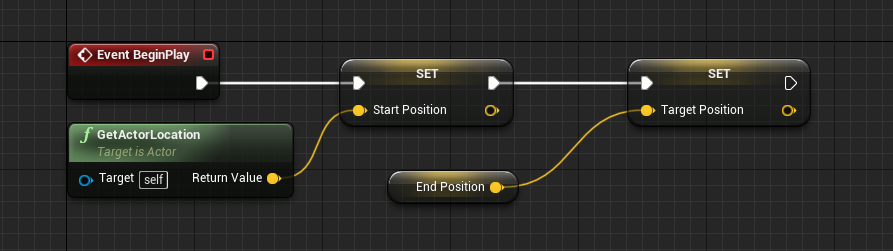
To begin, we'll set the initial values for theStart Position andTarget Positio n.
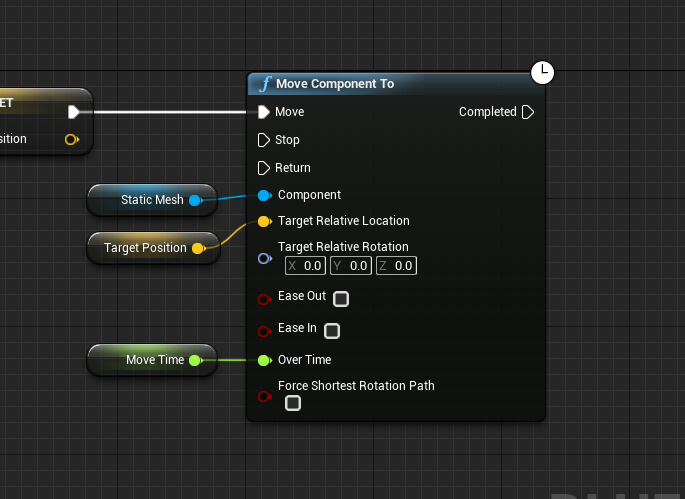
Continue the flow into aMove Component To node. This node takes in a few inputs and moves the object towards a certain location.
- Set theComponentinput to ourStatic Mesh component
- Set theTarget Relative Location input to ourTargetPosition variable
- Set theOver Time input to ourMoveTime variable
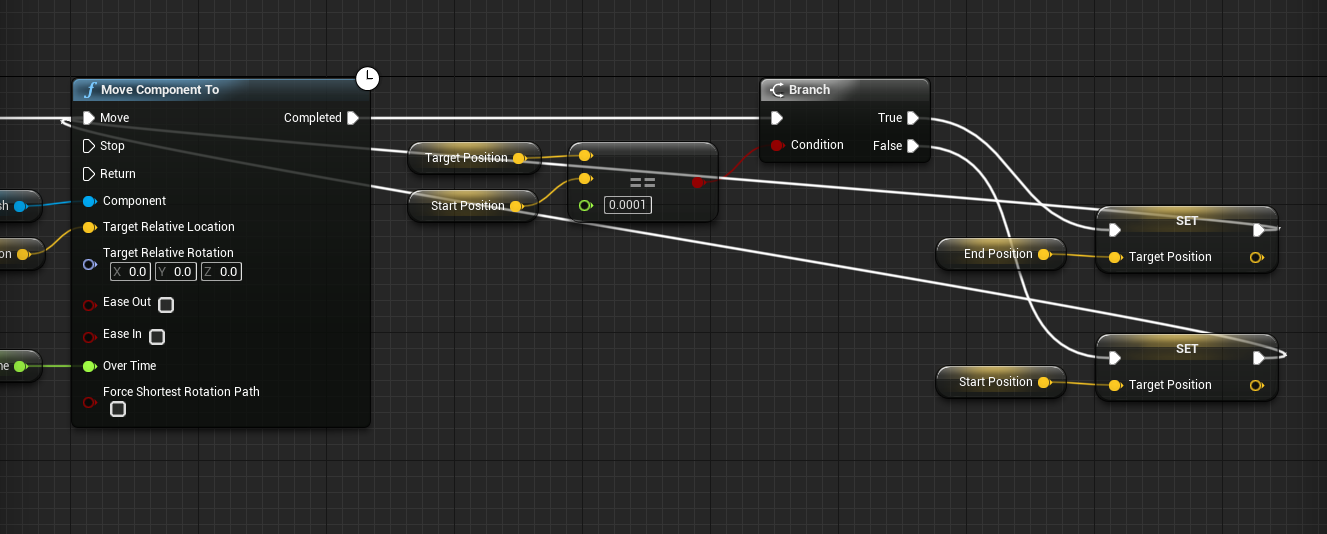
When we've arrived at the target position, theCompleted output flow will trigger. Here, we want to switch theTargetPosition variable to the start position and vice versa so that it bounces between the two.
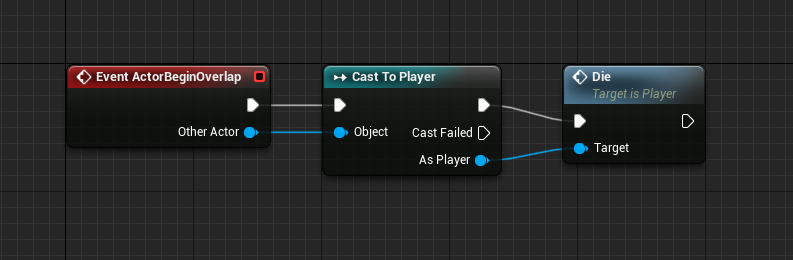
The movement is finished! Now let's work on colliding with the player. This is basically the same as the water blueprint.
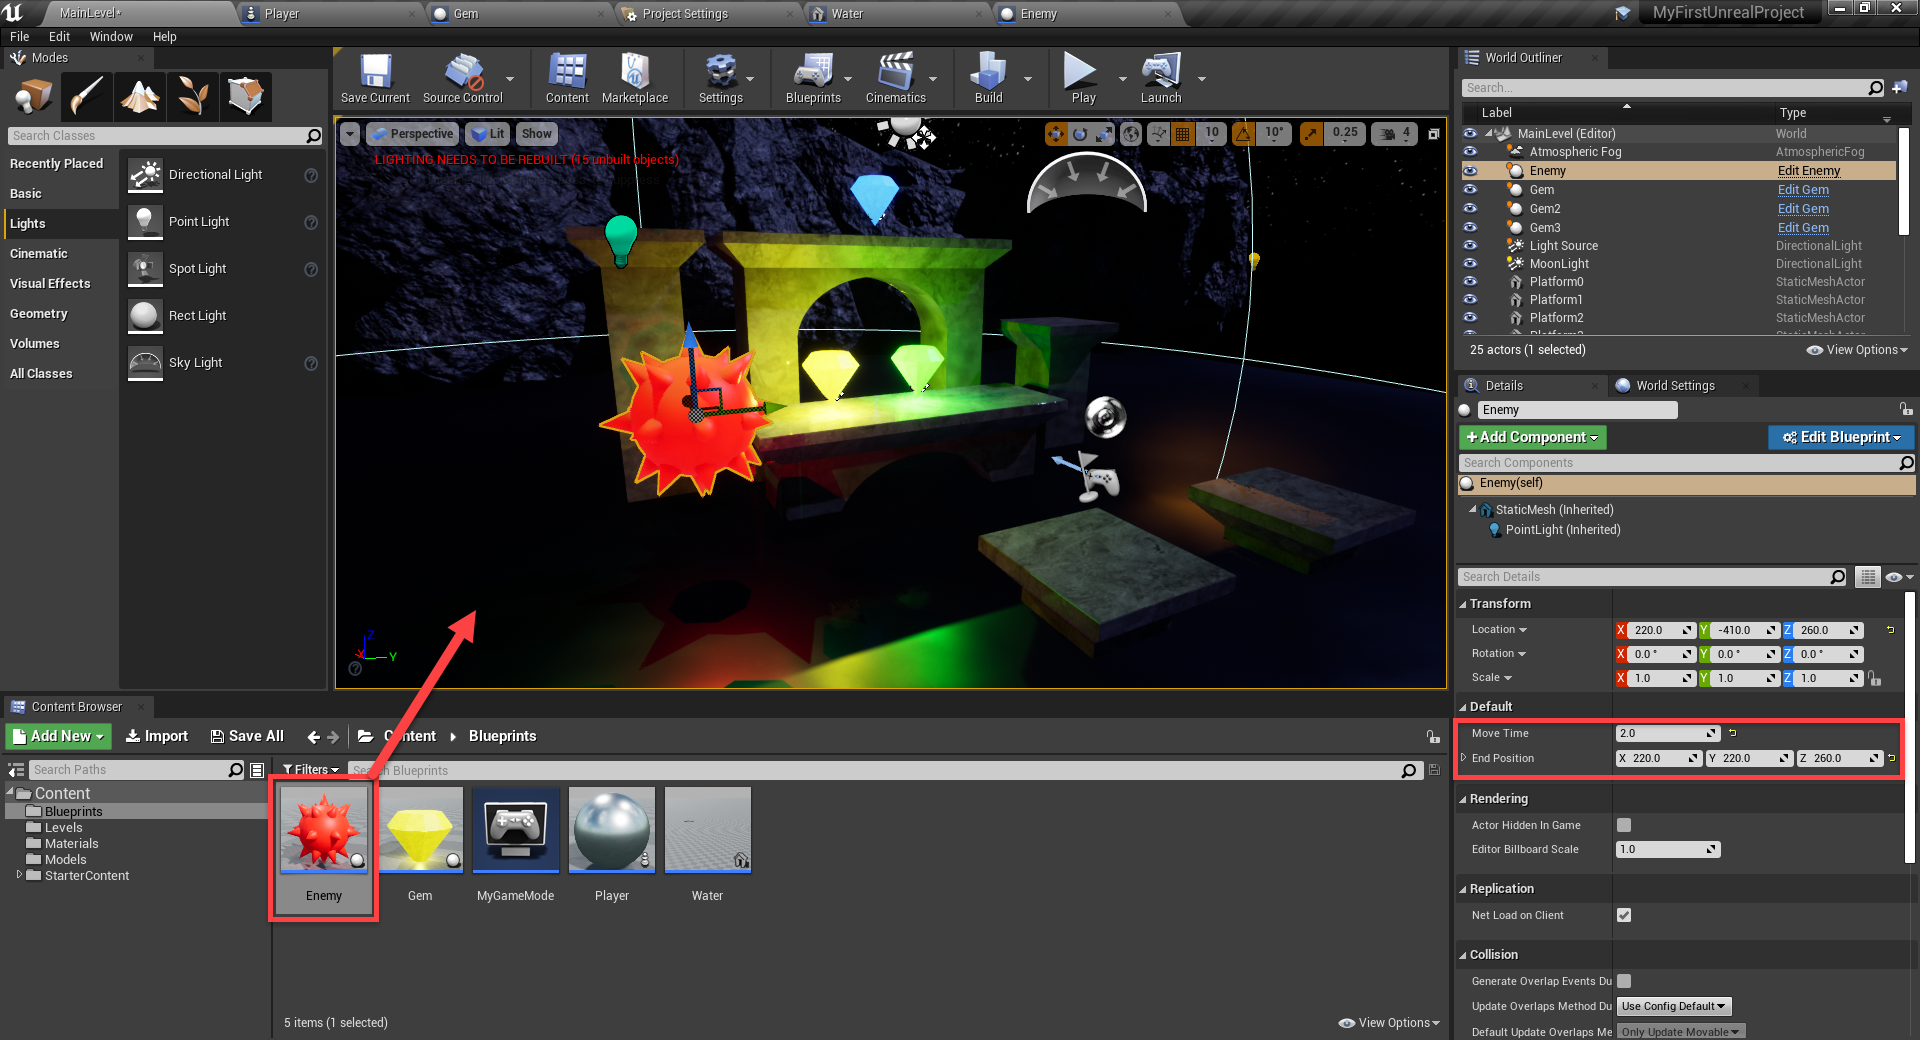
Hit the Compile button. Then back in the level editor, we can drag in the Enemy blueprint.
- Set theMove Time to2
- Set theEnd Position to the location where you want the enemy to move to
If you press play, you'll see that it will bounce between the two points! And if you hit it, the scene will reset.
Score UI
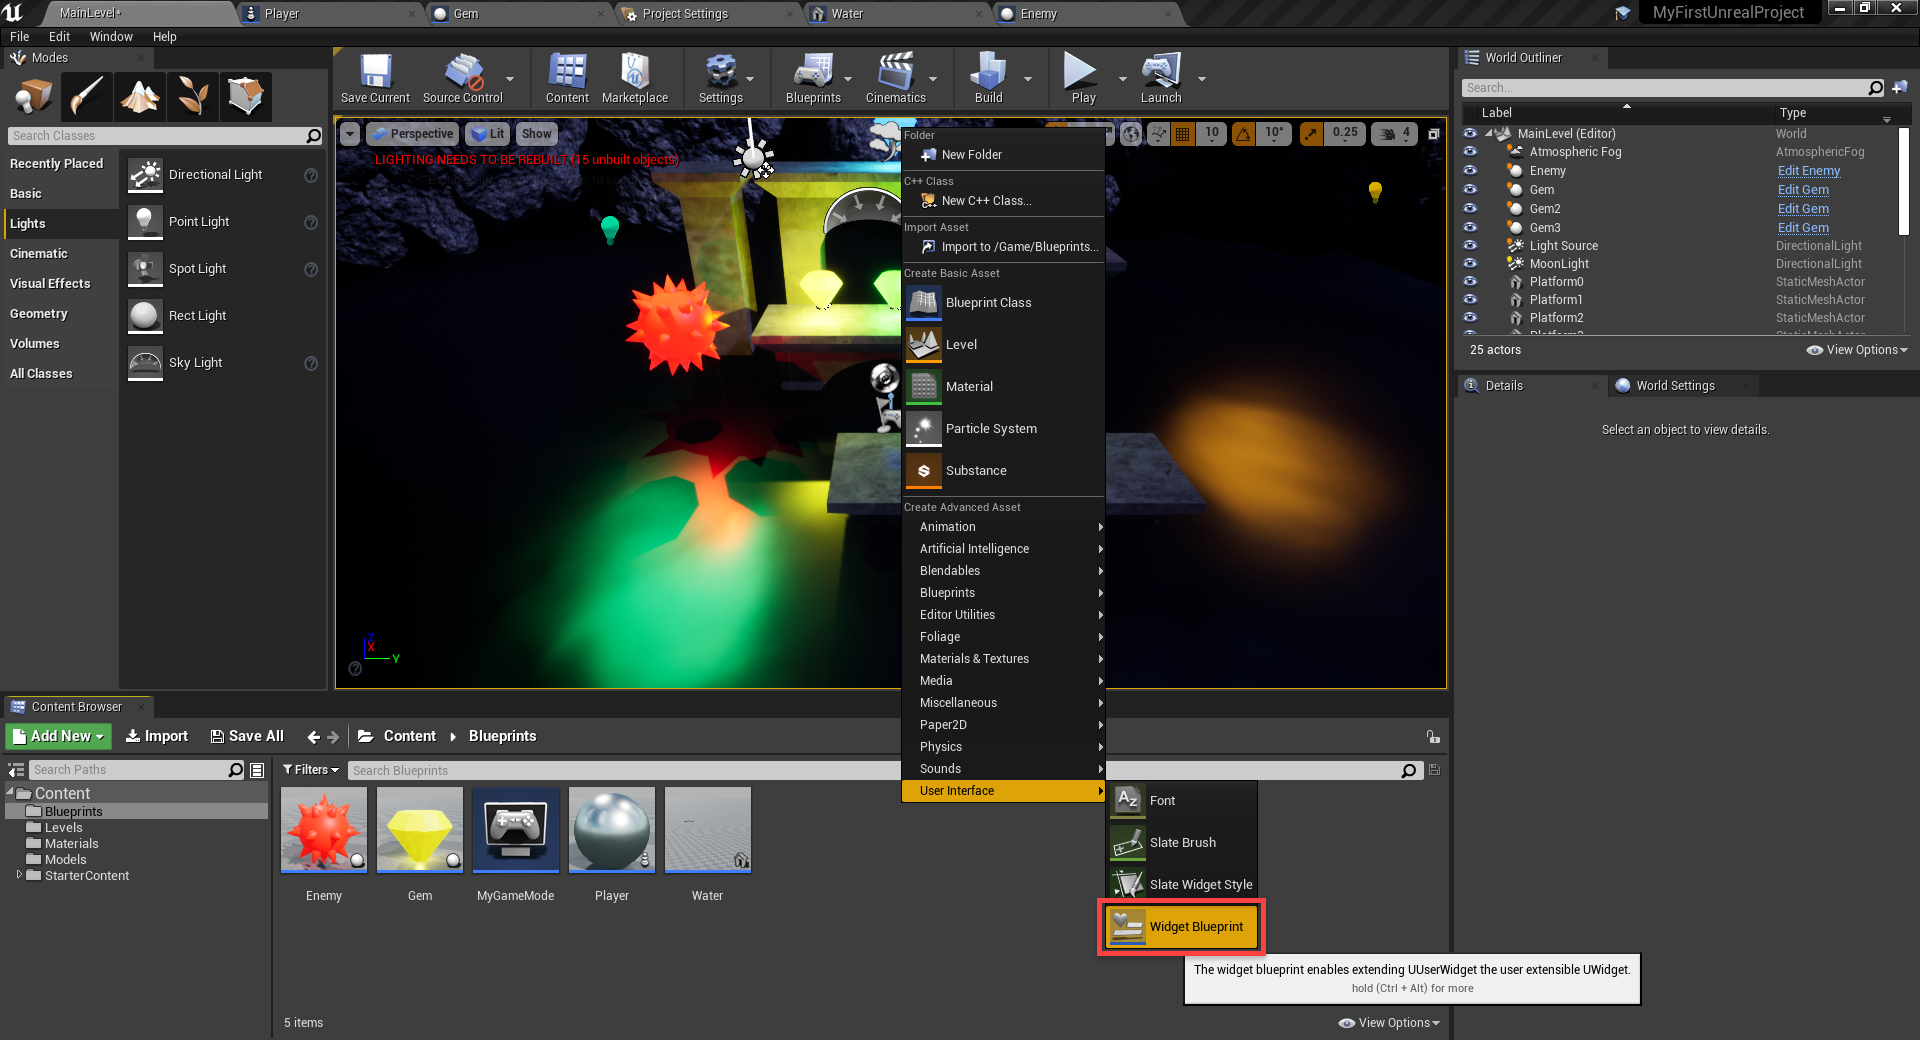
Finally, let's setup our user interface (UI). This is going to be text on-screen which will display the player's score. In theBlueprints folder, right click, hover overUser Interface and selectWidget Blueprint. Call thisScoreUI.
When you double click on it, it will open up in widget editor. Here, we can setup the UI elements and apply some logic to them.
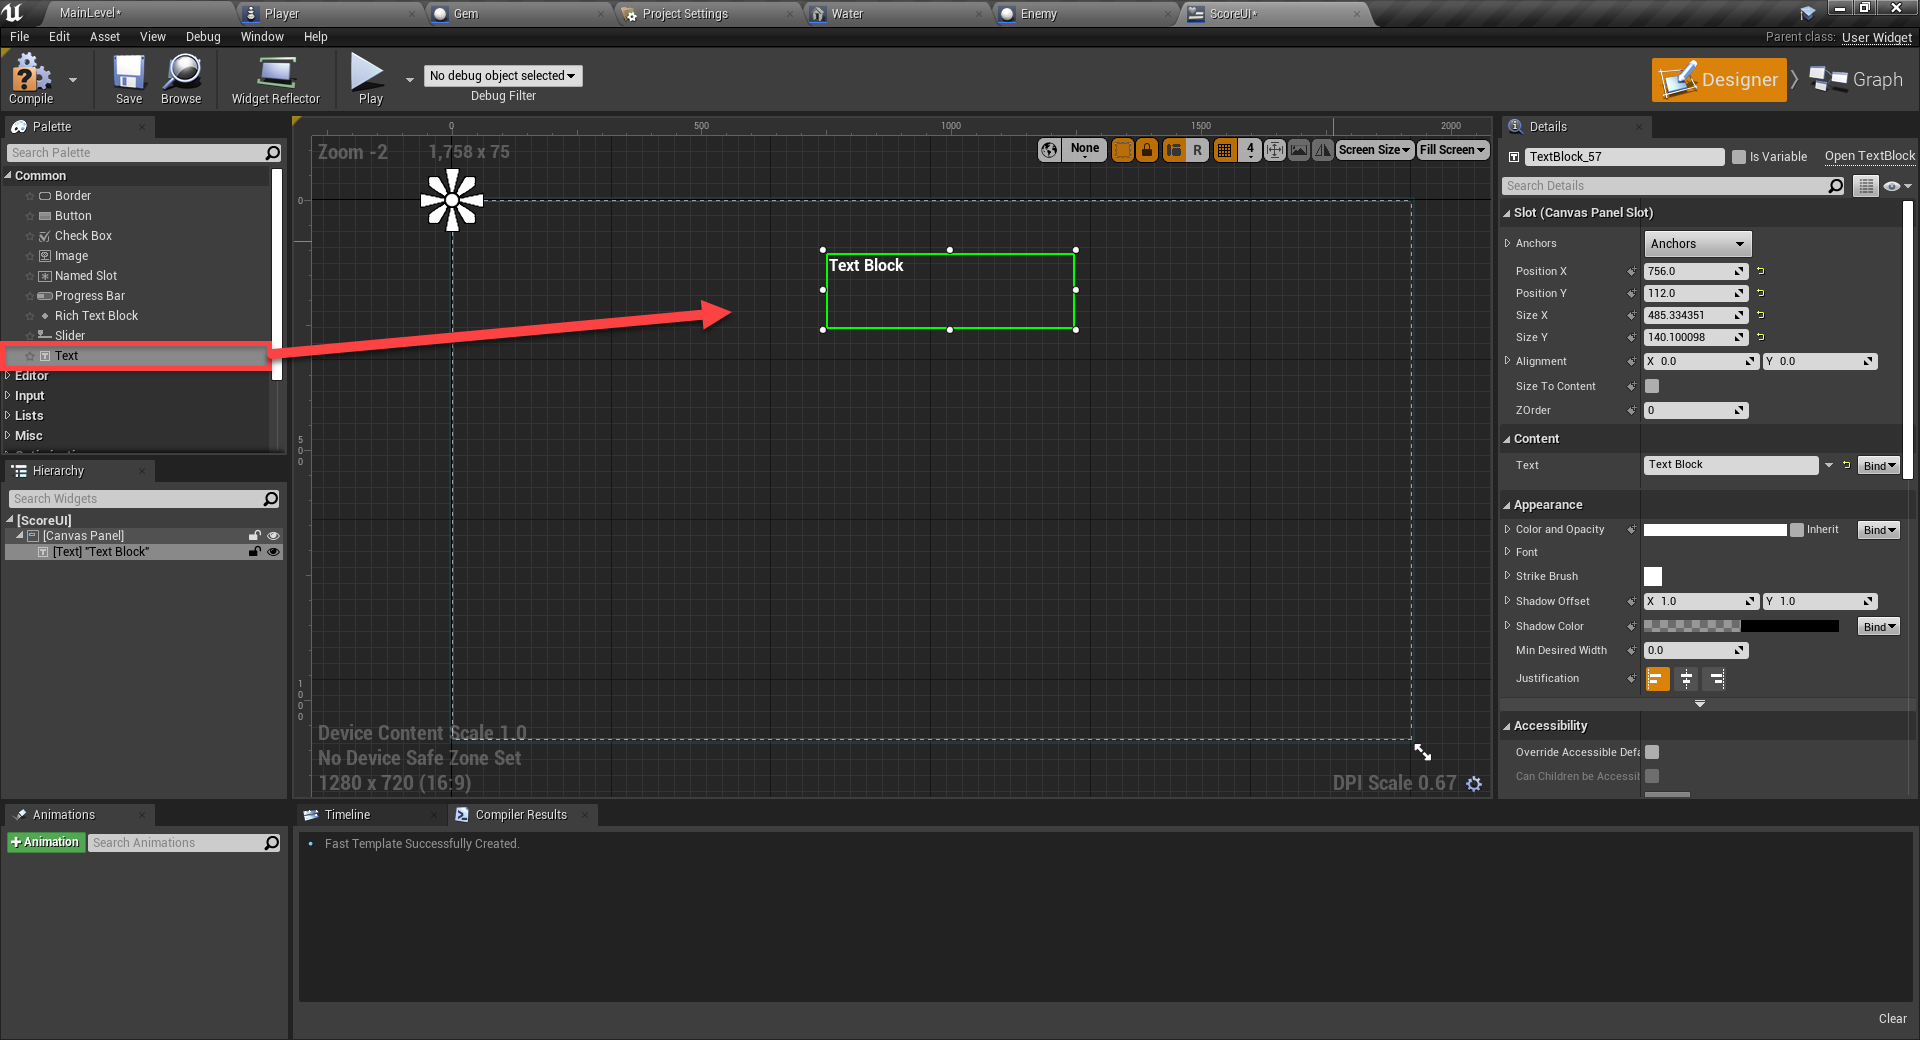
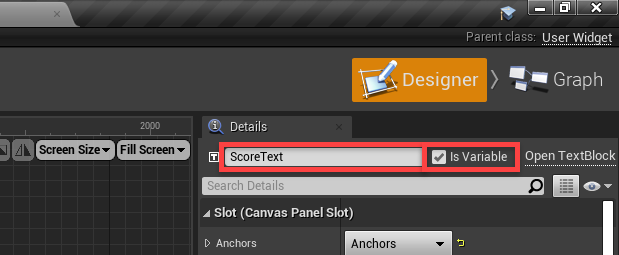
In thePalette panel, we can see all the different UI components we can use. Drag in theText component. You can click and drag to move it around and resize it by clicking and dragging on the white circles.
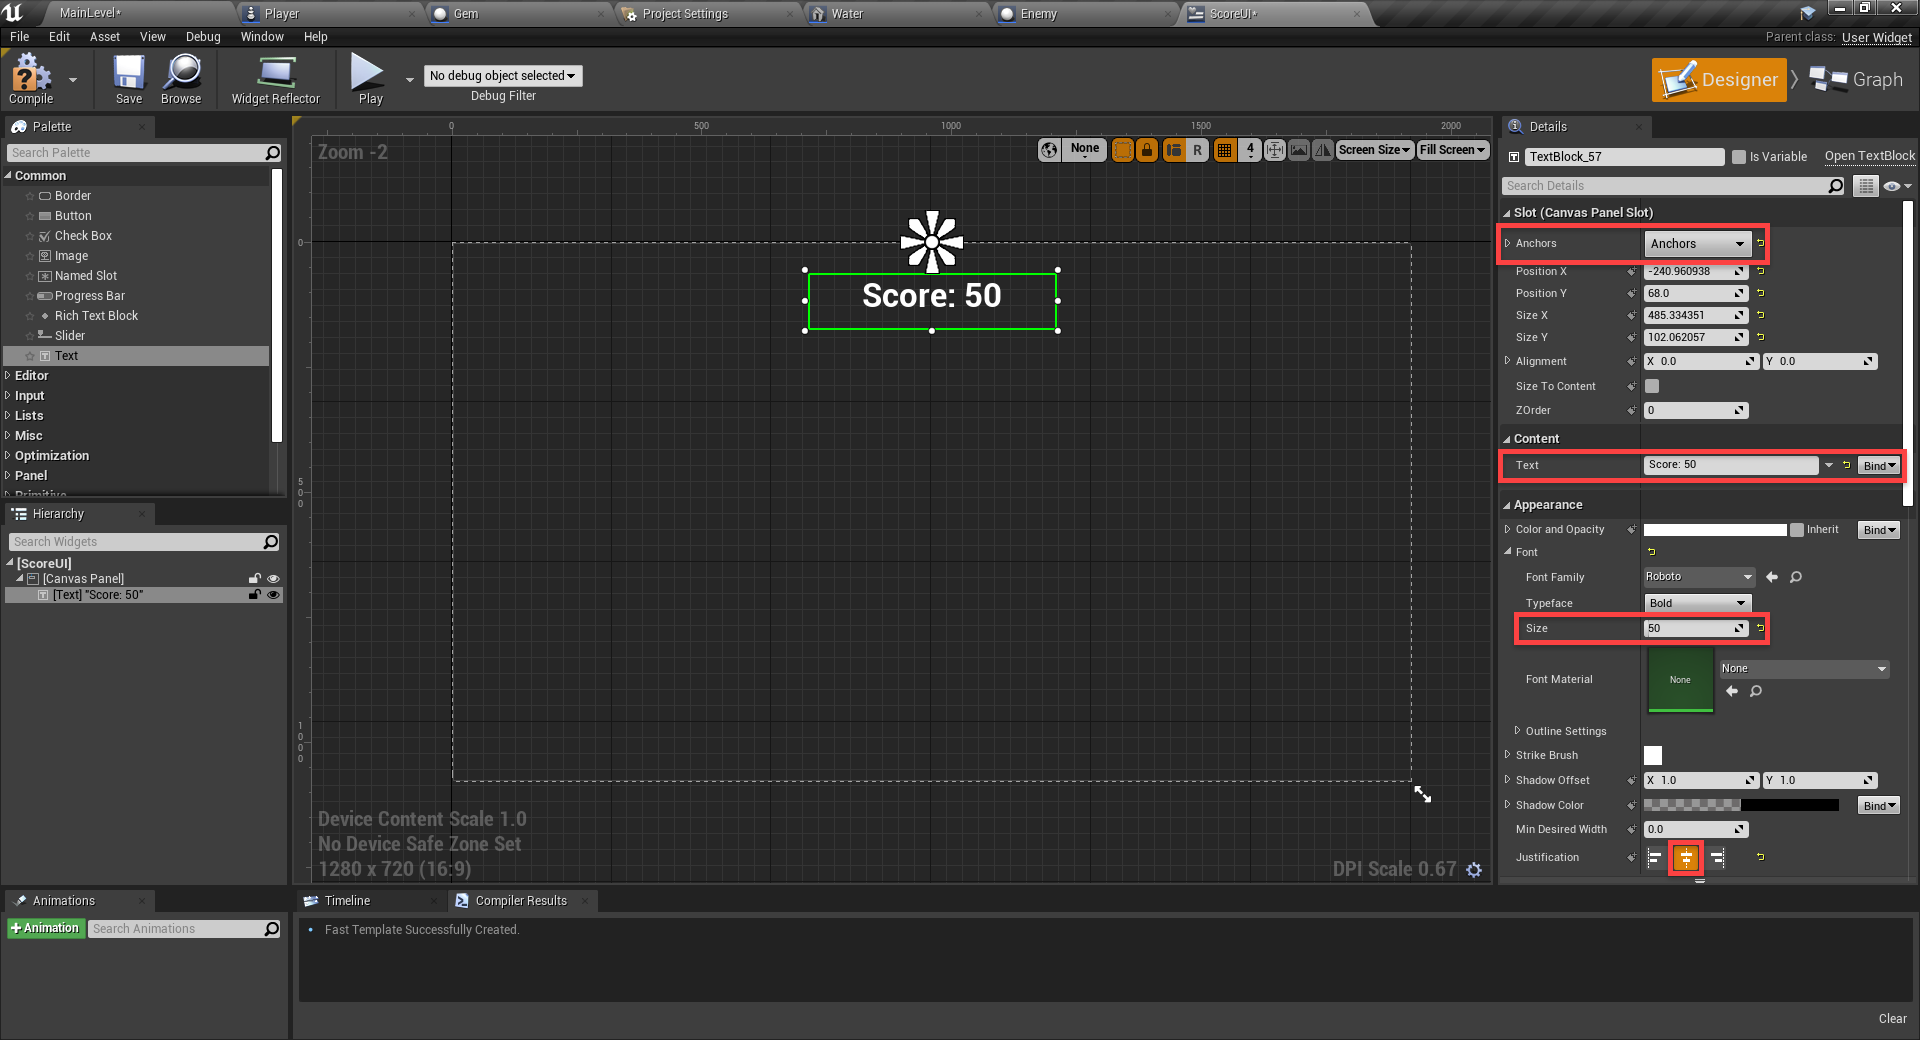
In theDetails panel…
- Set theAnchors totop-center
- Anchors are there for attaching the UI component to a point on the screen. This means when we resize the screen, the text will always be at the top center.
- Set theText toScore: 0 (different from image below)
- Set theFont – Size to 50
- Set theJustification toCenter
Also, change the name toScoreText and enableIs Variable. This will allow us to modify it with nodes.
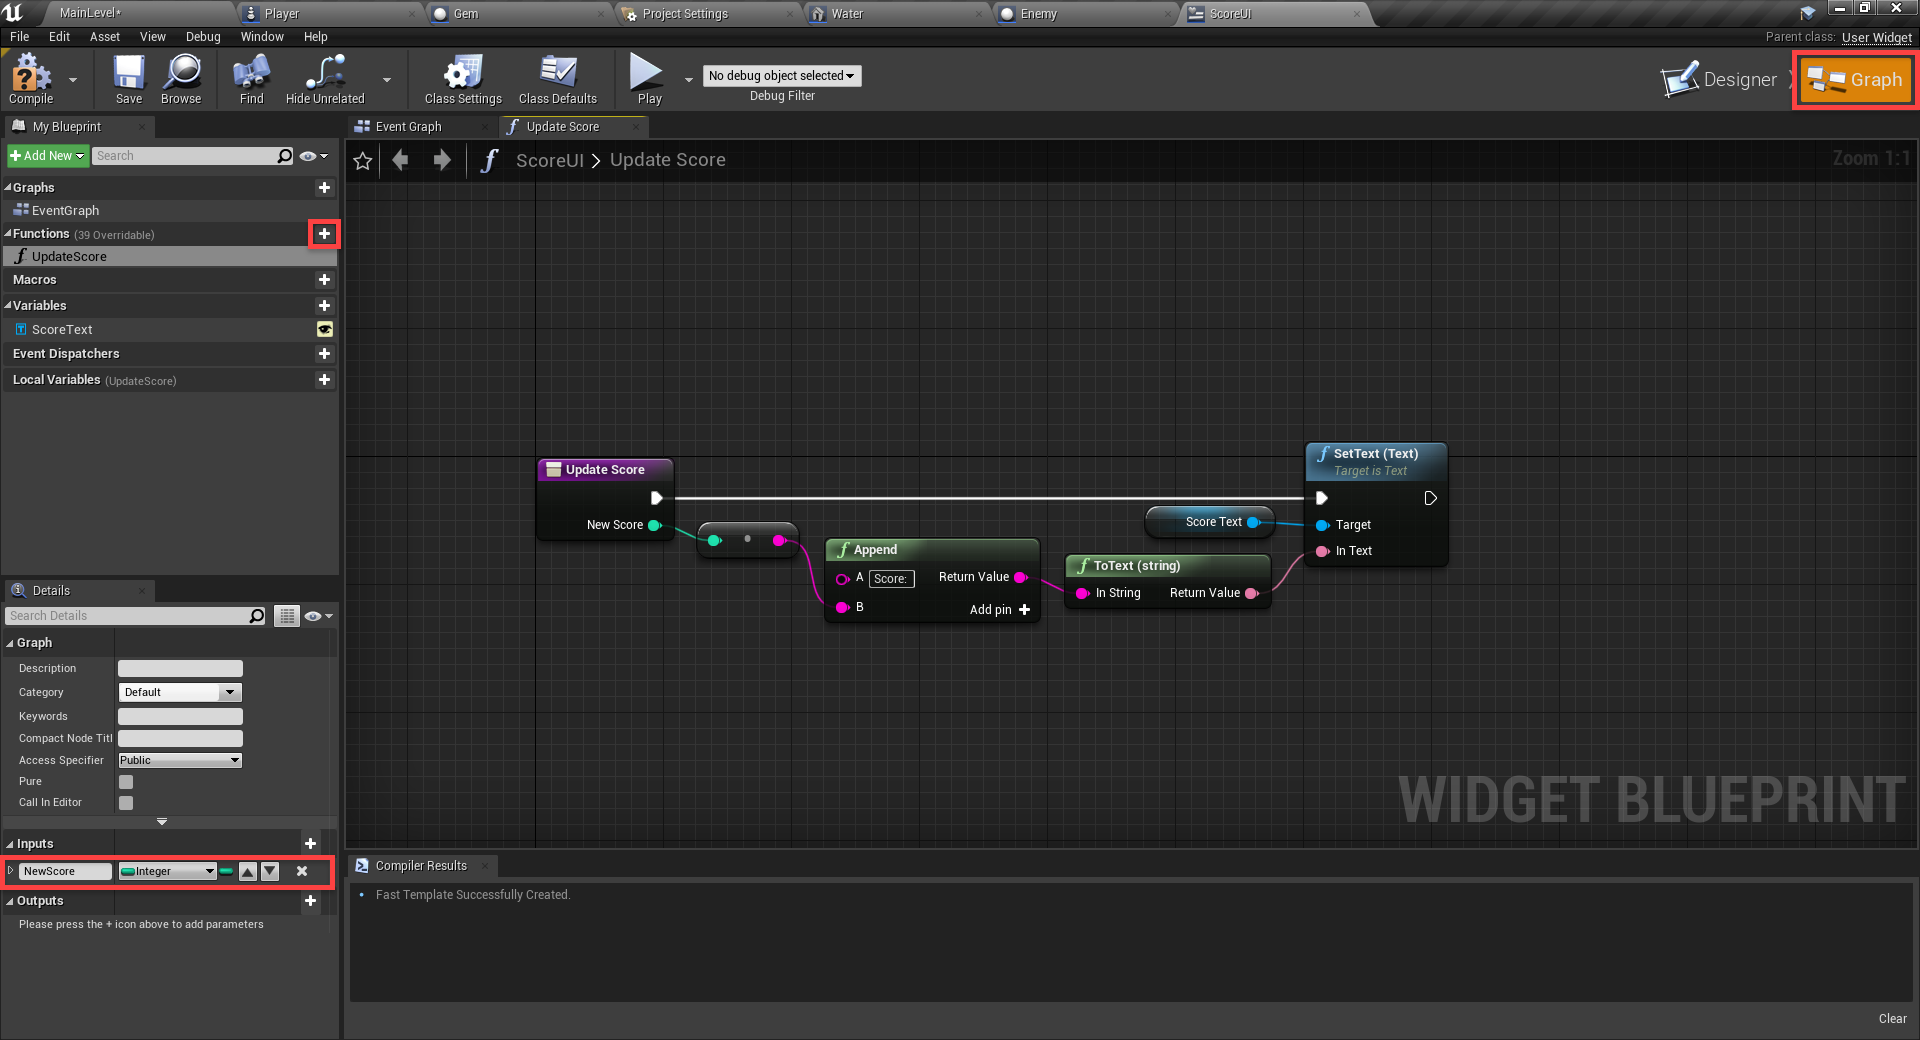
At the top right of the screen, click on theGraph button. This will switch us over to the event graph.
- Create a new function calledUpdateScore
- Give it an integer input calledNewScore
- Layout the graph like in the image below
What we're doing here, is creating a new string (text) with two elements. First a "Score: " string combined with the new score. Then the score text is set to this new text.
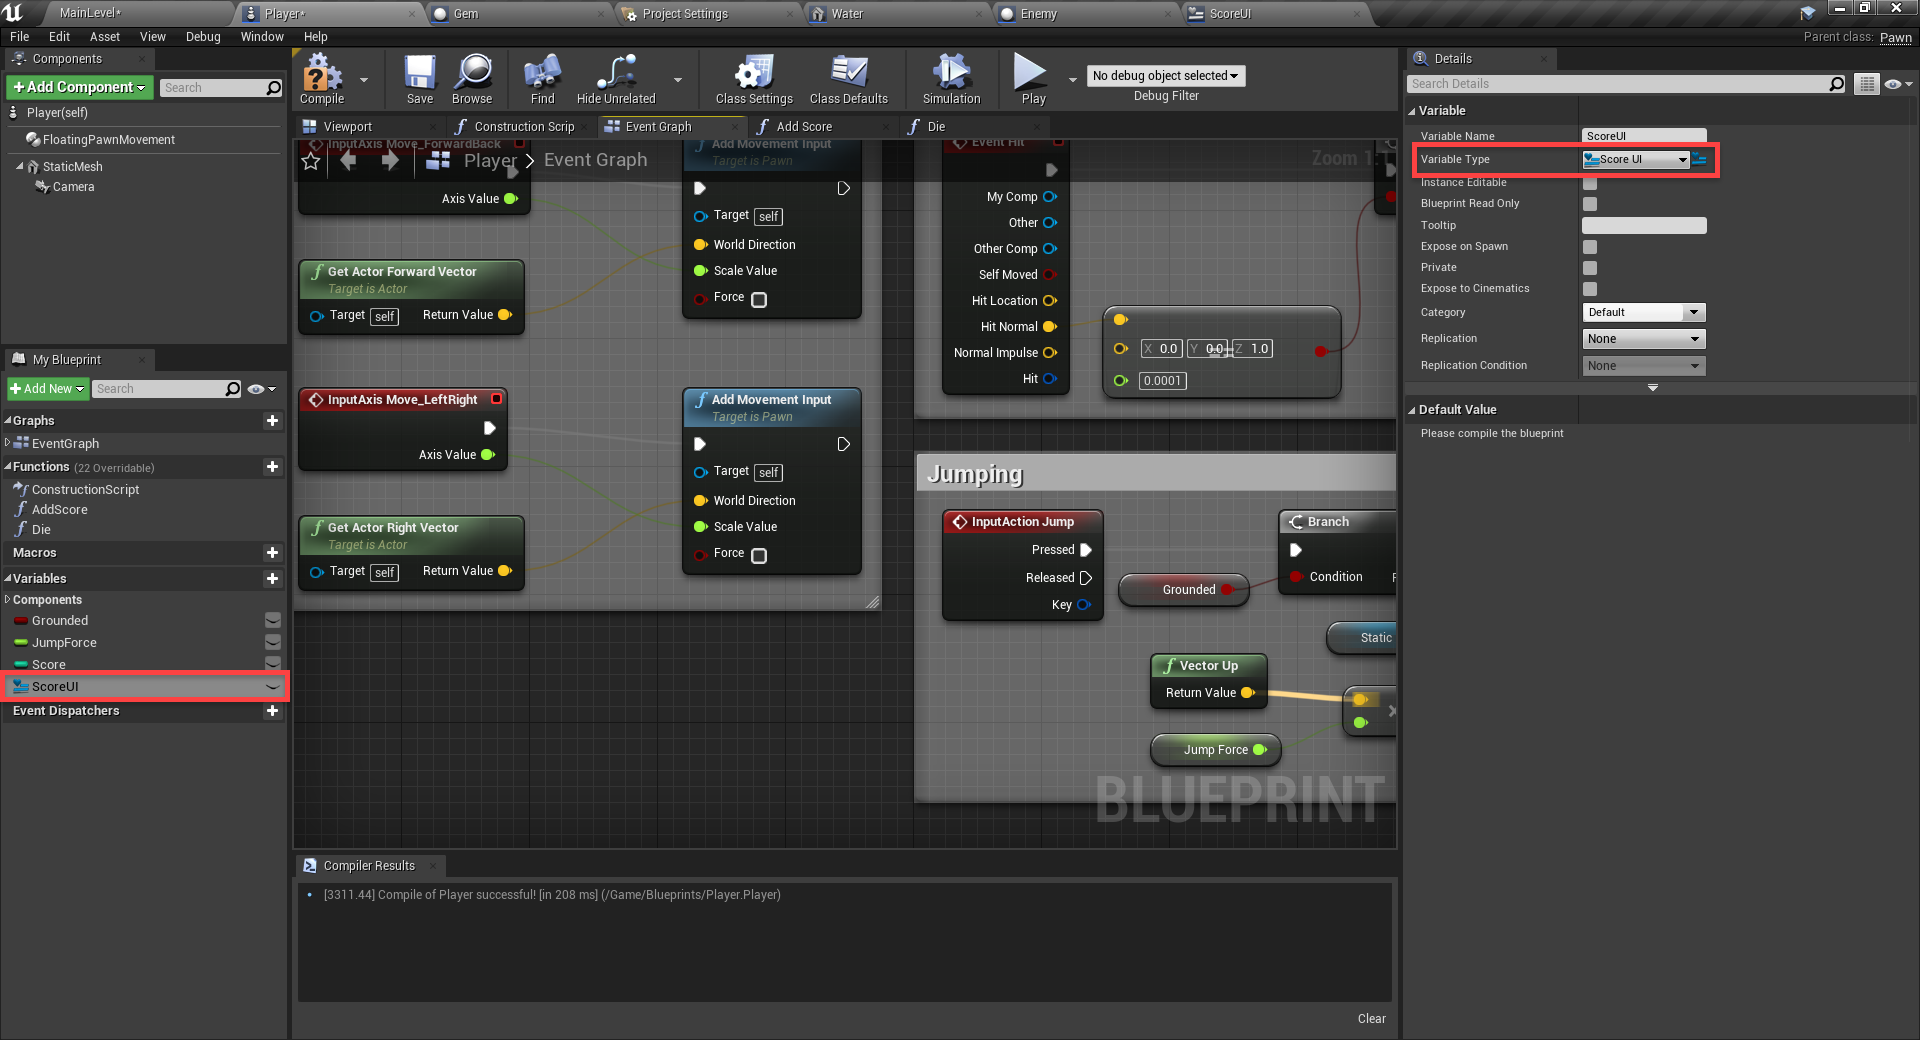
Now we need to hook this up to the player. In thePlayer blueprint, create a new variable of typeScoreUI calledScoreUI.
Let's then create theEvent BeginPlay node which gets called when the game starts. We're going to create a new widget, add it to the viewport and then set that as ourScoreUI variable.

In theAddScore function, let's call the UI'sUpdateScore text function.
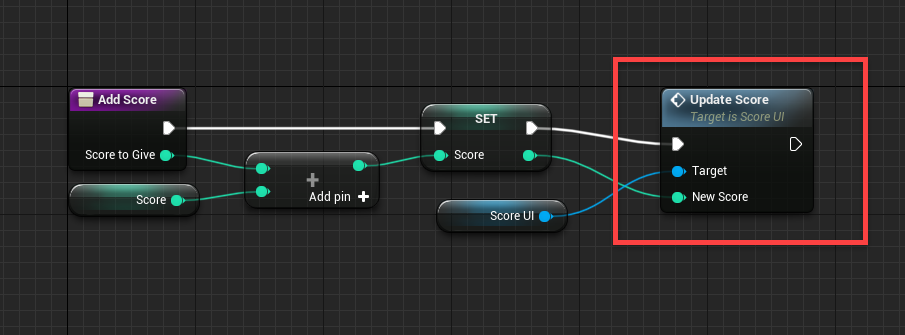
You can now press play and see that when we collect gems, our score goes up!
Conclusion
There we go! We've completed our first game in the Unreal Engine – just like that.
Over the course of this Unreal Engine tutorial, we've covered a lot. Not only did we learn how to make and add a variety of objects to compose our 3D platformer level, but we learned extensively how to work with Unreal Engine's blueprinting system to compose every bit of logic of our game (without manually coding anything!).
From here you can choose to expand the existing game – adding in new features or upgrading the graphics. Or you could choose to take your new skill set and apply it to a totally new game. There are many different features and editors available in the Unreal Engine, so have a look at them all. There are also many online resources that go over each aspect of the engine, what each node does, and how to do specific things that you may want. Either way, the foundations you've developed here will provide a great starting point for you to become an expert Unreal Engine developer!
We wish you the best of luck with your future games!
Related Posts
3d Game Design Unreal Engine
Source: https://gamedevacademy.org/unreal-engine-tutorial/
Posted by: andersonothed1996.blogspot.com
0 Response to "3d Game Design Unreal Engine"
Post a Comment